Ads 468x60px

Showing posts with label Samantha Walker silhouette tutorial. Show all posts

Tuesday, October 06, 2015

Print and Cut with Silhouette

Have you ever looked at the contents of your trash can and shaken your head in disgust after trying something new with your craft cutter?

Well apparently for me, 9 times a charm...when it comes to doing a print and cut with my  Silhouette Cameo. Ugh!

I know what you are thinking..."But you've done Silhouette stuff for years, you've never done a print and cut in all that time???"

Well, truth is, I haven't done many, but this one posed a few special issues that I did not expect to run into.

If it had been any other project, I might have given up, but this one was different. I was making an invitation for my husband's Veteran's Day Event that he is organizing for our city.

He has been planning this event since last year, and wanted a special invitation that he could send to the mayor, the governor, and a few other specific people whom he wanted to offer a special invitation to the event.

This had to be perfect...and eventually, it turned out according to plan, but it took a lot of trouble shooting, and reading directions (gasp! I usually just look at the pictures) to finally get the end product where it needed to be.

So this post is going to be an effort to help you advert any of the same issues that I had with this particular print and cut. They were mostly rookie mistakes and there are easy ways to avoid what happened to me.

Let's start this tutorial with the Silhouette Studio software and setting up a print and cut.

Below is the file that I designed and opened up in the Designer Edition of the Silhouette Studio Software. If you are familiar with Silhouette Studio, red lines are cut lines, and the rest is printable artwork.
To me, this file looked super easy to cut. I knew that my print and cut would need registration marks added, so I clicked on the registration mark icon to open the registration marks dialog window. I thought I was good to go...so I loaded my machine, and sent it to cut. End of story.

Wrong...

My first mistake was not to review the manual before starting...

Here's what you will need to know...

Above, look to the right of the screen-shot, and you will see the registration dialog box. To add the registration marks, go to the first box where it says "style" select your Silhouette cutting machine from the drop-down menu. I selected Cameo/Portrait option. This will put up the registration marks on your page, and some cross-hatch looking stuff, and a red box all the way around your design.

Now it's important to know what each of these means:

1. The red line is the boundary for which no cut lines can extend beyond.

2. The cross hatch area is the boundary for which no printable area can extend into. 

3. The Black cube in the corner and the two 90 degree black angles in opposing corners must be able to print completely with your printer and not extend beyond your printer's maximum printing area. 

All of this is key to the success of your print and cut, and the reason of my many failures with this seemingly simple design. Let's just say I learned a lot--so much so, that I knew I needed to explain all the registration markings to you.

After creating the registration marks I printed my design with my printer, and placed the printed design onto my cutting mat and was confident that I had done everything right.

Wrong.

Here's were I ran into issues:

Mistake 1:

Do you see how the words of my invitation extend into the cross hatch area? It isn't by much, but they do cross the boundary. If you try to print and cut set up like this, then send your design to the cutter, you will receive a message in the studio software that says, "Silhouette registration failed." If you don't change something, then it will keep giving you that message--no matter how many times you try to realign the paper on the mat--because that isn't the issue. Just sayin' I may have gotten stuck here for a while.

Fix for Mistake 1:

Now if you move EVERYTHING printable out of the grey cross hatch area...you will have success with the cutter reading your design. So I shrunk the words in my invite slightly to move them out of the cross hatches.

Mistake 2:

However, I ran into this same issue again, but this time because my cutting lines extended beyond the red boundary.

Fix for Mistake 2:

After a little playing in the Silhouette Studio software, I discovered that I could change the registration boundary a little bit by changing the inset numbers. I was able to bring my cut lines within the red cutline boundary in the registration marks dialog window.

See below...everything is within it's respective boundary.
Finally, my Cameo recognized my registration marks...Success!

Right?

Wrong.

I now ran into issues with the design not cutting properly.

Mistake 3:

My design was skewed. It looked awful! When I folded my card, it was more parallelogram shaped than rectangular.It was a mess. Nothing lined up. I thought I wouldn't get beyond this, but had to find a way. (see below)


Fix for Mistake 3:

Then I noticed something...something about my printed design. The lower right registration mark wasn't fully printing. I discovered that the bottom portion of it lay just beyond my printers maximum printing area. (see image left below, where I circled the issue in red.)


So...know your printer's printing area. Every printer is different, and this is going to make a big difference in the maximum area that you can choose for your registration marks to print.

Since my design was already pushing the boundaries of the red line area and cross hatches, the only way that I would be able to fix this issue was to shrink my 5x7 card slightly.

So I scaled my design slightly so that it stayed within boundaries and brought up my bottom inset on the registration marks to be within my printers maximum printing area. (See picture at left for registration marks dialog box, I changed the "bottom inset.")

I printed the design...I held my breath...and presto! The bottom of the lower right registration mark now appeared in whole on my printed design.  (above right) I placed it on my cutting mat, and sent the design from the Studio software to my Cameo.

Voila! It read the registration marks, and it cut out the design perfectly.

9 tries later, I finally...had the print and cut I desired.

Here's what the finished card looks like. I made 25 more.


Now, if you have checked all of these things, and everything appears to be within their respective boundaries, and you still get a "registration failed" message, reload and retry. Make sure that your mat is aligned with the furthest line on the left. It is shorter than the other lines. If you have done all of that, call Silhouette support, and they'd be glad to walk you through.

I tell all of this to you in detail so if you run into any one of these issues, my failures will help you troubleshoot what is wrong with your print and cut.

I hope you will try doing a print and cut with your Silhouette.  If you've read through the entire post, you are now well equipped to get it right the first try. If you run into any different issues and discover a fix for it, please feel free to share!

Monday, January 13, 2014

Silhouette Studio Tutorial: The Beauty of The Right Click!

Have you ever been frustrated in the Silhouette Studio software, trying to find a certain file, category, artist, or you want instructions on a given file without going to the store to find the instructions there. Well...there's a way to bring that information up easily. It's the beauty of the "right click" when you are in your library of the Silhouette Studio software. If you know about the right click already, great! I bet it has become quite helpful for you when using your Silhouette Library. If this is news to you...you will love this feature.

First, launch Silhouette Studio, then access your library by clicking on the symbol in the left side bar that looks like a book. That will bring you to your library.

Next, find the design you want more information on, and right click on it. It will highlight it and bring up a box on the side of it.
 I'll enlarge the area so you can see the box in the picture below.
The box has a few different options in it we will focus on "Show Properties" first, then I'll go over the other options. Click on show properties. It is circled in red in the picture above. 
When you click on that, it magically brings up a box at the bottom of your screen that shows you details about that particular design. This will bring up instructions and sometimes even links to tutorials (this is a new thing...we've been able to add website names in the past, but they weren't hyperlinked. they are hyperlinked now. Yeah!!!) 
Next to the properties, where I have circled in red in the photo above, you see a list of keywords associated with this particular file. These become helpful when looking through your library for certain themes, this is how it knows which files to bring up.

Okay...now for the other things in the Right Click menu...
The first option is delete item. 
This is a good option to know when a file has been updated in the store (sometimes we designers make mistakes and have to update files once in a while.) In order to get the new file, you must first delete it from your Studio Library and then upload the updated version for free. 

The second option is rename item.
You may want to rename an item something other than what it is known by in the Silhouette store. But by doing so, it may be harder to find the file later...just be wise in your naming.
The third item in the list is Sort By. Click on this to bring up a fly out menu of different options for sorting your file. 

The third item is "sort by."
When you click on this, it brings up a flyout menu with the options to sort by name, size, date downloaded, artist, and category. Click on any of these options to sort your library by your criteria of choice. Cool, huh!

Okay...here's another thing...just learned it today from a friendly lady in a Facebook community that I'm in...You can also look at your library as a list instead of icons. Just click on the icon that looks like three boxes with three lines by them. I put a red arrow by this and circled it. It will show you "view as list" when you hover over it. Notice to the right of it, the box that says "Search." If you put the search criteria you are looking for in there, it will bring up the files that have those key words associated with it. 
 For this tutorial, I typed in my name to bring up my files. The now show up in the list below. You can use other search terms like Christmas, Birthdays, animals...etc. Whatever you are looking for, there's a good chance there is a keyword that will bring it up.
That's all I have for you today. I hope this tutorial was helpful!

Thursday, January 02, 2014

The Ultimate Link-List of Samantha Walker Silhouette File Tutorials


***Update! 1/4/14***
I found a better way to format this. More links can be found on this post: http://samanthaleewalker.blogspot.com/2014/01/inlinkz-for-samantha-walker-silhouette.html Plus, there is a way to add your own Samantha Walker Silhouette file tutorials to the link up grid--look for the blue button at the bottom of the post.

Hello Silhouette Cameo and Portrait users! Thank you for purchasing my designs! I really appreciate your support over the years. As a "thank you," I have assembled this article of links to help you find some of the tutorials put together by me and my creative team.  This list contains tutorials that may not already have direct links associated with my corresponding files in the silhouette store. Please know that this list may grow over time as well as I try to match up files to tutorials, so bookmark or "pin" this page and check back often. I hope that by having a list in one place, it will make it easier for you to find them, and perhaps help you discover new files that you may have missed in the store.

If you are wondering why not all of my projects have links or tutorials, please understand that when I first started licensing designs to Silhouette in 2009, the Silhouette online store was a small beta project. I did not know that it would grow into a massive creative outlet for my designs. I also did not own a Silhouette machine at that time (gasp...not many of the Silhouette artists did;) just like I did not own a sewing machine when I started licensing my designs to Riley Blake for fabric.

You see...I'm an art licensor, and I license my designs to many manufacturers, and Silhouette is just one of the manufacturers that I license to. Without a Silhouette machine, I could not create tutorials for my designs, and naturally kept my designs more simple. Later, I desired to create more complex projects, as some of you may have noticed, that I really enjoy detail and challenging designs. So I put together a creative team to help me demonstrate some of these projects. As a result, I have had the opportunity to work with many creative crafters and love seeing how they use my designs. My team has been truly inspirational to me, and I hope that they have inspired you too.

Eventually I did buy a Silhouette machine when they came out with the Cameo--I couldn't resist, and can't hide the fact that I love it! Over time, I have learned how to use it, and it is so much fun! The biggest benefit of having a machine and designing files, is that I have been able to create more intricate 3D designs which require testing and tweaking to make them right. These more intricate designs, particularly the 3D ones, may require assembly instructions, so I want to make sure that you can find instruction for these more challenging projects. Please note that you will not find links for every file that I have in the Silhouette store.  Providing tutorials is something that some of the licensing artists do on their own accord in order to assist Silhouette customers with more challenging projects--we do it because we like you. I also do it because I want you to find success with my designs, and discover new ideas!

Some of the assembly tutorials may also have tips and tricks for using the Silhouette Studio software. I am often asked questions about how to use the Silhouette software, and must admit, that I'm not an expert at it, as it isn't the program that I use for designing. I use Adobe Illustrator because it has all of the functions that I need and integrates with the other Adobe programs that I use for designing different products. I only use the Silhouette Designer edition of the software when cutting designs. (Please note: the Designer edition of the Silhouette Studio software allows you to cut SVG files--the file extension that I use when saving things in Illustrator. The basic version of the Studio software, that comes with your Silhouette machine, does not cut SVG's. The designer Edition is quite reasonable.) So the Studio tutorials that I have on my blog are more of a courtesy. For the most part they are geared more toward the basic functions that you might use when cutting a design: like help with ungrouping, determining blade depth and speed settings, copying and pasting, moving a design, and shrinking designs to fit within the cutting area. With that said, I do know that the Silhouette studio software is an excellent tool from what I've seen others do with it.  It is capable of much much more than what I will show you here, for those of you who want to try your hand at creating or manipulating your own designs. For further help with the Silhouette software, please consult the Silhouette manuals, Silhouette customer service, or visit the Silhouette blog. The Silhouette Blog is an AMAZING resource for help with discovering the capabilities of the Silhouette software. There are also many amazing bloggers and Youtubers online that have some fantastic tutorials that demonstrate some of the advanced features of the software. The internet is rich with experienced users.

Okay...now for the list with links to assembly tutorials or ideas of how to creatively use files. Some of these tutorials are found on my blog and others are found on past and present SW Creative Team Member blogs. After you click on one of the links below, you may have to scroll down the blog post for the tutorials as they may have been posted with other promotions or projects that appear first on the link. Some tutorials have multiple links to them as they use multiple files.


Boxes, 3D projects, and other files that need explanation:

 
tutorial: 3D scalloped cake box                                    tutorial: corsage box with window
link: Design ID #27762, Design ID #7318                                Design ID #34717

          
tutorial: Drawer Stack                            tutorial: Woven Banner
Design ID #43716                                  Design ID #42056
   
tutorial: chandelier tutorial     tutorial: Flower heart basket       tutorial: Surprise box
How to use it on a card          Design ID# 42137                       Design ID #26873                    
Design ID #42135
     
tutorial: birdhouses  Design ID #8567, Design ID #8242          tutorial: Egg Carton Card
Design ID #8209, Design ID #24609                                         Design ID #39720

 
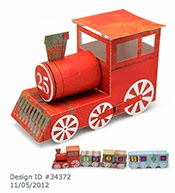
tutorial: bottle box  video link here                                        tutorial: Advent Train engine
 Design ID#27472, Design ID #27477, Design ID #27474                 Design ID #34372
        

tutorial: Heart Clamshell Box          tutorial: Burger Box,  Happy Easter Burger Box
 Design ID #37607                                        Design ID #39476, Design ID #25471
                                                               Design ID #26861 Design ID #26861,

tutorial: Basket of Flowers                                                     tutorial: Round Top Box
Design ID #3198, Design ID #27016                                          Design ID #37584
      

tutorial: Bag Carton Box                         tutorial link: Egg Boxes How to close egg boxes tutorial
Design ID #32471                                   Design ID #25664, Design ID #39794, Design ID #25648, 
                                                                 Design ID #25663, Design ID #25665, Design ID #25716, 
                                                                 Design ID #25715, Design ID #25662 
    tutorial: Live Laugh Love Box Card                                     tutorial: 3d Hat box
    Design ID #32476, Design ID #37993                                  Design ID #33023

               
 Print and Cut Gingerbread house tutorial                   tutorial: 3D Box Heart Handle
 Design ID #32428                                                       Design ID #26979, Design ID #8081
     
 tutorial: ornament boxes  Design ID #33808,                          tutorial: 3D Star Pouch

   
   tutorial: 3D Buckle Purse                        tutorial: advent calendar stand and blocks
   Design ID #26981                                   Design ID #34295, Design ID #34308
 
tutorial link: Spooky Treat box                                            Hexagon flower top box
Design ID #32816, Design ID #32440                                     Design ID #27657


tutorial link: XO bag 
grouping and ungrouping
Design ID #37991


Using Pens in your Silhouette:

 'z' is for zebra                                        Peacock Lace Card using Silhouette Pens
Design ID #47045                                    Design ID #40126, Design ID #11995
 
Adding and Subtracting parts:

#1 ribbon card tutorial                               Doily Card                    2 Bunny file made into a card
Design ID # 39721                               Design ID#42322                         Design ID #8219


                      Hello Sunshine card using various flowers and spiral flower
                        Design ID #39477, Design ID #7598, Design ID #25471


         Bunting Borders card
         Design ID #32817

Inspirational uses:

 
     Dress Card tutorial                        Pocket Card tutorial                 Frozen Treat Card
     Design ID #47249                         Design ID #44143                    Design ID #42031
  
 'I cook with wine' framed art       Chocolate is Proof framed art               My Little Charmer
Design ID #43819                                 Design ID #44014                  (misting stencil technique)
                                                                                                                     Design ID#38654


 'Make a wish' display  Design ID #43844,  42773             12 piece tag set on card
                                                                                                  Design ID #27019


          Scalloped Dot Fringe               Classic Car Card
          make a flower with it!              Design ID# 10369
          Design ID #4679
          Design ID #27019

       Santa's Advent Calendar                     Reindeer Card
            Design ID #34267        Design ID #34698, Design ID #33524
Print and Cut:
  snowman advent calendar                    woodland daisy
       Design ID #34284                 turn design into a print and cut
                                                              Design ID #12193


Related Posts Plugin for WordPress, Blogger...