
Have you seen all of the amazing Advent Calendars in Samantha's Silhouette Online Store? I am just so in love with each and every one. We may end up having one in each room this year!
They are fabulous, right!?
And remember, they are on sale through midnight tonight (11/30)
for 50% off!
And remember, they are on sale through midnight tonight (11/30)
for 50% off!
It's Jamie back with you and today I am working with the Santa Beard Advent Calendar and have a quick tutorial to share! Just have a look at all the cuteness this guy brings...

We will be using cotton balls to cover up the days so once we hit Christmas, his beard will be full and fluffy!
This file comes with a couple different options for the days. You can either cut them or do a Print and Cut. I chose to work with the cuts for this one because I wanted my numbers to be the same red as Santa's hat!
Tutorial:
Tutorial:

To start, place the cut file on your mat then click on it to select it. Once it is selected, right-click and choose "ungroup".
Next, go up to "File" and select "New" to open a new window. We will open up four windows during this tutorial.

Copy the background, the mustache, and the hat ball to the new page. I color mine white so I know what color to cut the items in.
Go back up to the "File" and select "New" to open another new window.

Go back to your original window and copy the beard piece then paste it into your new window. Again, I colored the piece white.
Go back up to the "File" and select "New" to open your 3rd new window.

Copy the numbers from the original window to the 3rd new window and color the items white if desired.
Go back up to the "File" and select "New" to open your last new window.

Copy the items shown and group them with like items so you can place your paper easily. I have color coded my items to help me with my paper placements!
Cut all of the items, four pages in total then
follow the assembly instructions below: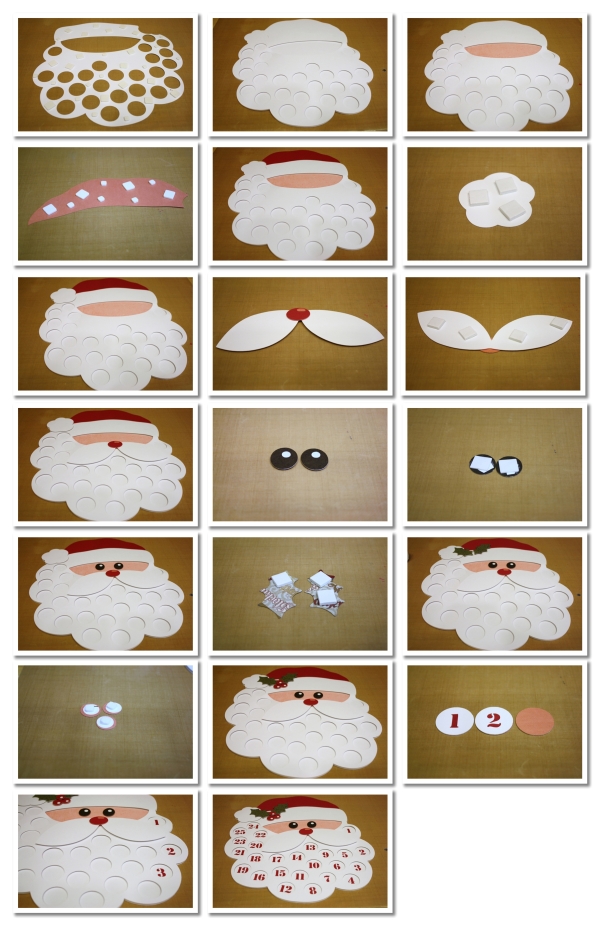
1. Place foam adhesive squares on the back of the beard.
2. Adhere the beard to the base.
3. Apply glue to the back of the face piece then adhere as shown.
4. Place foam adhesive squares on the back of the Santa hat piece.
5. Adhere the hat on the base as shown in the photo.
6. Place foam adhesive squares on the back of the hat ball.
7. Adhere the hat ball on the base as shown.
8. Assemble the nose pieces and adhere to the mustache.
9. Place foam adhesive squares on the back of mustache.
10. Adhere the mustache on the beard as shown.
11. Cut small pieces of white cardstock and apply behind the black eyes.
12. Place foam adhesive squares on the back of the eyes.
13. Adhere the eyes on the face piece as shown in the photo.
14. Place foam adhesive squares on the back of the holly leaves.
15. Adhere them to the Santa hat as shown.
16. Cut small pieces of white cardstock and apply them to the back of the holly pieces then apply foam adhesive squares on the backs.
17. Adhere to holly pieces as shown.
18. Adhere each white number piece to the red circles.
19. Apply adhesive to the back of each number then place it on the Santa base, pushing it under the beard.
20. Your project should look like this!

Thanks so much for stopping by today!
If you make one of the Advent Calendars, we would love to see them! Just link us up in the comments section or share it with us on Facebook!
Also remember that the Creative Team Call ends
tomorrow (12/1) so be sure to get your application in!
See all the details here: http://samanthaleewalker.blogspot.com/2012/11/announcing-samantha-walker-2013.html


hi Samantha where can I purchase the svg for the santa advent calendar? I have a cricut machine but would love this file if still available. thank you so much
ReplyDelete