Ads 468x60px

Showing posts with label A2 card. Show all posts

Tuesday, August 05, 2014

Dress card by Diana


Hello! Diana Fisher here with you today to share a tutorial on how to make this darling dress card from one of Samantha Walker's newest dress Silhouette files.

After you download the studio file, separate the pieces and set them into separate corners on your mat. You can then load all of the paper at once and make one cut. 


You can see here that I choses a palm tree pattern paper from Samantha Walker's collection Summer Lovin' from Carta Bella for my dress pieces, cream card stock for the dress base and a green card stock that matches the palm trees for the dress straps and center accent. 


After I cut them, here is what they look like off of the mat. 


After assembled, here is the pretty little dress. I resized this to just a little over three inches wide so it will fit the card, so you can image how small and cute it is assembled here. 


I want the dress to pop off of the card, but not be all alone on a white card base, so I get to work making a background with a large background stamp. I also cut a label using my die cutter to anchor the dress to the card. 


For a final touch, I tie some gold twine around the waist of the dress and then use foam adhesive to pop up the label off the card base and then the dress off the label.


The finished card is just perfect for sending a quick "thinking of you" note to a friend.


Monday, June 23, 2014

Silhouette Tutorial: Intertwined Chevron Card

Chevrons continue to be all the rage. From fabric, to paper, to clothing and more...you cannot get away from this delicious design. Today, I'm going to share with you a way to change up the look from a traditional chevron in this intertwined Chevron Card.

For this project you will need this Equipment:
A Silhouette Electronic Cutting machine. This file works great with both the Silhouette Cameo and the Silhouette Portrait cutting machines.
For those of you who are new to my blog, and may not have heard about the Silhouette electronic cutting machine(the machine I used to cut this file out,) I put together a product review at this link. You can read other's reviews of the machine here. This machine will change the way you craft!

You will also need this Silhouette File:
Intertwined Chevron Card (file will be linked as soon as it appears in the Silhouette store.)
With your Silhouette machine, cut the groups of chevrons in two different colors. (When you open the file up in the Silhouette software, select ungroup once. You will then see two different groups of the chevron pieces. Cut one of the groups in one color, and the other group in a coordinating color.) Then line them up in order so you have them ready to intertwine. 
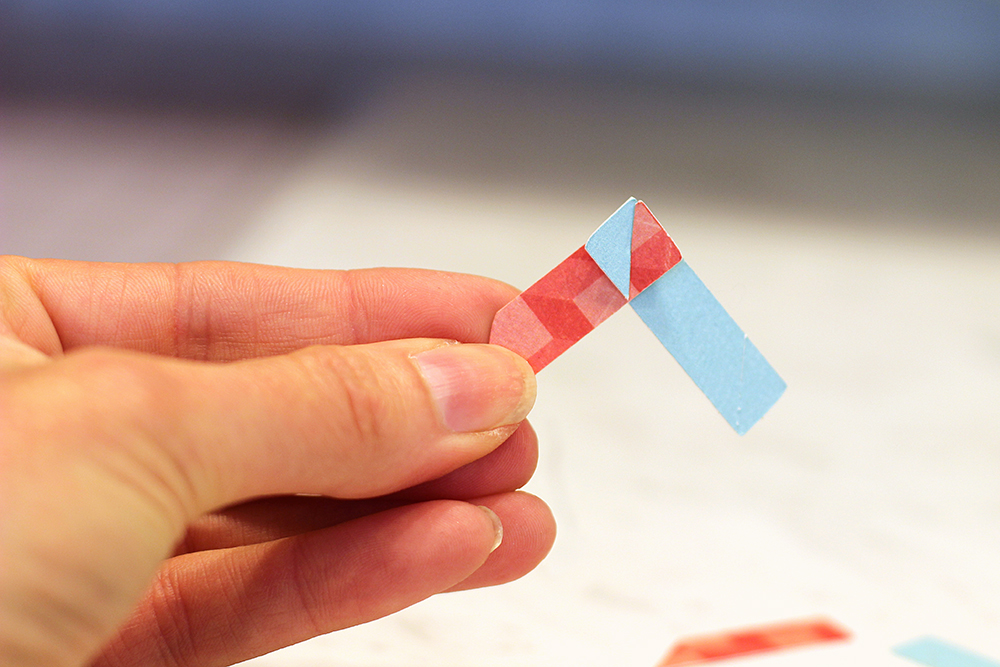
Intertwine two chevron pieces at the slit, as shown above. 
 Then flatten them out when the two pieces come together all the way down the slit. 
 Continue intertwining the pieces until you finish a row.
Complete as many rows as you wish, then attach each row to the card front with a good paper glue. The file includes 3 rows, but you could easily cut and paste more rows within the Silhouette Studio software to achieve your desired look.

Saturday, May 24, 2014

Candy Jar Card by Diana

Hello! Diana Fisher here with you today. 

There is nothing better than bright colors on a card — it's like gifting sunshine. For today's post, I am sharing how I made this candy jar card using a Samantha Walker Silhouette file and enamel dots. 


This is the candy jar as it is from the Silhouette store. Ungroup the file and delete the circle meant for the candy pieces, the little circles on the jar and the lid, and the reflection piece on the jar and the base.

Below is what you should have left for your cut file.


I used gray card stock to cut my jar and a piece of Samantha Walker's Echo Park Keepin' Cozy for the interior of the lid cut. 

Once I had jar positioned on a piece of white card stock, I began to layer in a variety of enamel dots in different colors and sizes.


The finished card is bright and cheerful. To add a sentiment, I cut a teeny tiny tag that was attached to the top of the lid with twine. The "sweet!" stamp is from Samantha Walker's JustRite stamp set called For All You Do Vintage Labels Three.


Friday, August 09, 2013

Silhouette Cutting File Tutorial: Stationary Box

Craftsy Today I'm going to show you how to put together my new A2 Stationary box. This project will maximize the use of two 12 X 12 pieces of double-sided card stock. You can put it together with or without the lid, you can add all contrasting panels or use just some. The box will hold A2 sized stationary (8.5 x 11 quarterfolded cards.) Customize the box how you want with ribbon and embellishments!


First, you will want to open the design in your electronic cutting machine's software. I'm demonstrating the file on the Silhouette Cameo using the Silhouette Studio Designer edition.

First off...I recommend using a double-sided card stock with a detailed design on the front and a subtle design on the back. I used my Antique Damask cardstock from my Traditions collection for Carta Bella. This worked perfectly, as the yellow on the back was a subtle complimentary color to carry the detailed damask on the front.
 When you open the design, half the cut lines will appear in the active area. 
Go ahead and set up to cut this in this position.
Now you will want to select the design with your move tool, and shift the entire design over 12 inches so that the other half of the design appears in the active cutting area.
Now that the design is cut, find these two pieces as shown above. Be careful when finding the piece on the right side with the angled corner--there are two other similar pieces, you will want to choose the one that is the larges of the three. The smaller two will become the contrasting panels for the sides of the box. 

Now glue the tab on the larger piece to the piece on the right.

Fold all the score lines, and glue the tabs to attach the angled sides to the bottom, as shown below:
Put glue on the front tabs and glue them to the angled sides.
Find the lid piece, and add contrasting panels if you wish. I only added the front artisan shaped panel and left the panels off of the top of the lid to expose more of the yellow card stock.
Glue the tab on the lid. You can choose to glue the lid on the inside or the outside of the box. I chose to glue the tab to the outside of the box...I'll show you why in just a second... 
 When glueing, I hold pressure on the glue point until adhered.
I like to use a good paper glue like: Tombow Mono Liquid Glue. This won't warp paper and when it dries...the bond will not fail. It is permanent--and when I say permanent, if you try to pull your paper apart, it will tear your paper before the glue is compromised. It's really good stuff.
Remember how I chose to glue the tab to the outside of the box...you can see my joint...
as I said...
I did this for a reason...
Here's the reason for glueing the tab to the back. I chose to use a contrasting panel on the back of the box. I placed the panel over the tab on my lid, as the tab would be strengthened by being between both the box and the panel--cool huh!
Fold the tabs on the optional interior divider. 
Place the optional divider where it suits your needs. You can add more than one divider...
you'll just have to ungroup the design in your cutting software, and select more to cut. 
Here's your finished box with the lid closed. 
It would be really cool to add thin magnets to latch it closed.
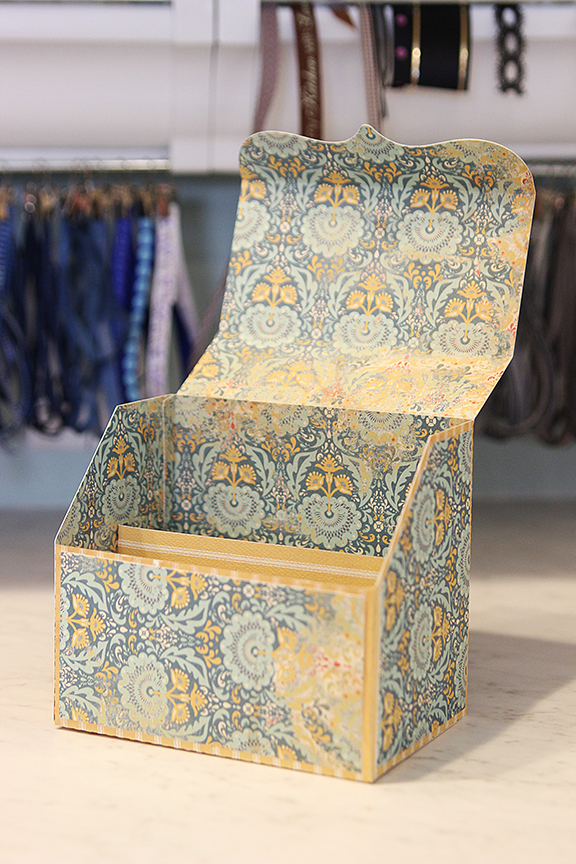
Here's the box in the open position.
Here's the box filled with a few cards...
Have fun customizing your box!

Happy Crafting!
Samantha Walker

Here are some of the supplies and other fun stuff!


 Get Amazon Prime Membership! Enjoy Free 2-day Shipping on Prime products, plus access to Free digital content like videos, books, and more!
Related Posts Plugin for WordPress, Blogger...