Ads 468x60px

Showing posts with label card making. Show all posts

Friday, August 09, 2013

Silhouette Cutting File Tutorial: Stationary Box

Craftsy Today I'm going to show you how to put together my new A2 Stationary box. This project will maximize the use of two 12 X 12 pieces of double-sided card stock. You can put it together with or without the lid, you can add all contrasting panels or use just some. The box will hold A2 sized stationary (8.5 x 11 quarterfolded cards.) Customize the box how you want with ribbon and embellishments!


First, you will want to open the design in your electronic cutting machine's software. I'm demonstrating the file on the Silhouette Cameo using the Silhouette Studio Designer edition.

First off...I recommend using a double-sided card stock with a detailed design on the front and a subtle design on the back. I used my Antique Damask cardstock from my Traditions collection for Carta Bella. This worked perfectly, as the yellow on the back was a subtle complimentary color to carry the detailed damask on the front.
 When you open the design, half the cut lines will appear in the active area. 
Go ahead and set up to cut this in this position.
Now you will want to select the design with your move tool, and shift the entire design over 12 inches so that the other half of the design appears in the active cutting area.
Now that the design is cut, find these two pieces as shown above. Be careful when finding the piece on the right side with the angled corner--there are two other similar pieces, you will want to choose the one that is the larges of the three. The smaller two will become the contrasting panels for the sides of the box. 

Now glue the tab on the larger piece to the piece on the right.

Fold all the score lines, and glue the tabs to attach the angled sides to the bottom, as shown below:
Put glue on the front tabs and glue them to the angled sides.
Find the lid piece, and add contrasting panels if you wish. I only added the front artisan shaped panel and left the panels off of the top of the lid to expose more of the yellow card stock.
Glue the tab on the lid. You can choose to glue the lid on the inside or the outside of the box. I chose to glue the tab to the outside of the box...I'll show you why in just a second... 
 When glueing, I hold pressure on the glue point until adhered.
I like to use a good paper glue like: Tombow Mono Liquid Glue. This won't warp paper and when it dries...the bond will not fail. It is permanent--and when I say permanent, if you try to pull your paper apart, it will tear your paper before the glue is compromised. It's really good stuff.
Remember how I chose to glue the tab to the outside of the box...you can see my joint...
as I said...
I did this for a reason...
Here's the reason for glueing the tab to the back. I chose to use a contrasting panel on the back of the box. I placed the panel over the tab on my lid, as the tab would be strengthened by being between both the box and the panel--cool huh!
Fold the tabs on the optional interior divider. 
Place the optional divider where it suits your needs. You can add more than one divider...
you'll just have to ungroup the design in your cutting software, and select more to cut. 
Here's your finished box with the lid closed. 
It would be really cool to add thin magnets to latch it closed.
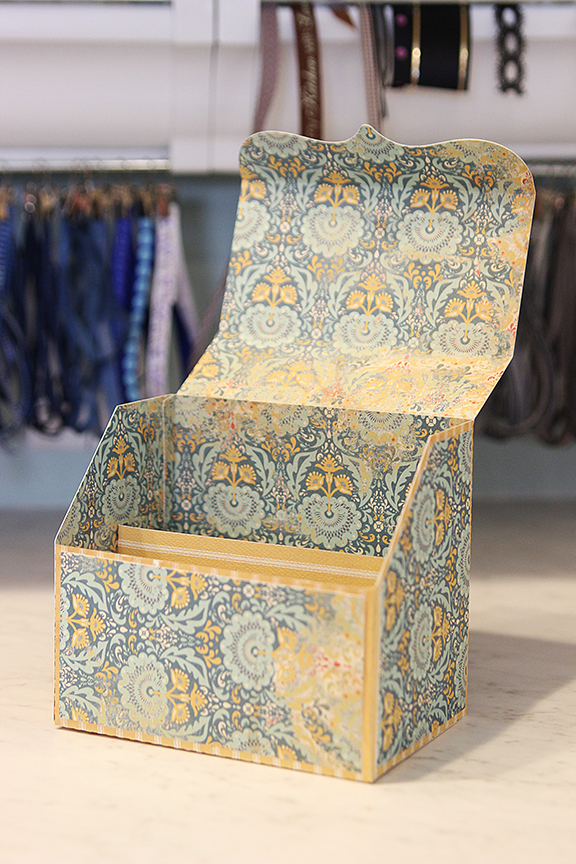
Here's the box in the open position.
Here's the box filled with a few cards...
Have fun customizing your box!

Happy Crafting!
Samantha Walker

Here are some of the supplies and other fun stuff!


 Get Amazon Prime Membership! Enjoy Free 2-day Shipping on Prime products, plus access to Free digital content like videos, books, and more!

Tuesday, August 23, 2011

Creative Team Spotlight: Cristal Hobbs!

This month we have the privilage of getting to know Cristal Hobbs.  Cristal's carefree approach to crafting is always welcoming to both newcomers and seasoned designers who love to craft. Cristal is also an avid blogger who shares about her love of creating through demos and new projects each week. I asked Cristal to answer a few questions to help us get to know her, this is what she said:

Q. What is your favorite Technique?
I don't really have one, I like to try new techniques all the time. If I can create it with paper or fabric I will. I love making paper ruffles, using fabric on layouts, coloring outside the lines.
I love the dimensional and textural qualities of this fun card. Isn't that trio of flowers so cute? Cristal used Kokeshi paper line Samantha Walker for Creative Imaginations. She also used Real Wood paper from Creative Imaginations.
Q. Where did you learn to design?
I didn't, I just picked up crafting and just wing it. I only began scrap-booking 3 years ago. I just started in my home and it spiraled from there. Kind of the like the Rachel Ray of scrap-booking...I'm no chef I just play with paper! hehe
Cristal created a gorgeous purple flower at the base of her fan for added flair. Patterned paper is from the Kokeshi line by Samantha Walker for Creative Imaginations.
Q. What influence your design choices?
Mostly nature and anything from fashion or past eras. I love 50's bold designs, 80's colors...I love it all, there is something special in every season. I am always thinking about the purpose and reason behind the design before I design. I love that crafting allows you to share your heart and soul. That influences me the most.

Cristal made this little dress with fabrics from the Enchanted Garden Collection by Samantha Walker for Riley Blake.
Q. Who are your artsy inspirations?
Probably the crafters I meet that are so kind in person, those people you just can't believe how amazing the are when you meet them. Eva Dobilas, Karen Maldonado, Shemaine Smith, Rhonda Van Ginkel, Lori Allred. Those people inspire me because they have heart and it shows in their creations.


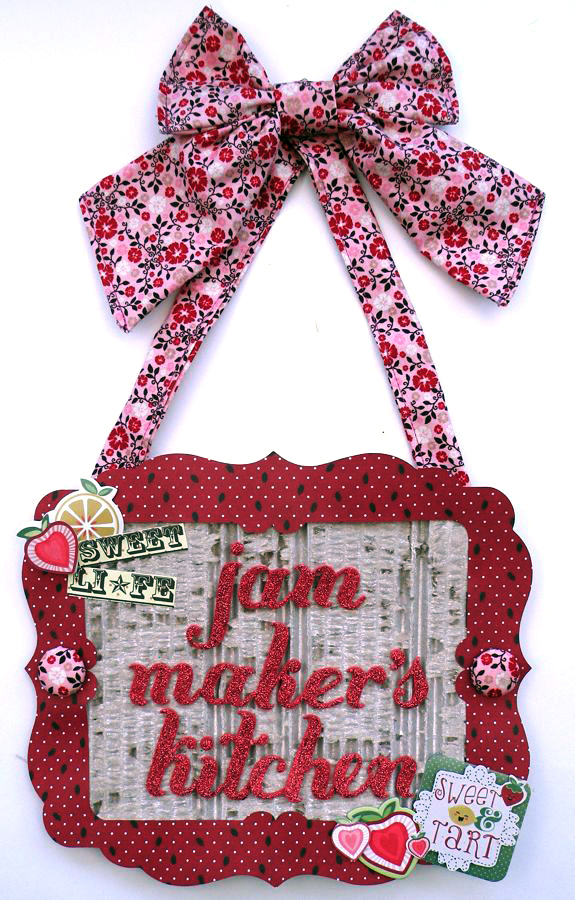
Cristal made this sweet kitchen sign with many various scrapbooking products, and added a hanging sash with fabric from the Wanna be a Cowboy collection by Samantha Walker for Riley Blake Designs. 
Q. What do you enjoy doing besides crafting?
I love raising my boys,being really old school. I raise chickens, garden, gather my own eggs, read alot, spend time baking and love doing things the old fashioned way. I used to have a real fire burning stove/oven. I love baking bread and the simple life.
Cristal created this with patterned papers from the Kokeshi collection by Samantha Walker for Creative Imaginations.
Cristal created this little sign with patterned papers from the Blossom collection by Samantha Walker for Creative Imaginations.
I hope you will go and visit Cristal's blog often.  She always has something fun and fabulous going on...and great giveaways!


Friday, August 19, 2011

A Perfect Match!

Like Peas and Carrots, PB&J, and cranberries and turkey...this is a perfect match!  I'm so thrilled to be designing coordinating products for Unity Stamps and Spellbinders!  If you haven't heard yet, all of my Spellbinders sets have matching stamp set coordinates.  That means...you can stamp images with my Unity stamps, and cut them out with Spellbinders dies!  How easy is that!

This release also included a new concept that I came up with when designing for both Spellbinders and Unity.  That is my Stacker sets---stamps you can "stack" to get a plethora of creative combinations.  There are two of these sets available through Unity.  Blossom stackers, and Ornate Artisan Stackers.  We are always looking for the perfect background shape for our cards....or interesting journaling block...or gift tag...these sets with their practically endless combos offer just the right look you are going for!

Here's a peek at what kind of combos you can get with the Blossom Stackers...I'll feature combos for the Ornate Artisan stackers in a few weeks.  This should get your juices going for the meantime:


I got to squeeze a little paper play time in this weekend, and it was fun!!!  I concentrated on my stacker sets and coordinating dies.
I wanted to show what can happen if you cut some of the tags and backgrounds in half....you can come up with a whole new shape!  The biggest background in this stamp and coordinating die set has flourishes on either end.  When cut, the flourishes can create a place to tie a ribbon.  That's just what I did with this gate fold card!  
I used paper from my new Blossom Collection for Creative Imaginations.  It's a fun and funky 70's inspired paper line. 
Jennifer Ingle has also been playing with my Unity Stacker Stamps.  I LOVE this card she created!  So feminine,  so very beautiful!  That gauzy flower epitomizes Summer!


Thursday, January 06, 2011

Creative Team Spotlight: Eva Dobilas

Each month at the begining of the month I am going to feature one of my creative team members so you can get to know them.  This Month, I'm starting with Eva Dobilas.  I love her flair for design and bright color choices.  I know I enjoyed getting to know her better, I hope you will too!

Love card created by Eva Dobilas with Ooh La La collection by Samantha Walker for Creative Imaginations.
Eva used Silhouette dies: artisan_rectangular_C00444_19210abstract_flourish_border_C00447_19210
I interviewed Eva, and this is what she said:

Q: What is your favorite technique?
A: I don’t have a favorite technique per se, I simply like to try new things that attract me. Sometimes, it’s an old technique, that is was just rediscovered strikes me and gets me inspired to create. One thing I love is using my Silhouette, so if that can be called a technique, than that would be it

Eva used papers and stickers and ribbon from Sweet Tooth and Christmas in the Kitchen collections by Samantha Walker for Creative Imaginations.
Q: Where did you learn how to design?
A: I have been creating for 13 years or so, and throughout these years I learned a lot from my peers, just perusing magazines, online galleries, and I have been fortunate to take classes from well known artists and you could say I picked up a lot of things from them. But I always say, if one has the passion for something, they will learn everything that helps them to achieve their goal and my heart is in designing, so you could say I have done a lot of “homework” and practiced a lot. It’s been a fun journey and it’s something that I am still on as I continue to grow.
Eva used Silhoutte die joy_word_snowflake__C01091_19210  to create this ornament.
Q: What influences your design choices?
A: I lot of things can influence my design choices, not all at once, of course, but here are a few to mention. Silhouette shapes, colors, textures, papers, fabrics, stamps, coloring mediums….
This card was created with papers from the Ooh La La collection by Samantha Walker for Creative Imaginations.
Q: Who are your artsy inspirations...
A: Throughout my years of drooling over gorgeous creations done by other designers, I have collected a lot that inspire me and that I just adore. Here are a few, but really there are so many designers that I just love, so it’s hard to narrow them down to just a few: Amy Sheffer, Betsy Veldman, Jennifer McGuire, Tim Holtz, Christine Middlecamp.


Q: What do you enjoy doing besides crafting and designing…
A: I enjoy cooking, baking, in fact I am thinking of writing a dessert book based on my mom’s recipes, which are all incredibly amazing Hungarian yummy pastries, nothing like that on the market and everyone should have something sweet in their life…lol. I also love to knit, and just recently made a really pretty scarf for my hubby. My other favorite thing to do is reading anything spiritual and coaching people to change their perception about things that may have held them back in the past and help them achieve happiness and peace in their life.
Eva used paper and stickers from Wanna Be a Cowboy collection by Samantha Walker for Creative Imaginations. She used Silhouette Die set: 3_nesting_artisan_shapes_C00493_19210  


Eva is quite creative, and has shared with us a step by step to create this fun embellished T-shirt.
Eva was inspired by a technique she learned from Amy Tangerine’s t-shirts and also her son’s sweatshirt design inspired me to do this.


1. You will need a t-shirt, fabric and Silhouette machine.

 Silhouette SD Machine Lot - w/Extra Blade Mat Pens
2. Cut out Love Letters Silhouette shape and cut large enough design for t-shirt. Eva used fabric from the Enchanted Garden collection by Samantha Walker for Riley Blake Design. Eva also used Silhouette die: love_letters_C00754_19210 

3. Trace pattern on the fabric and cut it out, leaving enough space around it, so you can stitch around it.

4. Turn t-shirt inside out and place the cut out fabric on the inside, where you would want your design to be.

5. Hand stitch on the traced line.

6. Once all stitched, turn t-shirt right side out and cut t-shirt inside the stitched lines, so the fabric will show through.

And the end result gives you a designer t-shirt.

Thursday, November 18, 2010

Introducing creative team member Eva Dobilas!

Last month I selected a team of 10 fabulous crafters to work with my product over the next year.  I selected them because each of them had a unique "something special" about the way they design.  Some love bright and bold...some like a simple graphics approach, some love to make cards, some paper mache, and others are true scrapbookers at heart.  I have had the joy of watching them post projects on my Facebook page that feature the use of my products.  I would love to introduce you more in-depth to each of them over the next week.  


Today, I am starting with Eva Dobilas.  


Let me introduce you to Eva.  She is a delightful person to know...always up-beat and positive and it's catchy...not only in her words, but also in her craft.  I discovered her beautiful work about a year ago, when she did a lovely project with my birdhouse Silhouette die. I loved how she added so much life to this simple die design...and particularly loved the stamps she was using.  To make a long story short...she was the one who introduced me to Unity Stamp Company...and the rest...is history.  I am grateful for that introduction as I have been having so much fun designing stamps for Unity! Eva loves to use bright colors, and pays attention to detail.  Here are some of the things she has been busy making over the last 6 weeks...I bet you she crafts every day...because this is just a sampling of many projects she has created in the last little bit.  She has a true love for design.
To make this gorgeous fall card, Eva used one of my digital cutting files from the Silhouette digital download store called:  2_layer_swirly_leaf_C01028_1921010/19/2010.  I love her choice of fresh gingham ribbon to make this card POP! 
Eva used stamps from the Ippity Fall for You set  (this is Unity Stamp Co. sister company)  to create this festive fall pumpkin. The Thanksgiving sticker is from my Harvest Collection for Creative Imaginations and the label that holds the cute arrangement of  stamps at the top, is one of my digital dies: 1_label_frame_tag_C00885_1921008/09/2010available from Silhouette designs.  Here adorable project was created with papers from my Harvest paper line by Creative Imaginations.  I love Eva's detail in her rolled flower at the top of her pumpkin!  

For this lovely card, Eva used my fern_artisan_C00375_1921012/17/2009 Silhouette cut set and my Encompassed Grace stamps from Unity. Eva started out with white paper, but she inked it up with Ranger Distress inks--very cute! Love it, Eva!


This cute pair of dimensional projects by Eva, make me smile! She made this adorable little Halloween House with my birdhouse die from Silhouette, papers from Basic Grey (a company I LOVE--they are good people) and stamps from Ippity and Unity stamps.  Eva's second project uses another one of my dies from Silhouette called, spider_web_treat_bag_C017107/07/2009 , which you can fill with candy for your favorite little trick or treater.  She also used Copic markers, which Eva is really good at...as she demonstrates on the witch in this project. The bats are also some of my digital Silhouette cuts, bat_circle_set_C01015_1921010/18/2010.  I think these projects are precious!
Eva created this card base with my Silhouette die: jack_o_lantern_card_C20090904130829_19210
09/04/2009 .  Her card turned out so fun with all of her extra layers and embellishments, including stamps from Ippity.  I sure love it! 

Eva used my Ooh La la paper collection from Creative Imaginations to complete this cute card.  My favorite thing about this card is her choice to add an unexpected pop of blue!  Clever way to add spark!
I have to Credit Eva for inspiring me to design this snow globe die for Silhouette (christmas_snow_globe_C01068_19210)  She asked if I could do it for a project she had in mind...I was happy to oblige...as I knew Eva would do fabulous things with it! I added the scalloped border around the snow globe knowing this kind of motif is something Eva already loves to do with her cards.

Eva used My Wanna Be a Cowboy papers from Creative Imaginations and all the shapes were cut with the following Silhouette digital cutting files:  

Here is another card by Eva.  For this card she used papers from my Harvest collection for Creative Imaginations, and coordinating stamps from my Fall Family Memories set for Unity Stamp Co.  Eva also used my artisans_nesting_rectangular_C00685_19210 05/04/2010 available as a digital download on the Silhouette die cut machine site.

Make sure to check out Eva's blog.  She is a regular blogger and always has inspiration to share.  

Related Posts Plugin for WordPress, Blogger...