Ads 468x60px

Showing posts with label card wrap. Show all posts

Monday, November 11, 2013

Silhouette Tutorial: Card Wraps, Fall Pop-Up cards, and window bag

Thanks for stopping by today! I've got a few new designs entering the Silhouette Online store this week. They are relatively simple designs, but still might require a little guidance to assemble them. I'll show you some tips and tricks to make sure that you have success with these files.
This is just a selection of some of my files that you will find at Silhouette this week.

First let's assemble the leaf bag:

 Fold all the scored edges first. Make sure to fold the sides toward the inside of the bag, and the "V" on the sides toward the outside of the back.
 Next we will assemble the bottom of the bag. This has become my favorite way to close the bottom of a box, so you will see this type of fold often. To assemble the bottom, tuck in one of the angle tabs into the "U."
Now tuck the second angle tab into the "U."
 Now tuck the wide "trapezoid" tab into the "U" tab. Voila...Now you have closed box on the bottom and it is strong!
 Glue the side tab...be sure to use a good paper glue like Tombow that won't wrinkle your paper.

Hold the sides of the bag together with your fingers, or use clips.

Then guck the flap slot into the slot on the bag. You can also put a piece of contrasting paper behind the leaf if you wish.

Now for a tip on a card wrap!

The card wraps don't need much instruction...just fold the sides on the dotted lines...fun and simple! 
However, tying them shut just right, may be another story. I have found the easiest way to do this is to thread the ribbon or string from the underside of each triangle in an "S" like order. Just follow the order of my letters in the photo above. Then with the ribbon ends, pull the corners together, and tie! 

Now for instruction on the Pop-Up leaf cards:

 First start curling out the edges of the leaves. Be careful not to get too aggressive with this step as you may rip the paper where the leaf is attached.
 Some of the leaf cards have a dotted line in the center of the leaf. You may choose to leave that as a decorative element, or you may choose to try to manipulate your paper further by scoring that edge with your thumbnail and using your index finger on the reverse side to somewhat crease the dotted line to give the leaves a little more life. (really, this step is not mandatory...my original purpose with the dotted lines was decoration...then I decided to try this just for fun.)
 Keep on going until all your leaves are popped up! Then glue the popped up leaves onto a contrasting cardstock. I used double sided textured cardstock from Carta Bella. If you used this cardstock, set your blade to a depth of 4, for detailed designs like this one, turn the speed down to 2. Then choose the "double cut" box if your blade is not brand new. With new blades, double cut isn't necessary...but if you are like me and want to get all that you can out of your blade...then go for the double cut.


Now to assemble and fold the envelope. The key here is to make sure you are assembling your envelope right side up. The envelope should be laid out as in the picture above. Notice how the bottom of the side tabs goes wider toward the bottom...that's what you are looking for. Now Glue the envelope liner to the inside of the envelope. 
Fold the side tabs in then put a dot of glue where the overlap and press to hold.
Then fold the bottom tab up, and glue it to the sides. Done!
This is what your card and envelope will look like at this point. Look's great, right? But let's embellish it just for fun!
So cut your tag piece in another contrasting color. Glue the little leaf  to the tag. This is left over from the envelope liner or the leaf provided in the file (this will be an either or...the maple leaf card has a smaller leaf included in the cut file...the autumn leaf and the oak leaf are just using the envelope insert leaf.) I used this crimson and gold double sided textured cardstock from Carta Bella...it's more of a green than a gold, but that's a technicality.

A fun embellishment for the tag would be some curling wire or beading wire.

Insert the wire into the tag, then curl the wire...by just wrapping it around a pen or pencil. 
 Choose a coordinating ribbon, then thread the wire around it, then glue the  ribbon onto the card.
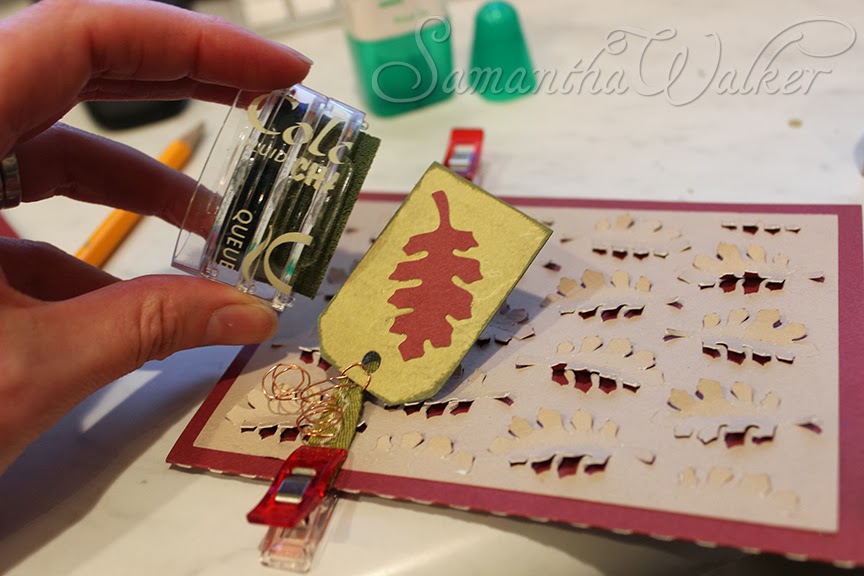
 Oooops...just an after thought...I didn't like how the tag didn't "pop" from the card background...so I decided to ink the edges with chalk ink. I used a Colorbox fluid Chalk cat's eye ink pad. These are super easy to use for direct inking to paper.

Ta Da! it's done...your autumn leaf card set!
Samantha Walker

Saturday, June 23, 2012

Sneak Peek: Spellbinders™ Summer Spectacular Day 4

I love this time of year! Don’t you? It’s fun to have the kids home from school, we’ve been actively engaging in swim team, having water fights in the backyard, and forgetting that it’s dinner time because the sun doesn’t want to go down. While they run around in the sun, I can enjoy their fun kid noises from my home office as I busily create new things for you to create with. I’ve been especially anxious about sharing my new Spellbinders™ sets with you!

This summer I have two new sets releasing with Spellbinders...a set with a Parisian theme...which is perfect for all your girly projects...and the second set a botanical themed set with a whole new concept in die cut crafts...just wait...you’ll see what I mean in just a minute...
Here is the first project I created:


Spellbinders Supplies:
Grand Calibur® 


S5-146 Botanical Swirls and Accents MSRP $29.99 (used in the first project)

S5-145 French Frills MSRP $29.99 (used in the second project)


Cross Promotional Partners Supplies:

JustRite stamps Ooh La La French Frills clear stamp set (New CHA Summer 2012!)
JustRite stamps Botanical Swirls Label cling rubber stamp set (New CHA Summer 2012!)
Other Supplies:
colored card stock (pink & brown)
various ink (pink and brown)
make-up applicator powder puff
wax paper

Today I’m going to share the steps to create the card wrap pictured above with the Botanical Swirls and Accents set.

First I cut a 8 ⅛ x 8 ⅛" square out of card stock.

{Die preparation hint: this is a very intricately detailed die...please run the die through your Grand Calibur® machine with wax paper first to make die releasing easier...or you can lay wax paper over your project as you cut your card stock. This is what I did--makes releasing the paper from the die a piece of cake.} Here's a video link that also references the wax paper tip...you'll love the detailed dies that Kim Hupke shares in this fantastic clip.

Next I laid my corner piece from my Botanical Swirls set exactly over one corner of the 8 ⅛" square. Make sure that the edge of the die is exactly on the edge of your paper. Then I taped the die into place.

Then I ran it through the Grand Calibur® machine. Then I removed the die and positioned it into the next corner.


After the second corner was cut, I removed the outer edge of excess paper so that it didn’t get caught in the machine. (You can also see that my wax paper is getting smaller. I remove the cut corner portion of the wax paper each time I release the paper from the die.) I repeated this 1 time on each corner until all 4 corners are cut.
This is the portion wax paper part I remove after each corner is cut.
Then I embossed it with using the base plate, rubber mat and pink plate and ran it through the machine again.
After embossing each corner I quickly stenciled the high points of my embossed areas with a light pink ink, and then repeated the process until I embossed and inked all 4 corners. (Yes, that is a make-up powder puff I used to apply the ink with...you can get them cheap at the drug store and they wash up great.) The inked areas really highlight the embossed areas as shown in the photo below.
Next I folded the corners into the center, making sure to fold only at the dotted line. (You don’t want to fold the delicate design area.)

Then to crease the flaps so that they laid down flat, I ran it through my Grand Calibur one more time with my base plate, the rubber pad, and my pink embossing plate. I made sure the embossing rubber mat was touching my embossed leaves so that it didn’t flatten my project as I run it through to crease the folds.
I placed a black 5 ½" square card insert into my card wrap. You can get creative with your card insert, but I just left mine simple here as I’m only demoing the card wrap portion of this project today.

Then I used the large leafy window die to cut the artisan shape for my card wrap seal. I didn’t use the leafy frame, but rather the insert from the center of the leafy frame. I stamped that with my NEW coordinating stamp set from JustRite stamps called Botanical Swirls Labels.
Then I cut the a smaller artisan square using the smaller square die from the set (which has 4 holes punched in it which makes it perfect for threading ribbon.) Then I stamped this piece with the “Love You” stamp from the Botanical Swirls and Labels set from JustRite.
Then I layered my labels onto one another, and thread black checked ribbon through two of the holes on my smaller label, and secured it around my card wrap.
Here are few other ideas for this set:


I wanted to mention that if you start with an 8 ⅛ X 8 ⅛" square (like we did in the project above,) your result will be four corners that fold into the center without overlapping each other. See how the corner looks in this picture below?  That is what you are looking for when using this die to fold a card wrap.

However...

If you start with a square that is 7 ¾ X 7 ¾", your result will be overlapping edges when the corners are folded in. This can be desirable if you are trying to create an envelope instead of a card wrap. You will want to trim the inside corners that are created as you fold as to not add bulk in the folded corners. Then you can glue the overlaps down to seal them like an envelope and leave one of the flaps unsealed for the envelope opening.
Another idea is to buy or create a square envelop and then use the triangle die from this set to simply cut a lacy design in the envelope opening flap.
This set has so much potential for all kinds of projects. I would love to see what unique ways you find to use this set. I can't wait to see what YOU create!


For even more ideas with the botanical set, you should click HERE. Kim Hupke introduces even more fantastic ways to work with this set.

 Next project...

I made this project (or should I say projects) with my Paris Frills set...Oh My Heavens!!! Let me just say...this set has addiction written all over it! There is so much fun girly stuff all in one set!


Do you want to know how I created that 3D Eiffel tower??? 


Well I’m not going to tell you today...you will have to come back tomorrow.


It’s so easy peasy lemon squeezy...
I only use one die...and a little adhesive.
Really!

And those dress forms in the card above...well I’ll show you how you can use your Grand Calibur® like a letterpress to really show off the emboss detail of these fun dies.
One more thing...If you come back, I’ll also show you my new coordinating stamp set that I used on this card. 

So please come back tomorrow to see a few more tricks and ideas.


Now for the contest info:

The Sneak Peek: Spellbinders™ Summer Spectacular! 
Begins on June 21st and will end on June 28th, 2012. It consists of 24 individual prizes and one grand prize drawing. Enter the Sneak Peek: Spellbinders™ Summer Spectacular! by visiting the participating blogs each day.

At the end of each blog post, click on the "Enter HERE" to open the entry form. You may only enter once from each blog each day.
Spellbinders™ will randomly draw one winner from each participating blog to receive that blog’s newly revealed dies. The Grand Prize Winner will be randomly drawn from the pool of entrants who sent entry forms from each and every participating blog during the 48 hours each blog was open. For the full list of official rules please click RULES.

The contest is now closed!


Don’t forget to enter at today’s other participating blogs!


Questions? 


No entries will be accepted at this email address. 

Tuesday, January 17, 2012

New this Week! January 17th, 2012


Samantha Walker doily heart lace edge design for Silhouette.
Valentine tool box digital die cut by Samantha Walker for Silhouette America.

Tent top chevron box digital die cut by Samantha Walker for Silhouette America.

Chevron card wrap for special occasion cards digital die cut by Samantha Walker for Silhouette America.
Hearts card wrap for special occasion cards digital die cut by Samantha Walker for Silhouette America.

Insert for hearts card wrap for special occasion cards digital die cut by Samantha Walker for Silhouette America.

Fancy card wrap for special occasion cards digital die cut by Samantha Walker for Silhouette America.

Insert for card wrap for special occasion cards digital die cut by Samantha Walker for Silhouette America.
Fancy Flower card wrap for special occasion cards digital die cut by Samantha Walker for Silhouette America.
Fancy card wrap flowers insert for special occasion cards digital die cut by Samantha Walker for Silhouette America.
Leaves card wrap for special occasion invitations or cards by Samantha Walker for Silhouette.


Fancy Leaves insert for card wrap for special occasion cards digital die cut by Samantha Walker for Silhouette America.


A little about the card wrap concept, while these are not meant to serve as envelopes, you could adapt them to be used that way.  However, the edges will not overlap, and weren't intended to either. They are merely a decorative wrap that you can use to wrap a special occasion card, then slip both into a square envelope. 

Some ideas with these would be to put a photo behind the lacey card wrap, so that it peeks through. This would make a perfect wedding invitation. You could also insert a piece of vellum, tissue paper, fabric, or cellophane behind the lace to give it a different feel.  These files are here to help you customize a fancy invitation to special event, or to create a special note or Thank You, or for use with any extra special occasion.

Related Posts Plugin for WordPress, Blogger...