Ads 468x60px

Showing posts with label giveaway. Show all posts

Thursday, July 24, 2014

Silhouette CAMEO Giveaway!

Good Afternoon!  We have a fabulous giveaway to share with you today!  
The winner will receive one 
Silhouette CAMEO and a Designer Edition Upgrade!  

Simply enter using the Rafflecopter form below:  

Winner will be announced on our Facebook page on 7/30/2014!

The giveaway details:
  • Winner will receive one CAMEO and a Designer Edition upgrade (provided and shipped by Silhouette)
  • Open to residents of US/Canada, 18 & older
  • Winner cannot have won a Silhouette America giveaway in the last 90 days

...and don't forget about the current Sihouette Promotion!
This month's promotion features...
 a CAMEO bundle which includes:
1 Silhouette CAMEO
1 copy of Silhouette Studio Designer Edition
1 teal CAMEO dust cover
for
$269.99

and 

a Portrait bundle which includes:
1 Silhouette Portrait
1 copy of Silhouette Studio Designer Edition
1 grey Portrait dust cover
for
$149.99

as well as 

40%* off Silhouette Studio 
Designer Edition Software!

To get these deals, simply click HERE and enter promo code SAMANTHA!

Tuesday, August 27, 2013

A BIG Back to School Giveaway!


We have a fantastic giveaway starting today that we are so excited to be sharing with you...


Of course, a giveaway this large couldn't be possible without a partnership between a fantastic group of bloggers and small businesses. Just a few of them include: Spaceships and Laser Beams, Vanessa Grant Events, Go Against the Grain, Michelle's Party Plan-It, We Heart Mom, Design Dazzle, One Inspired Party, Just a little Sparkle, Angelina's Dream Parties, Mimi's Dollhouse, PaperCandee, BellaGrey Designs, hello love designs, Samantha Walker Designs, Petite Bebe, I Will Invitations, Inkberry Cards + Design, We Heart Parties, Simply Sweet Parties, Dandelion Avenue, Cakes And Kids, Made by a Princess Parties in Style, paper & cake, Miss Party Mom, Doodlecraft, Adorable Cakes By Elizabeth, Kimberley's Kitchen, Love The Day, Simply Nesting, Mighty Delighty, Swish Printables, Partystock, Simply Brigadeiro, Lemonberry Moon, Modern Moments Designs, Sweet Petite Soirees, Forever Your Prints, Sweet Dahlia, Cupcake Wishes & Birthday Dreams, Party Patisserie, The Family Map and Cupcake Express.
And that's not everyone! Please refer to the Rafflecopter form to see a complete list of all the generous sponsors who made this giveaway possible!
Prize: One winner will receive $1400.00 USD
Eligibility and Rules: This giveaway runs from 11:59PM ET on August 26, 2013 to 11:59PM ET on September 17, 2013. It is open to individuals over the age of 18. The winner will be chosen randomly through the Rafflecopter form. It is the sole responsibility of the winner to adhere to all laws in their respective country, which includes payments to any governing tax body. This giveaway is void in any country where it is prohibited by law.
Claiming Prize: The prize will be sent via PayPal. The winner must claim their prize within 48 hours of receiving notice. If you do not claim your prize within this time frame, your entry will be void and another winner will be drawn. We don't want to have to do this! Please ensure that the email spaceshipsandlaserbeams [at] gmail [dot] com is on your "safe list."
Disclosure: This giveaway is a blogger-sponsored event that is in no way affiliated with PayPal, Facebook, Twitter, Pinterest, Instagram or any other social media channel. If you have questions about the administration of this giveaway, email Stephanie at Spaceships and Laser Beams at spaceshipsandlaserbeams [at] gmail [dot] com.

Please use the Rafflecopter form below for your entries!
All entries are optional however the more you complete the more chances you have to win!
Good luck!

Tuesday, August 06, 2013

Silhouette Promotion and Silhouette Cameo Giveaway!


Good morning!  We are excited today to be bringing you another 

Silhouette promotion along with another fabulous giveaway!


Now through August 14th when you use promo code SAMANTHA you can purchase the following deals...


Silhouette CAMEO®, 2 rolls of vinyl (chalkboard and white) 
and 1 roll of transfer paper for $269.99
AND
Buy one get one free deal on all Silhouette vinyl...
and that included transfer paper and stencil vinyl!

Just click HERE to start shopping!


Today Jamie is sharing a quick vinyl project she created for the back of her phone case.

* * * * *

Hi guys!  Jamie here with you this morning to share a fast and fun project to personalize your phone case!  I started by cutting out Samantha's 4-Piece Scissors cut with silver vinyl and layering them together and then I used Sophie Gallo's Create cut in the pink vinyl.  
I used the Silhouette Hook tool to weed the pieces from the vinyl and then placed them on my phone case.  I love that I can change the vinyl easily to switch between designs!

* * * * *

Are you ready to hear about how you can enter to win a Silhouette Cameo?
The giveaway runs now through 12:00a August 12th and is open to US residents.
SImply use the Rafflecopter form below and enter as much as you want...you can even refer friends on Facebook for extra entries!


We will announce the winner on Monday 8/12 on Samantha's Facebook 
and will email the winner as well!

Good Luck!

Monday, July 01, 2013

Silhouette Portrait Giveaway | Silhouette Studio Designer Edition Promotion!

Good Morning!  Today we are back with another fabulous Silhouette promotion and thanks to the great folks at Silhouette, we are also giving away another Silhouette Portrait and this time it will come packaged with the Designer Edition of their software!

First, let's talk about the new promotion...
Now through July 10th you can grab these fantastic deals...
Silhouette CAMEO® plus the Silhouette Studio® Designer Edition software for $269.99
Silhouette Portrait™ plus the Silhouette Studio® Designer Edition software for $129.99

and if you already own a machine, you can grab the
This is such a GREAT deal!
Just click HERE and enter code SAMANTHA!

For those of you who are not familiar with the Designer Edition of the Silhouette Silhouette Studio® software, it has even more versatility than the free software and provides several supplemental features too! Developed with the designer in mind, the Designer Edition includes additional eraser, knife, and file import options (including the ability to import .svg files). It also offers the ability to create intricate rhinestone and sketch patterns and works with all Silhouette electronic cutting tools!  It is also compatible with Windows XP and newer, Mac® OS X 10.6.8 and higher.  You can find a product video here.

*****

Today Jamie is back using the Silhouette Studio Designer Edition Software 
to create this gorgeous Corsage Box!
Here's the tutorial so you can create your own!
 1.  Import the 3D Window Corsage Box and the Spiral Flower.  Copy the flower and paste so you have two.  Load your paper on your physical mat and cut.  Remove the pieces from the mat.
2.  Remove the box and one of your flowers and enlarge the remaining flower.  Place a coordinating piece of paper on your physical mat and load it into your machine then cut the flower.  Remove the pieces from the mat.


3.  Fold the box on the score line.  If desired, cut a piece of clear paper to cover the window and adhere in place.
4.  Place adhesive on the two front tabs (closet to the decorative edge) and then adhere them to the sides as shown.
5.  Place adhesive on the two back tabs and adhere them to the sides.
6.  Next place adhesive on the four middle tabs.  Adhere the two back tabs to the back sides and the two front tabs to the front sides as shown in the image above.
7.  Bring the top of the box over  and press the tabs underneath the decorative edge.
8.  For each of your flower pieces, start rolling them from the edge.
9.  Continue rolling until it looks like this image.  Slide the flower off your tool (or pencil) and apply adhesive to keep its shape.
10. Cut a piece of ribbon and tie it in a bow.  Adhere the bow to the right corner of the window area.
11. Adhere your larger flower just above the bow.
12. Place in one of your smaller flowers as shown.
13. Finish the box by adhering on the third flower then fill your box as desired!


Now, on to the giveaway...


Good Luck!

Thursday, June 20, 2013

Summer Splash Cash Giveaway!


Welcome to the Summer Splash Cash Giveaway!
We have joined together with an amazing list of party planners and small business to achieve this big giveaway which will give one lucky winner $1200 USD in funds via PayPal! They include: Spaceships and Laser Beams, This Little Mama, Mimi's Dollhouse, Samantha Walker Designs, Petite Bebe, Angelina's Dream Parties, Flaired Affairs, Vanessa Grant Events, Yumtastics, Ribbon Revelry, Cupcake Express, Cupcake With Character, Inkberry Cards + Design, One Swell Studio, Simply Sweet Parties, Unlimited Party Themes, One Inspired Party, Hello My Sweet, Miss Party Mom, Get Scrooged, Printable Parties to Go, Party Pants LLC, Katarina's Paperie, Dorothy Kurzydlowski Photography, Party Printables, Itsy Belle, We Heart Parties, I Will Invitations, Confetti & Crumbs, Karo's Fun Land, Chic n Sweet Candy Buffets, FLIPAWOO Designs, Just a little Sparkle, Giggles Galore, Nancy Veitenhans Jamberry Nails Independent Consultant, Party Dime Time, Paige Simple Studio, Fancy & Fold, Go Against the Grain, Gabrielle's Cottage, Design Dazzle, Myour Stories Designs, Bloom Designs Online, and Amy's Party Ideas.
And that's not even all of them! You can see the full list of everyone involved in the Rafflecopter form. Without everyone working together this would not be possible.

Prize: One winner will receive $1200 USD in funds via PayPal. 
Talk about summer fun!

Rules: Contest is open from June 20, 2013 at 11:59PM EST to July 11, 2013 at 11:59PM EST. The winner will be chosen randomly through the Rafflecopter form. The odds of winning depend on the number of people who enter. Giveaway is open worldwide to all participants 18 years of age and older. Void where prohibited by law. The winner will have 48 hours to claim their prize. Should they not claim their prize within this time, another winner will be selected. Please ensure that the email spaceshipsandlaserbeams [at] gmail [dot] com is on your "safe list" as we would hate for you not to get your prize!

Disclosure: This is an independent blogger giveaway. It is in no way associated with PayPal, Facebook, Twitter, Pinterest, Instagram or any other social media network. I did not receive money to be part of or promote this giveaway. Should you have any questions, please contact Stephanie at Spaceships and Laser Beams via email at spaceshipshipsandlaserbeams [at] gmail [dot] com.


USE THIS RAFFLECOPTER FORM TO 
ENTER TO WIN $1200 IN SUMMER SPLASH CASH!


GOOD LUCK!

Tuesday, May 28, 2013

The winner of the Silhouette Portrait is….

The winner of the Silhouette Portrait giveaway is Dianne Bell!
Congratulations Dianne!


The Silhouette Promotion continues through Friday, May 31st!
Just click HERE and use the code SAMANTHA

Thursday, May 23, 2013

Silhouette Portrait Giveaway!

Good morning and happy Thursday!  
Today we are back with another fabulous giveaway sponsored by Silhouette!

All you need to do is enter below. You can earn multiple entries by following us on Facebook, commenting below, tweeting about the giveaway, and signing up for email updates. This giveaway is open to US customers only.


You are going to love all that you can do with your 
Silhouette and these fabric interfacings!

Jamie is sharing an adorable onesie she created using the Dog Puppy Silhouette cut, the Clean Cut Fabric Interfacing, and the Serenata fabric collection!  


Tutorial:
1.  Cut a piece of the Clean Cut Fabric Interface a little smaller than your fabric.  Place the textured side down on the back of your fabric.
2.  Use a hot iron to adhere the interfacing to the fabric.
3.  The back of your fabric should look like this now.
4.  Remove the backing from the interfacing.
5.  Place the fabric on your Silhouette mat.
6.  Insert your Fabric Blade into your machine and load your fabric.

7.  Move your design to match where your fabric is on your mat and then press the "send to silhouette" button.  Change your cut setting to "fabric cotton print" and make sure your blade is adjusted properly.  Press "cut".

 8.  Your Silhouette will cut your design.
 9.  Unload your mat once the cut is complete and remove the fabric.
10. Your cut should look similar to this.  Remove the design from the mat.
11. Place the design on your onesie and place it where you want it.
12. Iron the design on.
13. I used the Clean Cut Fabric Interfacing for my project and then hand-stitched the edges.  If you want to use a machine to sew on your design make sure you use the Sewable Fabric Interfacing.


If you already have a Silhouette, be sure to take advantage of the promotion!  You can get both the Clean Cut Fabric Interfacing and the Sewable Fabric Interfacing plus the Fabric Blade and a $25 download card for just $29.99!
Just click HERE and use promo code SAMANTHA!


Sunday, May 19, 2013

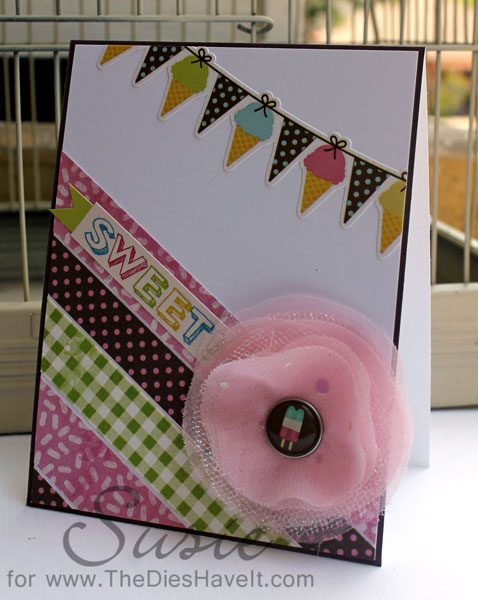
Sweet by Susie Moore

Susie here and I can hardly wait to share today's tutorial with you.  I am using papers and elements from Samantha's new collection called Cool Summer.  I am in L-O-V-E with the brads that come with this collection.  And I knew immediately what I wanted to make with the larger ones.  Take a look:


The larger size is just perfect for hiding the stitching that gathers up this sweet little gauzy flower.  Here are the steps to making this flower and also a peek into how I made my card base.

I used three sizes of circle Spellbinders dies to make my flower.  You could hand cut your circles because they do not have to be perfect.  I grabbed a few layers of some satin fabrics and added in some sparkly tulle too. 


When cutting fabric with dies, I find it best to place a piece of card stock under the layers.  It may or may not cut into the card stock, but it does help cut the fabric.  I ended up with lots of circles!


These are the pieces I used on my flowers.  I had leftovers to use on another flower later.  I stacked the layers and then offset them just a little because I was not going for perfection.


On the top of my layers, I ran a few basting stitches through all the flower layers.  I used blue thread here so you could see.  I made a circle of stitches and then poked the needle through the back and pulled the thread tightly to gather the layers.  Then I just knotted the thread.   I poked a hole through the center and inserted a large brad which covered my crazy stitching.  It was perfect!  Before I spread the prongs out, I added a circle of card stock to the back.  This is not necessary, but I found it easier to glue paper to paper instead of paper to metal when finishing my card.

Now that the flower is done, let me show you what my card base looked like before trimming:


I cut strips of Cool Summer papers and adhered them diagonally across the bottom of the card.  Then I took part of the ice cream border from the elements pack and placed it at the top.  A few quick trims with my craft knife later, I had the card base that you see in my original photo.

I just added my flower and the "Sweet" sticker to complete my card.

I hope you enjoyed today's tutorial.  And I hope you will make some flowers of your own soon.

And here is a little look at the Cool Summer Collection:

Links to products used in this post:


Saturday, May 18, 2013

Layered Layouts Without The Bulk by Diana Fisher


Hi! Diana Fisher here with you today. I'm going to give you some tips and tricks on making a layered looking page without all of the bulk. I know many of us love this look, but are disappointed once we try to jam them into our albums. Here are a few tricks I use on my pages.

First, I love 6x6 paper pads. Samantha Walker has a Cool Summer 6x6 paper pad offered through Carta Bella. The designs are perfect for those summer pages you are about to make.

6x6 paper pads offer smaller prints and patterns as well as the perfect size for doubling up the papers. These papers also tend to be a lighter paper weight and less bulky. 


To get started, select a few of papers and put them on your page. I chose a center focal point and single picture for my layout. I picked two coordinating papers from the pad and layered them in the middle.

Take a look at some of the other papers you have and choose a couple more. Use only about half of that sheet at 6x3. Pick some accents, too, and start to move them around on the page.


When you feel good about your few layers, go ahead and glue them down, leaving the edges without adhesive. Now, you can take small squares of other patterns and tuck them near your edges. 

2x2 or 3x3 inch squares work pretty well and you can start to glue them in-between your 2-3 main layers. It will add the layered look without the bulk of full sheets.


If you have coordinating embellishments like Cool Summer has, go ahead and begin to layer those in as well. Even with all of the different patterns and papers I used on this page, nothing is higher than a piece of chipboard. It should go nice and neat into an album when I'm all done. 


Thanks for stopping by here today to learn a little bit about layered layouts without the bulk. If you don't have one already, grab a 6x6 paper pad and start to play around with the different layering affects you can get with them.
-Diana

*******

Monday, May 13, 2013

...and the winner is


Alysa Dominguez!
Congratulations Alysa! You have won the Silhouette Portrait Die Cutting Machine!
We have sent you an email this morning!

*****

Remember there is still time to take advantage of the current promotions with Silhouette. Just click HERE and use the code SAMANTHA


Thanks to everyone for participating in our hop! 
We hope to see you again in June! 


Sunday, April 21, 2013

...and the winner is


Before we announce the winner, we wanted to remind you that the 
Silhouette promotion will run through Friday, April 26th!

SAMANTHA

Do you already own a Silhouette machine?  You can order the premium vinyl 25% off! 
This is the 9" by 10' rolls and is for indoor and outdoor use!  An AMAZING deal!  Silhouette use to charge $14.99 for this vinyl and recently discounted their price to $9.99...and now they are giving us 25% off of their new price!  Yes, we are excited!  All you have to do to take advantage of these savings is click HERE and use the code SAMANTHA at checkout!


And now for the Silhouette Portrait winner...


Glenna Anderson said...
Already a follower on your blog. I love all the projects you make with the Silhouette. Thanks for the chance to win.

Congratulation Glenna!  Please email your postal address and contact information to  social.samanthawalker@gmail.com so we can send you this amazing machine!


Saturday, March 02, 2013

Spellbinders projects


Today I am working with my new Butterfly Corner and Ornate Square dies!


But first...

Shhhhh....I'm going to let you in on a dirty little secret...I take shortcuts! 

I do it all the time, because I am human...
and as such, I often get caught up in life. It creates the need to find ways to modify how I do things, so that I can fit in all the things that I want and need to do in a day. 

So here's one of my favorite quick crafty-tips that can save you a bundle of time when you are in need of a quick card, or crafty gift. 

On days when I do have a good slot of time to get my crafty on...I work double time with my Spellbinders Grand Calibur...

As I'm working on my project, I get out my paper scraps too--you know...the ones too small that you think you ought to throw them away...

but no...don't do that...

Instead, while you have all your crafty stuff out, run those scraps through your Grand Calibur with some of your favorite Spellbinders dies and then save them in a special place for a day when you don't have much time. 

I like to file my "pre-cuts" in a file labeled with the die set they were created with. That way I can find them on the fly when I really need to craft fast. This works great for Birthday cards, tags for gifts, or even holiday crafts that need a special shape. 

I have learned to craft this way, especially right now, as my craftroom is in serious limbo. We have been working to finish our basement for over a year. (My husband has been doing a fabulous job, but it is definitely a process.) I have a lot of my crafty stuff packed in boxes, or stashed here and there as it awaits a permanent home. So I find myself using my dining room table as my craft zone, which is not ideal, when you have to gather everything up, and then put it all away before dinner. 

This week has been crazy. Parent teacher conferences, school projects, swim team stuff, gymnastics, music lessons, deadlines, and more deadlines...it's all good stuff...but my week went by so quickly, that it left little time for crafting. 

This was the perfect week to get out my pre-cuts, and make some quick cards. It took me about 20 minutes to complete all three cards...and then I was off to my last parent teacher conference of the week. 

I went through my files and quickly found some colors I wanted to work with that had been cut with my newest dies from Spellbinders. 

Even though I did not have much time to craft this time...I wanted to make sure each project had something special, or a little twist in the design. I'll walk you through what I did in each project below:
For this first card, I took the tag die from my Ornate Square set and did what I call a "double take." That's where I use a die that is shaped one way, and make it appear another way by criss-cross stacking it with a duplicate cut. It's a great way to change up your die sets to get lots of looks from one set. So the original tag die is rectangular...by stacking it, I made it appear as a square. Then to add a little finishing touch to my card, I took some fabric and ran it through the center of the tag, like ribbon. I added a few knots for interest. In this case, I had also "pre-stamped" this with my coordinating stamps from JustRite, when I did my cutting session on a prior day. I just filed it away stamped and ready to go for a quick card. 
-Spellbinders, Samantha Walker, Ornate Squares Die
-Just Rite Clear Stamps Samantha Walker Botanical Swirls
-Carta Bella cardstock Traditions by Samantha Walker
-Riley Blake Fabric Serenata by Samantha Walker

Here's another pair of cards that I created on the fly...
Once again these were created with pre-stamped pre-cuts, that I created one day, and filed away for a day when time was short. 
I have two twists on this card...I first split my butterfly into two separate wings...to embellish the sides of my "happy" tag. Don't you feel like you have wings when you are happy? I thought it was a fun way to say "happy." The next twist on my dies, is that I took the smallest square from my Ornate Squares set, and just snipped off the ornate corners to use as a layered lace edge at the bottom of my tag. It was something simple, that really made for a nice way to "ground" my tag design...after all I had just given it wings...I didn't want it to fly away just yet. ;) 
-Spellbinders, Samantha Walker, Ornate Squares Die
-Spellbinders, Samantha Walker Butterfly Corner Die
-Just Rite Clear Stamps Samantha Walker Botanical Swirls
-Carta Bella cardstock Paris Girl by Samantha Walker

I did another "double take" on this card. I used my largest ornate square die, and criss-cross stacked it to make it go from a square shape to a lacey snowflake shape. I also double stacked two of my butterflies from my butterfly corner set to give it a little lift. 
-Spellbinders, Samantha Walker, Ornate Squares Die
-Spellbinders, Samantha Walker Butterfly Corner Die
-Just Rite Clear Stamps Samantha Walker Botanical Swirls
-Carta Bella cardstock Paris Girl by Samantha Walker


Since I made such quick projects for this blog frenzy, I wanted to make sure that I left you completely satisfied with some "knock your socks off" inspiration...so I asked my uber talented creative team to help show off my new dies with their interpretation.  

You'll LOVE what they did!

Supplies:
Die Cuts: Butterfly Corner and Ornate Square by Samantha Walker (Spellbinders)
Patterned Papers: Traditions by Samantha Walker (Carta Bella)
Stamps: For All You Do Vintage Labels Three by Samantha Walker (JustRite Stamps)
Tools: Grand Calibur (Spellbinders)
Cardstock: Cream (Recollections and Bazzil)
Ribbon: Cream Crinkly (May Arts)
Twine: Buttercream (The Twinery)
Pearls: Cream (The Paper Studio)
Wood Chips: Hearts (Freckled Fawn)


 Projects below all by Aimee Maddern:
Supplies:
-Spellbinders, Samantha Walker Butterfly Corner Die
-LCI White Wood Grain Cardstock, Bazzill, 
Bo Bunny & American Crafts Cardstock
-Heidi Swapp Color Mist in Sweet Cherry & Primrose
-Dylusions ink spray in Cut Grass
-Mister Huey’s in Hot Dog, Lemonade & Bonny Blue
-Sequins, Misc
-3L adhesive squares, Glossy Accents


Supplies:
-Spellbinders, Samantha Walker, Ornate Squares Die and Butterfly Corner
-Just Rite Clear Samantha Walker For All You Do Vintage Labels Three Stamps
-LCI White Wood Grain Cardstock, Bazzill, Bo Bunny 
& American Crafts Cardstock
-Heidi Swapp Color Mist in Sweet Cherry & Primrose
-Mister Huey’s in Hot Dog,
-Charcoal Twine from the Twinery
-Hat Pin From My Minds Eye
-Sequins, Misc
-3L adhesive squares, Glossy Accents


Supplies:
-Spellbinders, Samantha Walker, Ornate Squares Die
-Just Rite Clear Samantha Walker For All You Do Vintage Labels Three Stamps
-Card Stock, Misc
-Stayton Ink in Timber Brown
-SEI ink in Tobacco
-Cantaloupe Twine from the Twinery
-3L adhesive squares, Glossy Accents

Related Posts Plugin for WordPress, Blogger...