Ads 468x60px

Showing posts with label Allie Gower. Show all posts

Tuesday, July 22, 2014

New Silhouette Promotion and a Silhouette Studio Tutorial!

It's that time again!  
Today we are introducing a new Sihouette Promotion!
This month's promotion features...
 a CAMEO bundle which includes:
1 Silhouette CAMEO
1 copy of Silhouette Studio Designer Edition
1 teal CAMEO dust cover
for
$269.99

and 

a Portrait bundle which includes:
1 Silhouette Portrait
1 copy of Silhouette Studio Designer Edition
1 grey Portrait dust cover
for
$149.99

as well as 

40%* off Silhouette Studio 
Designer Edition Software!

To get these deals, simply click HERE and enter promo code SAMANTHA!

Creative Team Member Allie created this fabulous 
First Aid Box and is providing a detailed Silhouette Studio tutorial too! 


Hey there, it's Allie from My Card Party and I have 
fun tutorial that will help you customize your projects!


I'm using shapes #62208 (Circle Basket with Small Bow) to create a little first aid basket for my medicine cabinet. I have a full sized first aid kit in the kitchen, but I hate dragging it out for a simple cut. I thought I'd just make a tiny basket to hold the ouchie essentials.

Let's get started. I'll walk you through all the steps using some of the Designer Edition tools. With these great features, you can really style your projects to suit your needs.

You'll need some red cardstock - a scrap will do, and white cardstock - I used a sheet of 8.5x11". 


I'm using the basket with a bow, but I will not be needing the bow. 
I also don't need the basket to be very big, so I've reduced everything to 75%.


To add a cross, start by drawing a rectangle. Align it with the middle of the basket by selecting the basket and the rectangle and using the ALIGN feature.


Copy the rectangle and rotate it by 90 degrees. ALIGN.


Group the two rectangles and WELD.


To get it aligned I added a rectangle for reference and then made sure it was centered nicely.
Delete the rectangle when you are done aligning.


OFFSET the cross and create an outline.


Change lines to dotted to create a stitched effect.


Make an extra copy of the stitched cross. 
Note: Change the lines back to regular cutting lines.
I've changed it to red so you can see it, this will be cut from red cardstock.


Using the OFFSET tool, make an INSET LAYER of the strap. 
I've colored it red just so you can see it. This will also be cut from red cardstock.


Ungroup the outer strap and the holes.


Pull away the outer strap and delete. Now you have a smaller strap with holes, to match the first one you cut out.


Assemble basket. The red cross will go inside. You only need to put a little bit of adhesive in between the stitched shape and the opening.

This little project is super affordable and easy. Now it's your turn, go on and customize one of these fun baskets for any occasion!


I filled it with two sizes of bandages, some antibiotic ointment and some lifesavers.
Something sweet makes an ouchie all better!


Here's my basket in action, at home in our medicine cabinet.

Thanks for joining me today.

Remember, these deals end July 31st!
Click HERE and enter promo code SAMANTHA!

Sunday, June 29, 2014

Creating Shaped Cards from Label Sets with Allie

Hi, it's Allie from My Card Party and I have a fun tutorial for you today, a shaped card. I thought this would be the perfect card for a friend and her little girl.


You'll need two of Samantha's files and a font, along with 
some cardstock and patterned paper.

Cutting Files:

Fancy Label Set (#20137)
Fancy Label Set (#20321)

Shown below are the two files. We will not need all the pieces.

Here's the shapes we're using.


We'll flip both shapes vertically. For the upper label, release the compound path, and inner offset the inside mat. For the bottom piece, we'll release the compound path again and create two copies of the outer piece. I've colored the pieces so you can see where they go in the card.

Resize pieces to fit the way you would like them. I like to arrange them right on the screen to see how they'll look. Add a score line to one of the large peach mats, as shown. I like to go to the right of some of the detail, because that won't hold up well to folding.

(Tip: If you hold down the shift line while drawing a line, you get a perfectly straight line.) 

Cut your pieces out and embellish as desired. I used a stamped, colored image along with flowers and bling. When you adhere your front mat to the back mat (the one with the score line), you'll only place adhesive to the LEFT of the score line.


Thanks for joining me today. There are a couple of different ways to create a shaped card, but I find this one easy. I hope you do too!


Tuesday, May 06, 2014

Paris CD Holder with Allie!

Hi, it's Allie from My Card Party and I have a fun tutorial for you today, a decorated CD Holder. I thought this would be the perfect gift for a friend's Mom - it will hold a CD filled with pictures and music inspired by their recent trip to France.

You'll need three of Samantha's files and a font, along with a sheet of her fun Parisian Poodle paper from the Carta Bella collection Paris Girl.

Cutting Files:
Eiffel Tower (#41675)
Curved CD Holder (#46575)
Font: SW Par-Tay Font (57535)

I start by cutting out the CD Holder, at the exact size it appears.
Next, I cut the 5 Flower Corner - I like to layer it right onto my other shape to see how it will fit.


I delete the CD Holder, leaving behind the foliage.
Then, I ungroup the foliage and drag away the parts I don't need at the moment.


I cut the bottom outline in green.


I delete the outline and bring back the foliage. I eliminate what I don't need, and cut the leaves in green. I've put an x over the parts I delete.


Next, I cut Paris with a few modifications. I swapped a small circle for the dot on the i and weld everything together. Size shown.


I pull all my files back together and size the Eiffel Tower to fit, then remove the other parts and cut it from black cardstock.

Assemble as shown. When adhering anything to the outside of the CD Holder, make sure to ONLY put adhesive on the bottom corner, so that your CD Holder will open.
I inked the foliage and applied Shimmer Texture to both the bottom layer and the separate leaves. The leaves are attached only by the stem, for a fun 3D effect. I also bent them slightly.
I used hot glue to apply the flowers to the foliage.
I use a pin to apply adhesive where the letters will touch the flowers.


Supplies:

Digital Cutting Files: Samantha Walker: Eiffel Tower (#41675); Curved CD Holder (#46575); Five Flower Corner (#7638); Font: SW Par-Tay Font (57535)
Patterned Paper (Parisian Poodle)
Cardstock (green, black)
Flowers (Wild Orchid Crafts, Prima)
Rhinestone Flourish (Want2Scrap)
Heart (chipboard painted, inked and embossed)

Thanks for joining me today. Happy Mother's Day.

Saturday, April 05, 2014

TEXTING Silhouette Style by Allie!

Samantha has this fun new Par-tay Font [#57535] in the Silhouette Online Store and much like the image states, it welds well!

Have you welded? Welding makes applying text to your projects easier, especially for vinyl projects. In addition to welding, let me walk you through some other fun things you can do with fonts to make your projects more fun.

Fun things to do with fonts
New Par-tay Font from Samantha Walker

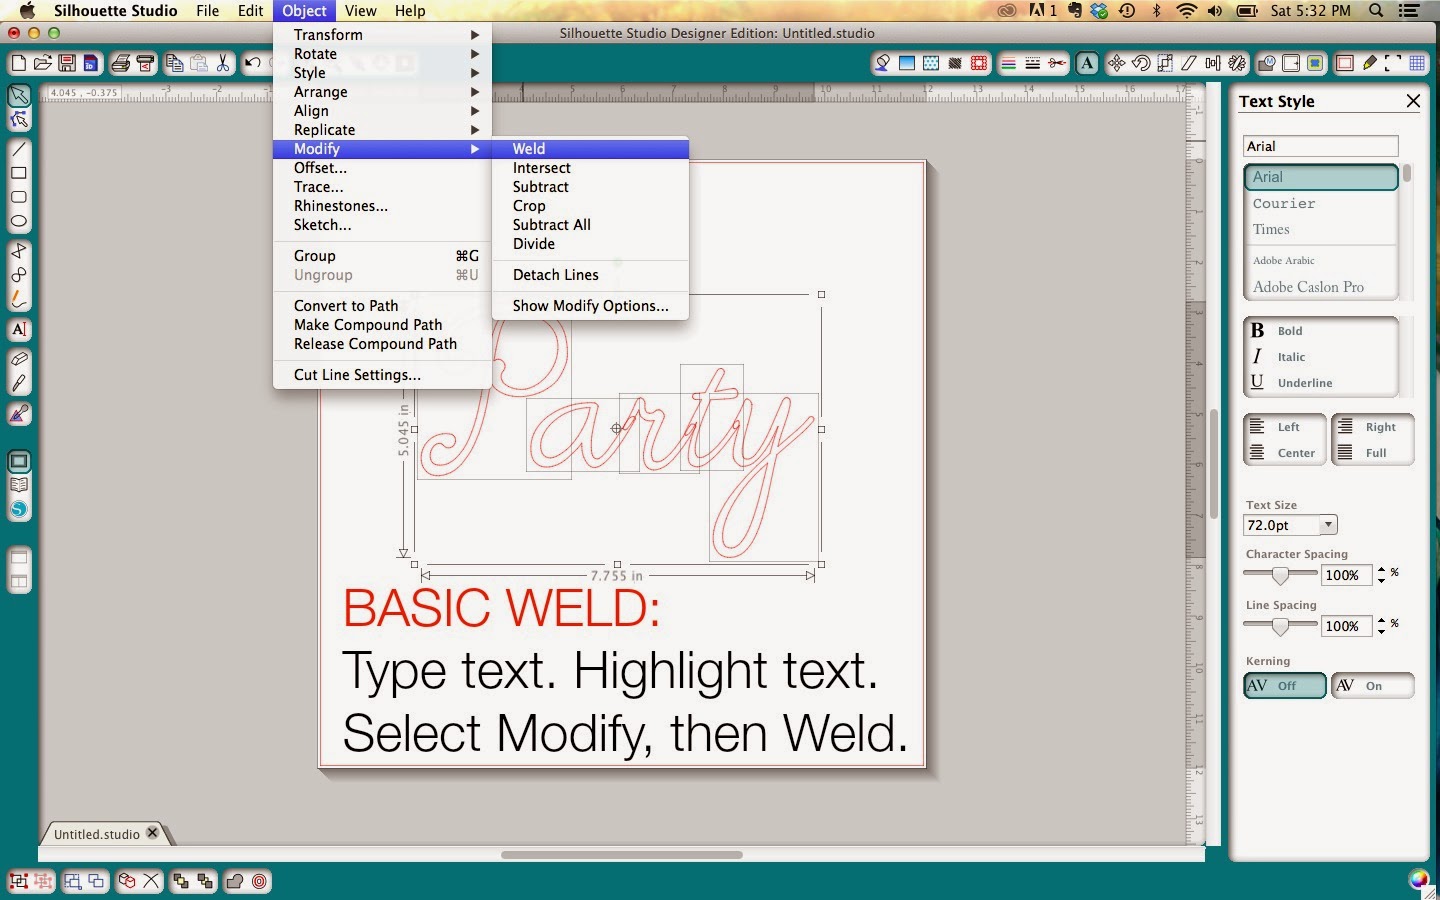
For a Basic Weld, type your word, select the text and choose OBJECT then MODIFY and select WELD just as it's shown below. Any overlapping letters will then be combined.


What if you want to weld your words and make them shaped, for example the word Rainbow over an actual rainbow?

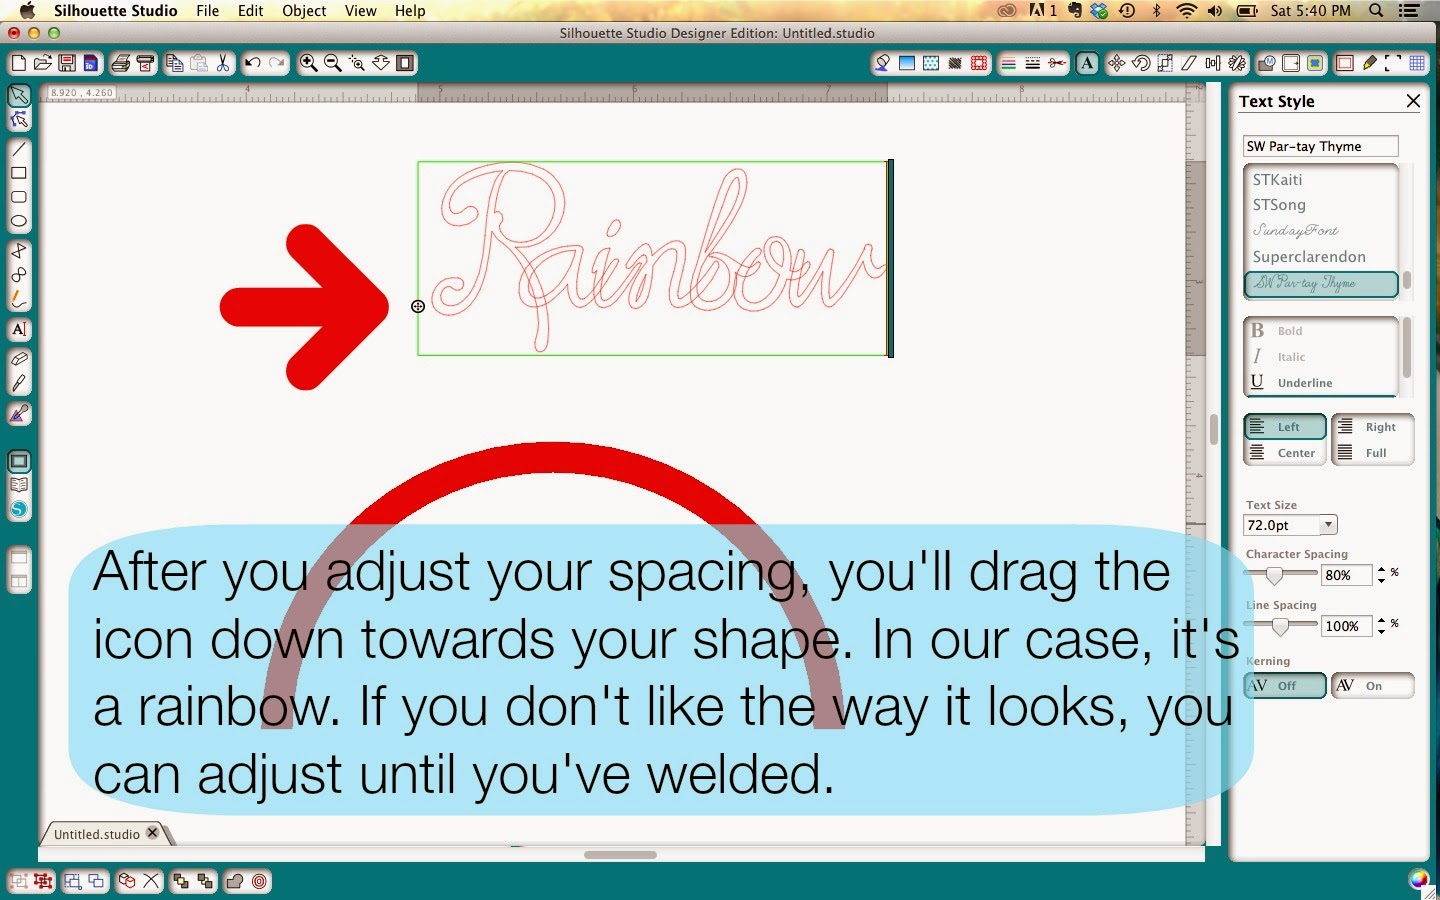
Since you're curving your text, you need to space the letters a little closer together. Adjust your character spacing. When you click on the little A to type your text, the Text Style menu opens. The arrow below is pointing to the Character Spacing option. I found 80% to work well for the Par-Tay font. Sometimes, a little trial and error is necessary.

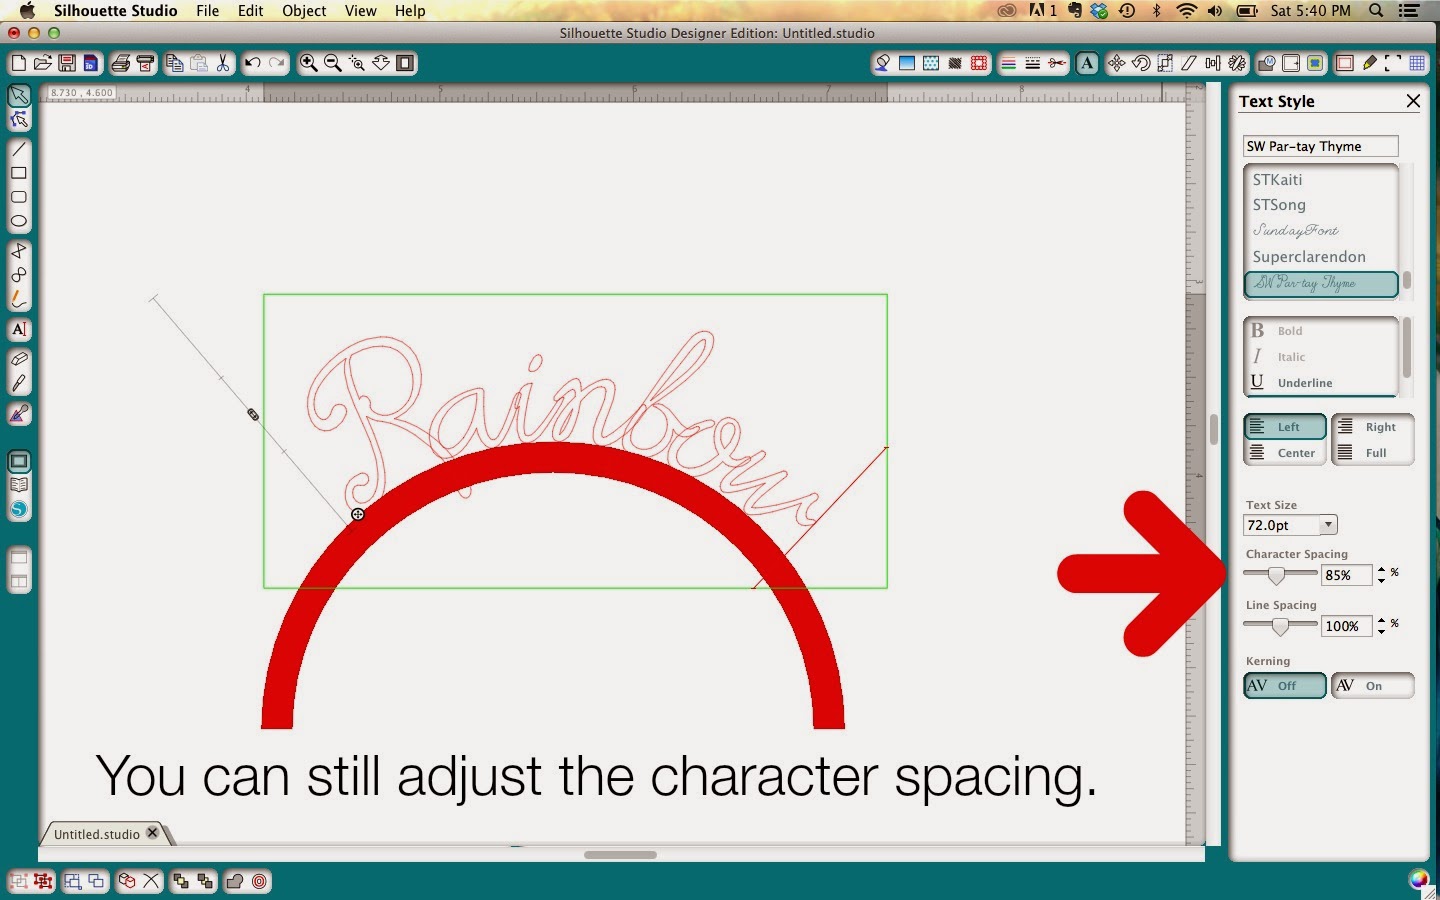
 If you adjust and then curve your text and it's too far apart, or even too crowded... you can still adjust the Character Spacing until it's welded.


To curve the text, you'll click on the little round circle (shown above - on the lower left side of the box of text). Pull it down to the object until it curves. You can drag it along and place it wherever you like. This works on any shape, and can even be used inside the shape - just pull past the shape.

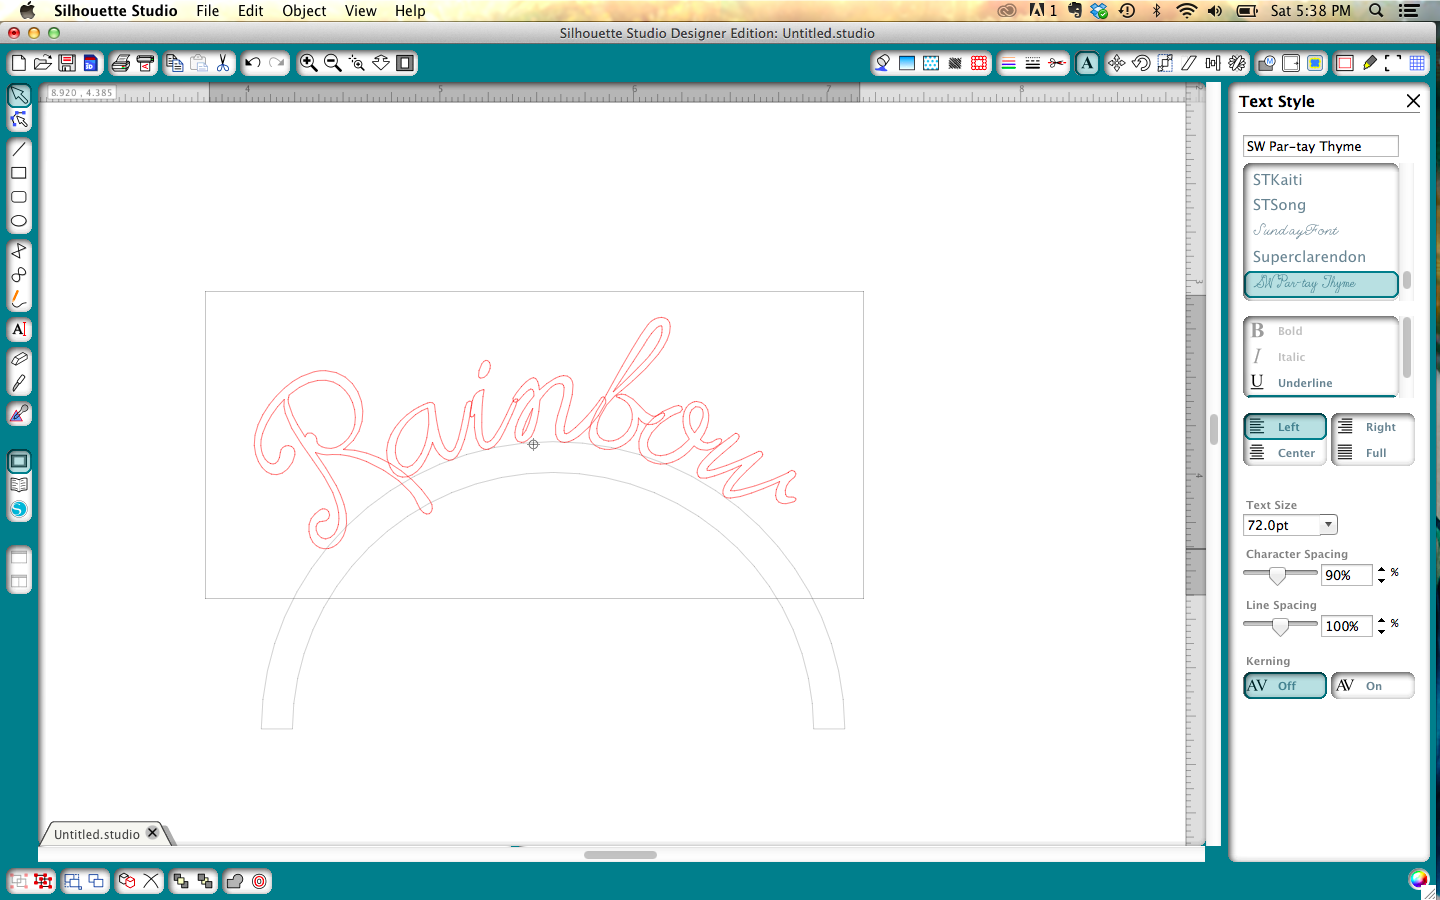
 Voila, you've curved some text. Note, I've turned this upper layer of the rainbow red just so you can see better.

Now don't forget to weld!  (not shown)


 If you're still with me, and you've mastered all that, let me walk you through some of your other text options.


There's a little icon that looks like a forward slash ... just like this character -  
This tool opens the SHEAR menu and lets you adjust the shear horizontally or vertically, also known as kerning.

Each picture shows you what that option would look like.

HORIZONTAL SHEAR PLUS 30ยบ

HORIZONTAL SHEAR MINUS 30ยบ

VERTICAL SHEER PLUS 30ยบ

VERTICAL SHEER MINUS 30ยบ


Obviously you can kern more or less, using any of the tools, and you can even customize. You can still curve (that is, shape) kerned text as well.

I really like to customize text and make it work for my projects.

I'll share one more thing. Some text is just too thin, and maybe you're frustrated because you like it but you can't cut it out of certain materials. Lavenderia Script was just like this for me, but I thought it was so pretty.

Note: If you want to shape your thin text, you will want to shape first and then proceed with the offsetting. You'd also follow this procedure to mat words.

I offset the word Merry to .07. You can easily do this with the Par-tay font as well.


Thanks for joining me today.

Happy TEXTING!


Saturday, March 22, 2014

Matryoshka Dolls - A Print and Cut Tutorial


Print and Cut is a two part process. Your printer prints, and your Silhouette cuts. You can print and cut your own images, fill images with printable patterns, or just use items from the Silhouette store that are ready to Print and Cut. Today, we're cutting one of Samantha's images that is ready for the Print and Cut process. 

The small P indicates this project is for Printing and Cutting.

Silhouette has a step by step tutorial as well, and that can be found here.
  1. Open a new file.
  2. From the FILE menu, select Page Set Up. Because I'm printing on 8.5x11 cardstock, I chose US Letter, then clicked OKAY.
  3. From the FILE menu, select Registration Mark Settings and check the box "Show Reg Marks" - I also increase the Reg Mark Size to Thick. (see below) 
  4. Open your chosen Print and Cut image from your Silhouette Library. I opened and made an extra copy, and rotated the two images 90ยบ Clockwise. I'm using the Accordion Fold Matryoshka Doll #14597 designed by Samantha Walker for the Silhouette Online Store. 
  5. Send the project to your Silhouette. Select "Click here to print." and print your project.
  6. Place your printed page onto your Silhouette mat in the same orientation it appears on your screen. Send the project to your Silhouette. Select "Click here to skip printing." Follow directions and "continue." Now you will see the Cut Menu. Select "detect automatically." Your Silhouette will immediately begin to register the marks. Nothing is being cut at this time. Once the registration mark detection is completed, you will then have an option to CUT.
If you plan to re-create your project, just save your project, reopen and repeat steps 5 and 6.

For those of you that prefer a video, this video is provided by Silhouette. The project uses Silhouette's White Sticker paper, but the Print and Cut process would be the same.


Note: For best results, use a nice cardstock. I have my images printed locally for just .17 on my printer's "House" cardstock(Pegasus by Mohawk papers) and it looks really nice and cuts very smoothly. I make sure to use a clean mat in good condition. If you have debris or some deep cuts, it can throw off the cutting ever so slightly, and you may not be as pleased with the results. If you find that your image is not being cut well even with a nice mat and quality paper, you may need to calibrate. Please refer to Silhouette's Calibration instructions here

Now that we've cut our Matryoshka Dolls, let's make something!

I am wrapping a gift, so I thought a doily would look nice on top. I'm using Samantha's Doily Making Set #42323, but just two of the pieces.

  1. Open Doily Making Set from your Silhouette Library.
  2. From the Object menu, select Ungroup.
  3. Delete the parts you won't need. I've deleted all but the largest doily and the middle mat. 
Select UNGROUP from the OBJECTS menu and click on any pieces you don't want, then delete. I'm using the largest doily and the mat directly underneath. I dragged the mat away and filled it in with red. See below. Note: If you'll be moving the doily, be sure to highlight all the pieces and "re-group" - it's 


I like to color my pieces just so you can see what's what in the finished project. I'm cutting the doily in white and the mat in red.


Once my pieces were cut, I matted the doily on some patterned paper and tucked the folded Matryoshka Doll on top of the doily under a Hemp bow and a few flowers. I wrote a little message on the back of the doll. The card slides right under the knot in the Hemp bow and flowers and can easily be pulled out, no adhesive needed.

Supplies:

Pegasus Cardstock by Mohawk, Red Cardstock, Patterned Paper (October Afternoon), Kraft Paper on the Roll (available at Amazon), Hemp/Jute, Flowers (Prima, Wild Orchid), Adhesive (ThermoWeb, AdTech)

Tuesday, February 25, 2014

Two Strap Birthday Purse by Allie

Hi, Allie Gower here from My Card Party sharing a creative gift giving idea. 

This cute sized purse made with one of Samantha's cutting files from the Silhouette Online store, is just right for some gift cards or sweet treats, or even both. With the addition of a fun tag and birthday sentiment from Samantha's Botanical Swirls Labels clear stamp set for JustRite Papercraft, it's now a perfect birthday surprise for your favorite purse lover.


Instructions for 2 Strap Purse:
(This Silhouette Tutorial focuses on embellishing Samantha's 2 strap purse file. For complete assembly instructions click here first, then come back here to learn some fun techniques to add some personal touches.)
  1. Cut all Purse parts. Distress tan portions with Toffee Crunch ink and add stitching accents with Peanut Brittle marker. Add stitching accents to dotted pattern with Summer Sky marker. Assemble, using brads in holes to align elements and gluing where appropriate. On the bottom, send brads up into the inside as shown below (upper right photo in collage).
  2. Die cut tag. Stamp sentiment. Distress and add Tear Drop Rhinestones. Be careful to place your adhesive only on the purse closure, so that the purse can be opened and closed.
  3. Add Silver Swirls Finesse. (Note, this was cut to accommodate the flowers).
  4. Add flowers.
Supply List for 2 Strap Birthday Purse
You will need the following Samantha Walker Silhouette Cutting Files:
You will need the following papers from Samantha's collections:
Rough and Tumble Adventure 12x12 paper (for the purse both the dots and the goldenrod contrast)
Rough and Tumble - Floating Boats/Aqua textured cardstock (for the tag)
Botanical Swirls Labels - Happy Birthday Sentiment
5 Label Sheet
Strap Purse
Other Supplies:
Peanut Brittle and Summer Sky Memento Markers
Wild Orchid Flowers
Tear Drop Rhinestones -Want2Scrap
Related Posts Plugin for WordPress, Blogger...