Ads 468x60px

Showing posts with label silhouette promo code. Show all posts

Monday, September 15, 2014

September Silhouette Promotion!

It’s time for our September Silhouette Promotions!
This month we are focusing on the Silhouette Portrait, bringing you a fabulous bundle filled with fabric goodies!  We are also running a special for 40% off the Adhesive Cardstock!


All this for just $149.99
​Save over $100! 


Head over to http://www.silhouetteamerica.com/september
and use promo code SAMANTHA 
to get this amazing bundle!


You can also get 

To take advantage of this offer, click on the link 
below and enter promo code SAMANTHA!


Tuesday, June 24, 2014

A New Silhouette Promotion!


It's time again for a Silhouette promotion! 

This month's promotion features...
 a CAMEO bundle 
and 
a Portrait bundle 
as well as 
30%* off all accessories and materials on Silhouette America.com
 (*exclusions will apply)

To get these deals, simply click HERE and enter promo code SAMANTHA!

Creative Team Member Diana created this fabulous 
Animal Party Mask Favor using her CAMEO!


Hi! Diana Fisher here with you today. It's about that time for parties for the little ones. Whether it is a pool party, a little weekend get together or a birthday party, you may want to have a little something extra for the kiddies.

Here is a step-by-step tutorial on how to make animal party masks using fun animal files you may already have from Samantha Walker. 

I started with the Ice Skating Raccoon file. She also has a fox and a bunny that would work, too.


This is the file as it is when you download it. You be un-grouping and deleting the pieces you don't need.

After you are done deleting, you'll have the body, nose and face. Using the eraser tool, erase all of the body creating a chin on the head. 


I measured a face and it seems like 10 inches wide is a good size to make the mask. It may be a little big on a toddler, but perfect for elementary ages. I also made the holes for the eyes on the mask larger.


Once all sized together, then separate the pieces and put them on two different mats. You can see here how I divided my pages. The top of the first sheet cut light grey paper. The bottom of it cut black.

Below, will cut dark grey for both the top and the bottom cuts. 


Before I cut this last file, I added circles to the sides of the head. This is where I will add twine to be able to tie the mask on.

Once you have all of your pieces cut, you can get some adhesive and twine to begin assembling the mask.


I wanted to have some flexibility for the eye holes on the head, so I did not cut them with the Cameo. I measured afterward and cut them with a small knife.


Once everything was assembled, I tied on the string, leaving one end loose for fitting.


There you have it! A fairly easy way to make masks for a child's event or party. You can have them ready and prepared in advance, or just cut the pieces and have the kids put them together for their party craft. 


Remember, these deals end July 5th!
Click HERE and enter promo code SAMANTHA!

Tuesday, June 04, 2013

Silhouette Portrait Giveaway and Heat Transfer Vinyl Promotion!

***This giveaway is now closed.  Congratulations to Valerie C!***


Good Morning!  Thanks to Silhouette, today we are back with another Silhouette Portrait giveaway and an amazing Heat Transfer Material promotion that you won't want to miss!

Let's start things off with the this sensational 
promotion with Silhouette featuring their Heat Transfer Material!
If you haven't tried it yet, this is your chance!


Did you see?
ALL of the heat transfer products are 
buy one get one (of equal or lesser value) for free!
This is such a fabulous deal and the offer includes smooth and flocked heat transfer material, printable heat transfer material, and the heat transfer starter kit. Plus, you can mix-and-match however you like!

If you haven't ever worked with the heat transfer material, Jamie is back to show you how easy it is to create this adorable Zombie-lovin' bag!

Supplies:
Misc: Large Canvas Tote Bag


Want to create one of your own?
Here's how!
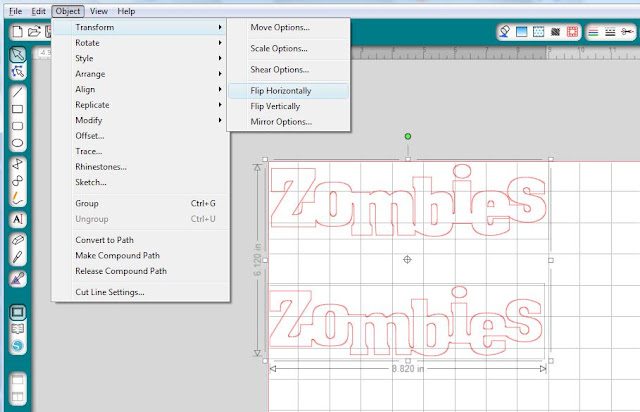
 Download and open the "Zombies" Silhouette file in the Silhouette Studio software.  Size the file as desired and then ungroup.
 Select both files and then go to the "Object" menu and highlight "Transform" and select "Flip Horizontally". 
Your cut should look similar to this now (backwards!).
Now the next step you can do a couple different ways, you can either place the HTV in your Silhouette machine and "load media" or you can trim your HTV to size and place it on your mat (both have the shiny side down).  I like to use my mat with mine so I don't have to move my rollers and it allows me to use smaller pieces (and scraps!) but it is just a personal preference.

1.  I placed my HTV on my mat to match my software screen.  Choose the Heat Transfer Vinyl setting to match your material, adjust your blade, load your mat and cut!
2.  Remove the backing from the HTV leaving the design you want on the plastic transfer sheet.
3.  Weed out any areas necessary with the hook tool.
4.  Do steps 2-3 for the second cut as well.
5.  Place the larger white flocked HTV on the bag where you want it placed.
6.  Place a cloth or ironing sheet over the design to protect your iron.
7.  Press with a hot iron for 45-60 seconds.
8.  Gently lift of the plastic piece.  If any of the design isn't adhering, place the sheet back down and reapply your pressing cloth and iron again.
9.  Your design should look like this now.
10. Place your dark pink HTV over the top of the flocked letters, centering.
11. Repeat steps 6-8.
12. Your lettering should now look like this image.
13. Do the same using the Zombie Family cut and place it under the lettering as shown.


Isn't it so much fun!?  
Just think of all the items (and clothes!) you could decorate around the house!


Just click HERE to start shopping and 
remember to enter code SAMANTHA 
to get the discount!

Now on to the giveaway!


Related Posts Plugin for WordPress, Blogger...