Ads 468x60px

Showing posts with label Samantha walker. Show all posts

Monday, February 24, 2020

Silhouette tutorial: Purse Cards

New in the Silhouette Design Store...

An updated version of my gift-card purse/money- pocket card. Yes, it's a mouthful...but it's a great practical and fun design, that has two special pockets that can hold a gift card (outside pocket) and/or money in the inside pocket.

It will appear in the Silhouette design store shortly. I'll post the link here.

This variation of the design has a St. Patrick's day theme. Watch for more themes on this new variation of the purse card in the coming weeks. You may be directed to this post for the tutorial on similar designs, that go together in the same way. 

Since the card has some new improvements, I thought I'd update the tutorial as well. 

First cut out all the pieces on the coordinating colors in the Silhouette studio software. You will have to ungroup all the pieces, and move one color group at a time, onto the cutting mat in the software.  You will work through each color group, moving it onto the live cutting area, and sending it to cut. 

Side note...If you are using the Cameo 4, and the autoblade resets to 0, when you start a new color, you may have to remove all excess design information that is not on your page/to be cut. (Meaning creating a separate file for each color.) Sorry for the extra step here, it's the only work around I can find right now. 


After you have cut each color group, lay out your pieces, so they are ready for the gluing steps.


Locate the main card piece and the contrasting bands at the bottom of the purse. Attach with a good paper glue like Tombow mono adhesive, to prevent your paper from warping. It also dries really fast.


Fold your pocket piece accordion style.


Glue the darker green contrasting piece under the decorative clover piece. Add a brad to the point, where the hole is already cut. The little green tab will help close this pocket in a tidy way.


Locate the interior "money"pocket, fold the tabs, and attach it to the inside of the card with glue. You do not have to attach it if you don't want to use it. Instead of money, you can use the dollar sized note card, provided with the cutting file, to insert a note here. 


The above shows the pocket being used with the provided dollar sized note card.


Now we will fold the "leather straps" around the card, be sure to thread your decorative buckle onto the strap, before attaching with brads. Do this for all 4 parts of the card. Brad holes are already cut...just line things up. 


This photo shows the buckle straps fully assembled. It also shows a previous prototype of the pocket before I added the tab and slot. It bugged me, that I couldn't keep it closed, and taping it, would have been clunky. I thought you'd think so too...so I redesigned it with a tab and slot, in order to keep things neat. ;)


Now we will center the pocket onto the face of the purse card. Use a touch of glue on the tabs and press it into place. Then add a dab of glue to the triangle flap, and slide it into the pocket and press. 


Time to add those adorable circle handles! Add a dab of glue to the bottom third of the gold side of the circle. Center the first one using the "dip" in the purse as your guide to line things up.


For the second circle, same thing...add a dab of glue to the bottom third of the circle. Now we will align it with the circle handle, that is already glued. Fold the card onto the circle handle, once you have it aligned. 


Now we will add the other additional feature, that I decided to redesign with this version. A closure strap, with a slot to slid it into! Attach it with a brad, then fold it, and slide it into the slot on the other side. It closes and stays closed so nicely now. 

Happy Crafting! 

Thursday, November 21, 2019

Circle Purse Instructions

This week in the silhouette store, I'm introducing a new purse design for Fall. You will be able to download this cutting file from my Silhouette shop.

Here's the direct link! Silhouette Design ID 308507

To make this purse you will need to download the cutting file available as either an .svg file or .studio file.

Arrange the different colored layers in the Silhouette studio software. This file already has maximized the space of a 12x12 cutting area, and is color coded to closely match my finished example above. You will only have to move a few pieces onto the live cutting area for each color paper change. If you aren't familiar with the Silhouette studio software, there are many tutorials online to achieve this step.

Assembly steps:
Attach the three contrasting backing pieces with a fine tipped paper adhesive such as Tombow mono adhesive. (these are the lighter yellow color)

Fold the leather strap pieces around the buckle hardware and fix with a brad or with glue. There are holes in this file that will match up to make attaching brads easy. The brads will hold the leather straps to the sides of the purse.

Fold the side pieces along the folding dotted line. There are two rows of dotted lines, one is to mimic stitching, the other is to actually fold. (see first picture in the second row.) Attach sides and front piece to the main piece with glue. Align the holes and fix brads at those points for the purse feet on the bottom. The brads aren't necessary, but add a nice detail.

Slide the front buckle onto the leather strap. You may fix it on with glue if  you wish. Attach this decorative strap with glue or brads.

Fold teeth on the side pieces inward then glue them to the front and back of the purse. (shown in first picture on the bottom row.)

Your purse is now complete. You can adhere a sticky velcro dot to the front flap purse strap, or use tape to shut the purse.


Friday, December 02, 2016

Review of NEW Janome Skyline S9

Janome recently sent me their new Skyline S9 embroidery/sewing machine to play with and review...and play I did, and have enjoyed the machine very much!

This machine is a part of their affordable S series, and is the first in this series to combine sewing and embroidery on one machine.  The machine is feature rich, yet has the ease of use you expect from a Janome machine--with built-in tutorials to get you up and running. It also comes with a comprehensive manual that is indexed well, with pictures and diagrams, to let you know how to use all of the features. One of my favorite features...is it's wi-fi capability. This is a machine that speaks the language of the 21st century. You can send designs to the machine wirelessly via your i-pad. Because the machine is so feature rich, I wasn't able to test out every feature, but I wanted to make sure I at least tested out the basic sewing stitches, decorative stitches, and embroidery, and changing basic settings through the touch screen. I also purposely created a project that had many layers to see if this machine could be a reliable "work horse." My conclusion...you're going to love this machine.

To test some of the machine's basic features, I created designed and pieced quilt. (Heads up, this quilt design will be available as a FREE downloadable project on the Janome website later this month.)  For this project, I used basic straight stitches and listened to the machine's soft hum, as I pieced. The machine is smooth to operate, and has low vibration, which makes it nice to use. The LED lights were great for lighting up my project so I could be accurate with my piecing. The machine allows you the ability to operate it with a traditional foot pedal, or a touch stop/start button. A convenient knee lift is included with this machine for raising the presser foot.


You can also adjust the speed via the slide control, to prevent you from being to "heavy with your pedal" if you need to sew a little slower. I liked the convenient inclusions of the locking stitch, reverse, and cut-thread buttons. I also found the automatic presser foot lift feature quite useful in streamlining the process on my project. I would have loved to have had a completely automated needle threader like the Janome MC 15000, but the manual needle threader did the job well, and was quick. (This is where you save some money on the machine.) The workspace is larger than any of the other in the S class, at 8.25"x13" of bed space and 8.25" to the right of the needle. This was more than adequate space for the projects I chose. I went through lots of thread piecing this large quilt and so I got to know the bobbin winder. It's super simple, and if you forget how to use it, simply press on the question mark on the user interface and you will be directed to a tutorial.

For my second project, I tested out the embroidery side of the machine. You need to attach the embroidery arm unit, and switch out the needle plate before proceeding into embroidery mode. It doesn't take long to switch over, and I went back and forth between sewing mode and embroidery mode a few times with ease.

For this project, I created a matching pillow for the quilt. I selected one of Anna Maria Horner's on-board embroidery designs (yes, get excited, because 40 of her designs are included on this machine,) and selected some gorgeous thread from her embroidery kit specially designed for use with the S series. This thread is yummy scrumptious--yummy colors, and a scrumptious luxurious sheen in a strong polyester thread. This particular design was comprised mostly of satin stitches which really show off the sheen of the thread. I didn't have a single thread break while stitching this beautiful design.

The Skyline S9 includes the embroidery arm and three hoops--the largest being 170mm X 200mm. There are also hoop magnets included if you have a project where that kind of attachment works better over traditional hooping. I enjoyed watching the mesmerizing stitch sequences, and was pleased with the intricate detail that the design and the machine provided. This design takes 21 minutes and the screen shows you exactly which stitch you are on and how much more to go. You can resize your embroidery using the touch-screen interface, you can also reposition the design and change stitch density.

For fun I added some decorative stitching to my pillow project. After testing out several of the satin and decorative stitches, I chose to feature one of the appliqué stitches as I wanted the embroidery design to stand out and not get busied by a decorative stitch. The decorative stitches would be super fun for another project though. I played with the spacing and size on this appliqué stitch, via the touch screen, and found a setting perfect for my project.
When assembling the pillow, I decided to try out how the machine would do with a thicker project. So I purposely chose to quilt the design and add welting trim to see if the stitches were consistent even when things got a little tougher. I also designed the back of the pillow so it could easily accept a pillow form, by creating a split overlap with a rolled hem. This design meant that at one point, I would be sewing through 6 layers of fabric plus the welt edge, making that 8 layers, not to mention the quilt batting changing the thickness as well. The Skyline S9 had no issues with this extra workload. I used the included zipper foot to help aid in attaching the welt, which made the welt placement easy.
I was having so much fun sewing these projects, I decided I'd get another project done. I made a Christmas advent calendar to delight my three kiddos. This was a simple panel kit from Riley Blake, that I've had for a while, but just hadn't finished yet. I thought this would be the perfect time so the kids could have fun with it this December. I enjoyed adding some detail to this project with little accent stitches and a little bias tape. The pockets are filled with adorable "softies" that have ideas for different activities each day in December.

These were just some of the features that I tested. There is so much more to this machine than what I played with--including the ability to design your own custom decorative stitches! If you are looking for a great embroidery/sewing combo machine at a nice price point, this would be a good one to consider. You can read more about the features of this machine on the Janome website here.

By the way...the quilting on my quilt was done by Melissa Kelley of Sew Shabby Quilting. She does a beautiful job!

Monday, December 14, 2015

Can This Photo Be Saved? Photoshop Tutorial Part 2 of 2

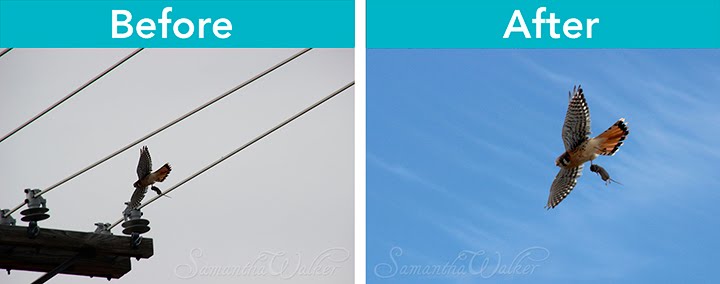
Last week I shared this terrible photo with you of a Kestrel that came into my yard when I wasn't ready with my camera. (in this post here.) I basically missed the shot because I didn't have the right settings or time to set up the shot before the Kestrel flew away.

Today, I want to show you how I fixed it. I apologize to those who have been waiting to see the second half of the tutorial....last week had a few surprises that prevented me from getting to this post...thanks for your patience.

I'm using Photoshop CC to adjust my image. This tutorial assumes that you have some basic knowledge of photoshop like familiarity with tools and use of layers. If you have Photoshop Elements, you may not have all the features mentioned.  And one more thing before I begin...If you know a little about Photoshop, you are probably aware that there are often several different ways to achieve the same thing. Every designer works a little differently. It's a personal choice, and you have to do what works for you. This is my method...and it works for me.

Exposure:
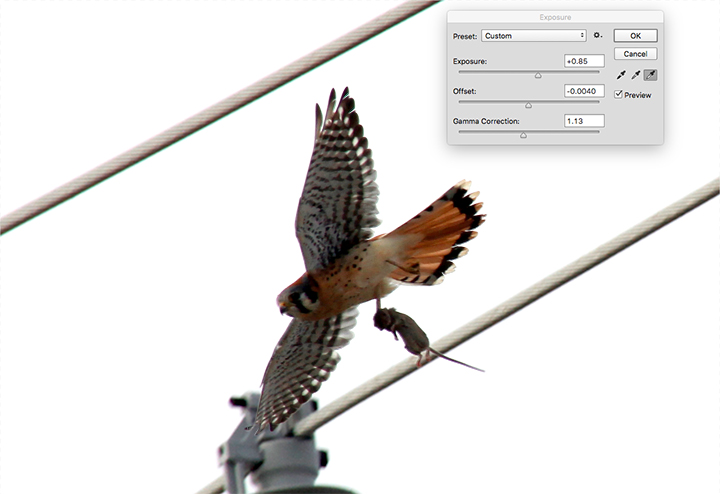
The first thing I did was fixed the exposure. Go to Image/Adjustments/exposure, and the exposure interface window will pop up. There are three settings that you can control with in exposure. Exposure, Offset, and Gamma Correction.

Here they are explained in layman terms:
Exposure adds or subtracts overall light from your image. Move the slider to the left will make it darker, slide it to the right and the image becomes lighter.

Offset will effect the darks in your image. Move the slider to the left and your darks will get darker, more it right and your darks will grey out. This is a slider where a little goes a long way--so don't get carried away with this slider.

Gamma correction effects the tonal range. Moving the slider to the left removes detail from the tonal range, moving it right adds detail. This will effect how much detail shows in your image.

Unfortunately, the exposure on my original image was so wonky, that it was beyond correcting perfectly...but the idea was to get it to as good as it could get. The Kestrel in my photo was too dark, so I bumped the exposure to the right to put some light back into it. This brought out some of the feather details in the falcon's wings. Be careful not to go too far with this setting, because it is easy to wash out your image. To help the image with contrast, I barely bumped my Offset to the left to give more contrast. Bumping it too far to the left will put too much black into your image. Go easy. Then I worked with the gamma correction until the detail was showing up. In this case, I had to move the slider to the left which enhanced the bird without muddling the detail together.

Isolation:
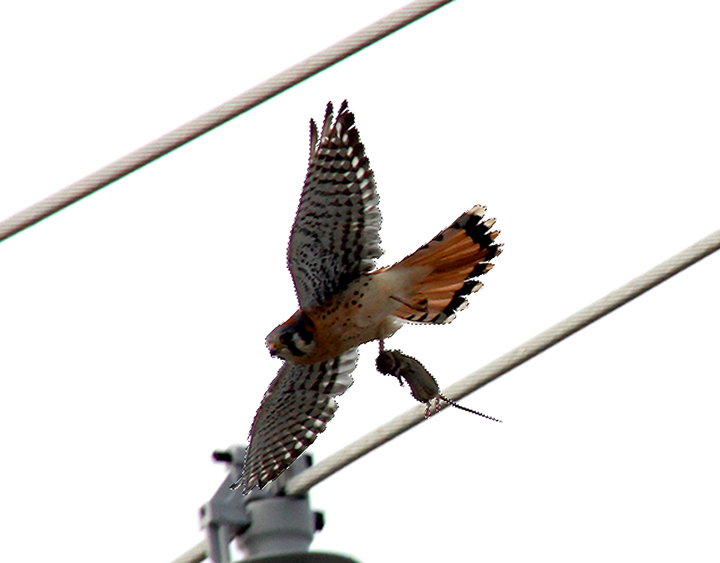
Next, I needed to isolate the bird so I could get rid of the distracting background. To do this, I used a combination of tools.

First I used my magic wand to select the white areas by clicking on them.

Then while holding the shift key, I added to my selection big areas like the power lines by using the rectangular selection tool.

Finally, while holding the shift key I added to my selection with the lasso selection tool (feathered 2 pix--setting is in top bar) any areas around the bird that weren't selected by the previous selection steps. (like the grey area from the power line that butted up with the lower wing and the power line behind the mouse.) Make your selections the best you can, but do not worry about making your selection absolutely perfect. Just make sure that your selection doesn't eat into the area of the bird. If it does, you can fix it with the lasso tool by clicking on option (alt PC) while selecting and your lasso will subtract that area.  We will clean anything up with the eraser tool in an upcoming step.

Once all of those areas were selected, I inverted the selection by clicking ⌘-shift-I (command-shift-I on Mac Control-shift-I for PC, or find inverse in top dropdown menu Select/inverse)  Now my Kestrel was isolated.


Refine Edge:
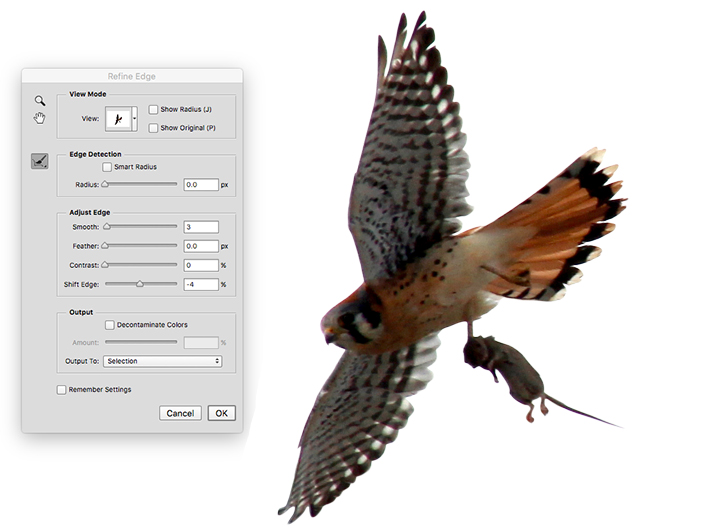
If you were to lift the bird from the background at this point, you would be sorely disappointed because you'd be left with a rough edge. To remedy that, go to the top bar and click on Select/Refine edge. It will bring up the dialog box shown below.

We will make a small adjustment here that will smooth the edges of our selection. Go to "adjust edge" and move the slider that is next to the word "smooth." Move it over to a small number like 2 or 3. You can also shift your edge to bring it in closer to your subject if you were unable to get your selection as close as you wanted it. Do this by moving the "shift edge" slider. It usually doesn't take much. Play with this to see what it does. It will show you where it is shifting the edge.

Once you've made these adjustments, copy your selection by clicking ⌘C. Paste your selection in a new layer.

Zoom in on your subject, and if there is any background still remaining, you can erase it with a small feathered edge eraser tool. Get close to the edge without erasing your subject.
New Background:
Now the original background of my photo was awful. Nothing exciting about a white sky and a distracting utility wire.

I knew I had a good sky background in another photo, so I found one that would be perfect for this project...only one small problem...there was another bird in that photo. I opened up this photo separately so I could apply my easy fix. 
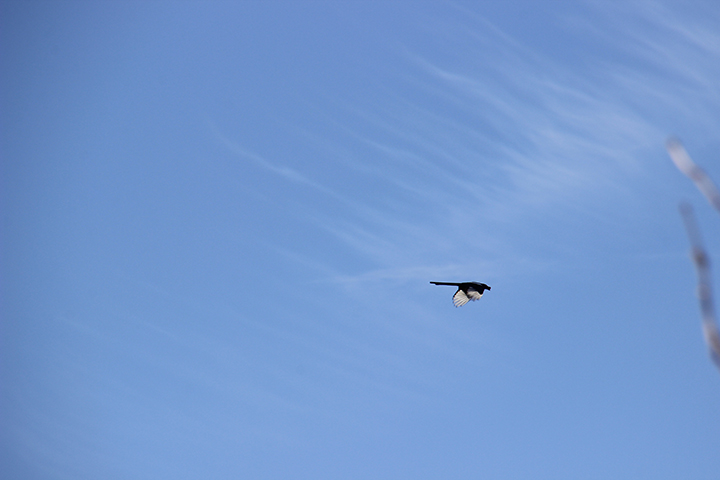
I used the clone tool... 

When you use the clone tool, you need to select a brush. I almost always select a feathered edge brush of appropriate size for the area I'm trying to clone. That way, the area that you clone will blend better. You will also need to tell the tool where you want to start cloning from. You do this by clicking on the chosen area of your photo while holding the option key (alt PC.) Now your cloning tool will use that as your origin of where it will copy from. Now move the clone tool over the area you want to cover, and use it like a paint brush.  I cloned right over the magpie in the sky so the sky giving the result below.

I then selected the sky by clicking ⌘A.  Then clicked ⌘C to copy the sky. I went back to my Kestrel photo and pasted the sky right over the background layer by clicking ⌘V. 
See layers below:


Softening edges:
The picture below shows you what the two layers will look like together...Notice the harsh edges. It looks like the Kestrel has literally been cut then pasted onto the sky. There's an easy way to fix this.
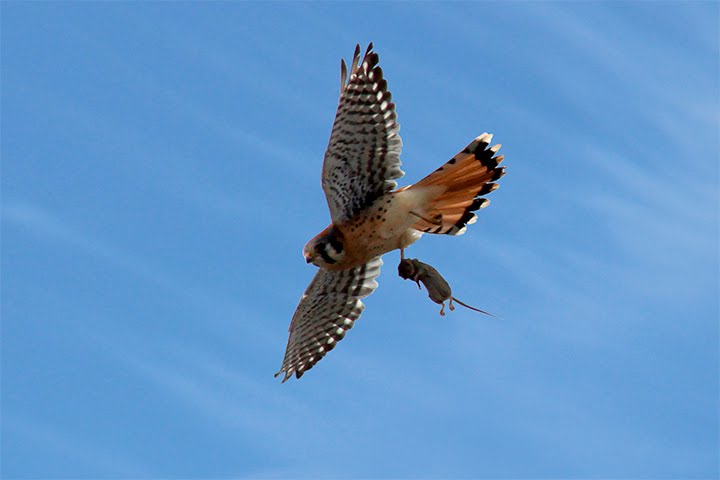
I used my eraser tool and selected a soft feathered brush. You don't want a large brush, you'll want a smaller one...the one I used was about 50 pix. I set the opacity of the brush (control found in top bar) to about 15%. Then I lightly smoothed over the back edge of the wings. It made the wings pick up a touch of the blue sky color, making the bird fit better with the new environment. I also hit the back of the mouse to blend it with the sky. You want to go easy with this--it's easy to over do it. You don't want your subject to go transparent...you just want to blend it to make it fit.

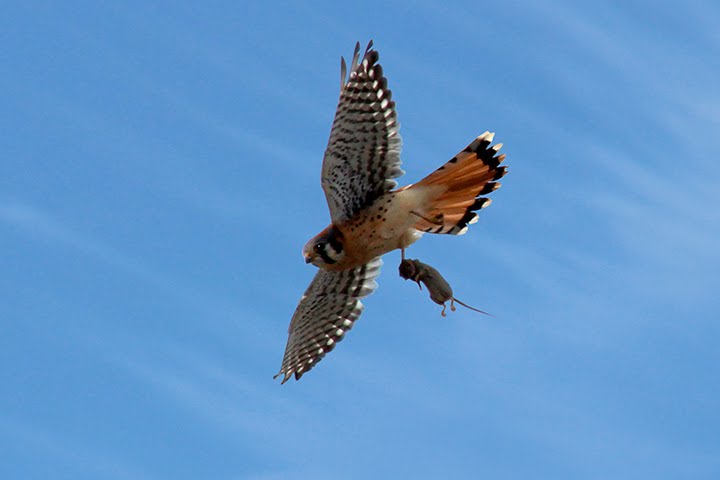
I then adjusted my brush to an even smaller diameter. That way I could blend areas of the bird that I wanted to keep sharp yet still fit with the new background. I smoothed around the birds head and any other areas that didn't seem to fit quite right. Notice the harsh white edge around the mouse tail in the photo above, smoothing around the edges eliminated the white without loosing the detail of the tail (see below.)
Finishing touches:
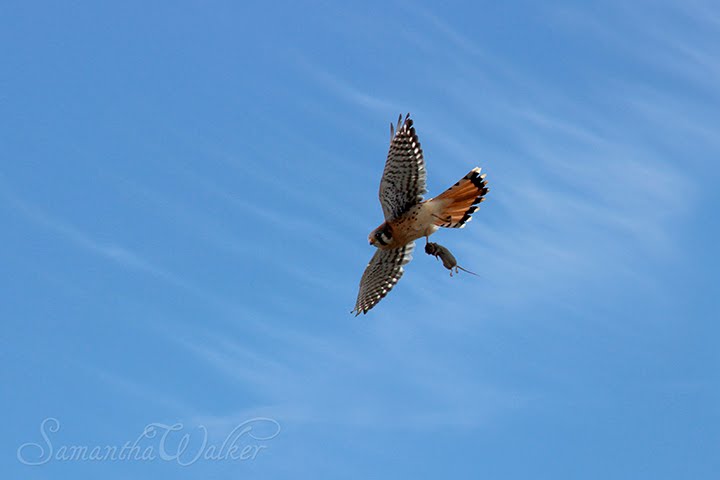
Finally, the bird lacked sparkle. Nothing makes a living creature look more dead than dull black eyes.

I fixed this by creating a highlight with a small soft brush in a separate layer. It's too risky to do right on top of your subject, so always create a new layer before applying brushwork. That way, you can easily delete it if you don't like it, or adjust that layer's transparency should you need to. With one little click with my soft brush, I added a simple sparkle. Make sure that your brush is small enough that it looks proportionate to the eye. Think of where the sun is shining, and place the sparkle relative to where it might hit the eye. In this instance, the sun is above and to the right side of the bird...so I placed my eye shine in the upper right portion of the eye center. It's much easier to fake eye sparkle when there isn't much detail showing in the eye. The process to enhance eyes is much different if you already have eye detail in the photo.

Now if you are happy with your final image...save a photoshop version with the layers in tact, and save a flattened JPEG copy to send to your photo developer.
Saturday, January 03, 2015

Keepin' Cozy Petal Book by Cathy


Hi Samantha Walker Fans!  Cathy here with you today sharing Samantha's Petal Book!  It's so easy to create and it will make the perfect mini for all of your winter photos.  I used Samantha's Echo Park Keepin' Cozy 6x6 paper pad and stickers for my petal book!
I enlarged the book ( as you can see in the screen shot) so that each of my pages were a little over 3 inches wide across the circle part of each page.  That way I knew I could add some fun 3x3 photos of our winter outings!  
Just cut all ten pages, layer and punch a whole to add a binding ring!  Then just decorate!  It's a mini you can but together in just a matter of minutes.  Gotta love that!


Here's a peek at some of the inside pages...I can't wait to fill them, I just ordered some photos this morning!


Click on the photo below to find this design in the Silhouette Online Store!


Thanks for joining us today at Samantha Walker!

Tuesday, December 30, 2014

New Years Eve Candy Wrappers by Christine

Are you looking for a last minute favor to add to your party tomorrow night?  How about some of Samantha's paper candy wrappers?  Today I am going to share with you the ones I created:


I used the Candy Box (#50803) and some gold cardstock to create these.  


The gold paper I had was 8 1/2 X 11" so I sized my box down to fit in that.  Otherwise you can make your candy boxes even bigger!


You can find Samantha's full tutorial for putting these together here.  Samantha used patterned paper on hers.  Since I used solid cardstock I added some 2015 stickers to mine!  I also filled mine up with 15 Hershey kisses - perfect to ring in 2015 with!  

Thanks for joining us today and Happy New Year!


Tuesday, December 02, 2014

Santa Snow Globe Card with Diana


Hi! Diana Fisher here with you today to share this Snow Globe Card with Santa Claus. I am sharing with you a different way to make the card than is featured on the example.  

I wanted to put the globe base on the inside of the card, making room for a "Merry Christmas" sentiment that I will be adding later on. 

When you download the card, here is what the studio file looks like.


I then separate the files based on what color card stock I will be cutting them out of. I had five colors on this one sheet. 


On this sheet I had the white pieces. 


This sheet was for backgrounds and the globe. 


To assemble my globe in the inside of the card, here is how I arranged that. You can see I still left room for Santa Claus to overlay the globe from the front instead of the globe coming up over Santa.


And here is the up close shot of Santa in the front of the globe. 


Remember, when working with a cut file, there are usually more than one way to arrange the pieces. Have some fun, play around with the pieces and see what you can come up with!


Related Posts Plugin for WordPress, Blogger...
