Ads 468x60px

Showing posts with label bendy cards. Show all posts

Thursday, May 22, 2014

The Little Things with Tammy Malone

Sometimes the littlest things take up the most room in our heart - Winnie the Pooh

The joyous occasion of welcoming a child in to this world can quickly turn to sorrow, as it did for our pastor and his wife. They had anticipated the arrival of another great grandchild only to find themselves 8 days later standing at a graveside with no words to bring comfort to their grandson and his family.

While life does not always play fair, we can try to bring comfort to those that are hurting. Our church decided to give them a rose bush in memory of their great granddaughter so I was chosen to create a special card to go with the gift. 

 I chose the Sloped Bendy Card and Box since it would be something they could display on a coffee table or nightstand.
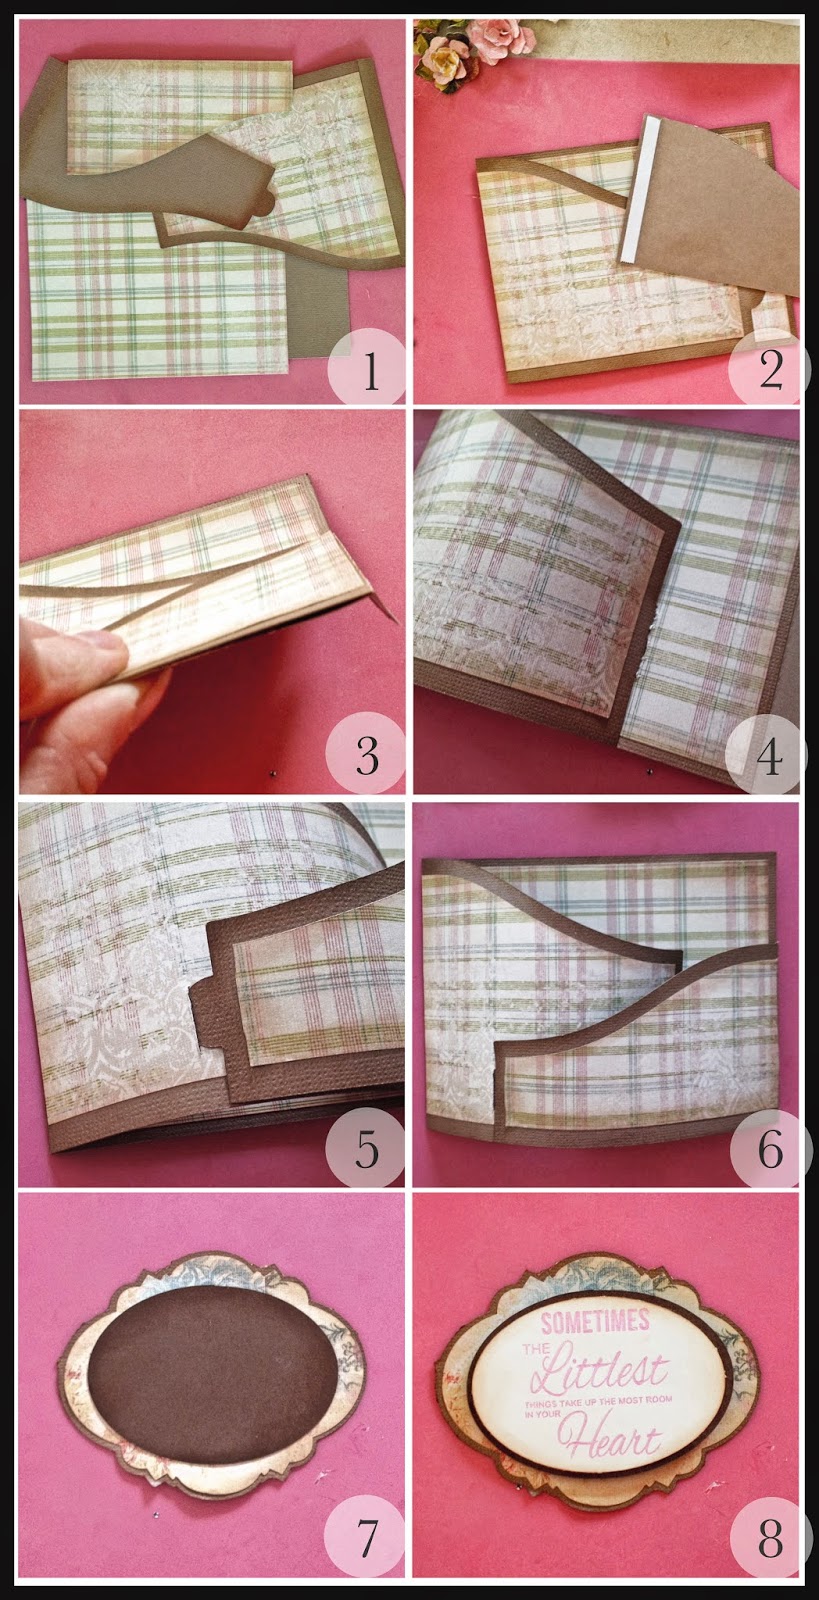
  1. Cut out all of the pieces for the Sloped Bendy Card along with an inset for the patterned paper. Adhere the patterned paper to the card pieces.

  2. Add adhesive tape to to both flap edges.

  3. Align fold with the bottom of the card base and adhere to the card.

  4. Fold in the large flap (left) and attach the tab in the pre-cut slot on the card base.

  5. Fold in the small flap (right) and attach the tab in the pre-cut slot located on the front of the large flap.

  6. This is how your Bendy card should look when assembled.

  7. Cut out a label from the 5 Label Set along with an inset for both the label and oval. Assemble all of the pieces.

  8. Use a Sketch Pen or a Print and Cut for the quote on the label. Attach to the oval mat and adhere to the card base.

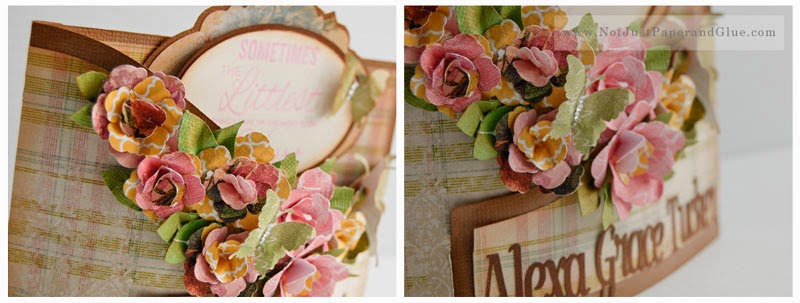
For the finishing touches I cut out various sized flowers from different patterned papers along with a couple of butterflies. After adding the name to the bottom of the smaller flap, I attached the flowers along the top edge of the card. I added some hand-cut leaves along with the two butterflies.


 The left-over flowers and butterfly were used to accent the Card Box and a lightweight magnet was added to the box lid to keep it closed during the presentation.

Rarely do you ever hear me bragging on my own work, but I have to say that this is one of my most favorite cards that I have made in spite of the circumstances surrounding its creation.

Products Used:
Samantha Walker: Bendy Card Box Basic in the Silhouette Online Store Samantha Walker: Bendy Card and Envelope Sloped in the Silhouette Online Store 

Samantha Walker: Butterfly in the Silhouette Online StoreSamantha Walker: Flower Spiral Gardenia in the Silhouette Online Store


Friday, April 04, 2014

JustRite Projects and Spellbinders Sale!

We have some stunning creations to share with you today
from some of the JustRite Stampers crew!  


Eva Dobilas designed this awesome Bendy Card using the Bendy Card with Fence (#53893) Silhouette file with JustRite's Home Tweet Home Clear Stamps. 
Don't you just love it?  You can see more about her project here.


For all the details visit Michele's blog post.


Spellbinders CHA Winter Release dies will be arriving early next week over at JustRite and they are celebrating with a Spellbinders 25% off all Spellbinders Dies. (Please note that this sale does not include JustRite Dies).   You will find over 55 new die additions to their website assortment!  Just click HERE to see more!

Sunday, January 26, 2014

Silhouette Tutorial: Bendy Card with hearts, by Allie Gower!

New This Week in the Silhouette Store!
I have 4 new designs that just arrived in the Silhouette store on Friday. 

Today, my creative team member, Allie Gower, is going to show you how to use the Heart Pennant Flags #54446 banner with the sloped bendy card design from the previous week. 
silhouette heart shape


Isn't Allie's card adorable!
how
To make this box, you will need these files: 
you might also like Bendy card box sloped #54226 a box that is a great size for presenting a bendy card in it's "bowed out" position.

Paper: 
Allie used my paper from my Rough & Tumble line for Carta Bella, and plain kraft card stock.

Equipment:
You will also need a Silhouette Cameo or Portrait machine to cut this box. 

These are the steps to creating Allie's card:
1. Cut shapes with your Silhouette Cameo or Portrait machine. 
2. Ink hearts with Memento Lady Bug Ink.
3. Create mats for card segments. Ink edges with Memento Desert Sand.
4. Apply ribbon to front mats, wrapping around the mats.
5. Apply mats, making sure not to cover the slits. 
**Tip - thread a piece of scrap paper through each slit to help align.**
6. To achieve a nice curve, roll flaps around something tube shaped. 
7. Stamp sentiment on scrap paper and punch using an Epiphany Heart shaped punch. (You could also enlarge the hearts that come in the Heart Pennant Flags #54446 set.)
**Tip - if your scrap paper is too small to hold while stamping, attach a strip of scrap paper.**
8. Add button tied with twine. 
9. Attach stamped hearts and other die cuts.

Here are some supplies to recreate Allie's look:

Monday, January 20, 2014

Silhouette Tutorial: Bendy Card (stationary) Boxes!


Last week I introduced a variety of bendy cards into the Silhouette Online store. I have already started to see some of the things you are doing with them and you guys are so creative! Keep on sharing your projects with us! We love it when you do!

Each of these cards came as a set with a matching envelope that you could put the card in when it is flat (perfect for mailing so the recipient can bow the card when they receive it.) However, I was nudged by one of my creative team members, Allie Gower, that she was hoping I could also make some boxes so that she could give the cards away when fully bowed out. These would be something you could use when you aren't mailing the cards. I thought it was a great idea, so I went with it.

Each bendy card box also doubles as a stationary box for housing A2 sized cards and envelopes. It is the perfect size for giving away stationary gift sets. So if you aren't into the bendy card scene (yet) you will have other uses for these boxes. They are also a fun size for small gifts and treats. Imagine a stack of candy bars inside. (I think that sounds fabulous...especially after a week and a half of being on Nutrisystem. LOL )

Whatever you end up doing with these boxes, they are sure to be a hit with your lucky recipient.

Pictured below are the cards that go in these boxes. Click here to find them in the Silhouette Online store. For a tutorial on my blog on how to assemble the bendy cards click here.


Here's a few fun creative ways you can use these cards from my team! They were meant to be decorated. Think of the cards as a blank canvas waiting for you to insert your imagination.
 

Now for the boxes...

To make this box, you will need this file: 
Bendy Card Box angled (I will link it here as soon as it becomes available in the silhouette store.) You can use these same instructions for the other bendy card boxes. You can find the matching bendy cards at this link here.

Contrasting Paper: 
I used my Cardinal paper from my falling snowflakes paper (stripes are on the back) from my Keepin' Cozy Collection line for Echo Park. I also used Carta Bella Textured card stock snowfall blue/chesnut.

Equipment:
You will also need a Silhouette Cameo or Portrait machine to cut this box. This is designed for a 12X12 mat, so you will need to follow the instructions below if you have the portrait machine.

Portrait machine adaptations not necessary: 
Note: This box was too big for a 12x12 sheet, so I designed it in two pieces. I also made sure that the largest piece could also fit alone on a 8.5 x 11 cutting mat without having to scale it down for portrait users. 

Assembly:
1. cut the large box piece, then the smaller one out of the same color of card stock. They will not both fit on the cutting mat at the same time.
2. glue the tab indicated in the file, to the side labeled "A"
3. cut the optional panels out of a complimentary paper.
4. glue the panels to the 2 sides, front, back and the flap. When you glue the panel to the flap, be sure to line up the slots. You will also have to be careful when you glue the front panel on as well.
5. Fold each tab and side of the the box inward.
6. With a non-warping paper glue, start glueing the tabs to the nearest side. Take notice that you will want to leave glue off the top portion of the front tabs as the front side does not come all the way up. (It was designed this way on purpose.)
7. Continue gluing the rest of the tabs, leaving the front flap free.
8. Thread ribbon through the front slot, then through the back of the front flap. Tie the ribbon in a pretty knot or bow.
Related Posts Plugin for WordPress, Blogger...
