Ads 468x60px

Showing posts with label Tammy Malone. Show all posts

Thursday, May 22, 2014

The Little Things with Tammy Malone

Sometimes the littlest things take up the most room in our heart - Winnie the Pooh

The joyous occasion of welcoming a child in to this world can quickly turn to sorrow, as it did for our pastor and his wife. They had anticipated the arrival of another great grandchild only to find themselves 8 days later standing at a graveside with no words to bring comfort to their grandson and his family.

While life does not always play fair, we can try to bring comfort to those that are hurting. Our church decided to give them a rose bush in memory of their great granddaughter so I was chosen to create a special card to go with the gift. 

 I chose the Sloped Bendy Card and Box since it would be something they could display on a coffee table or nightstand.
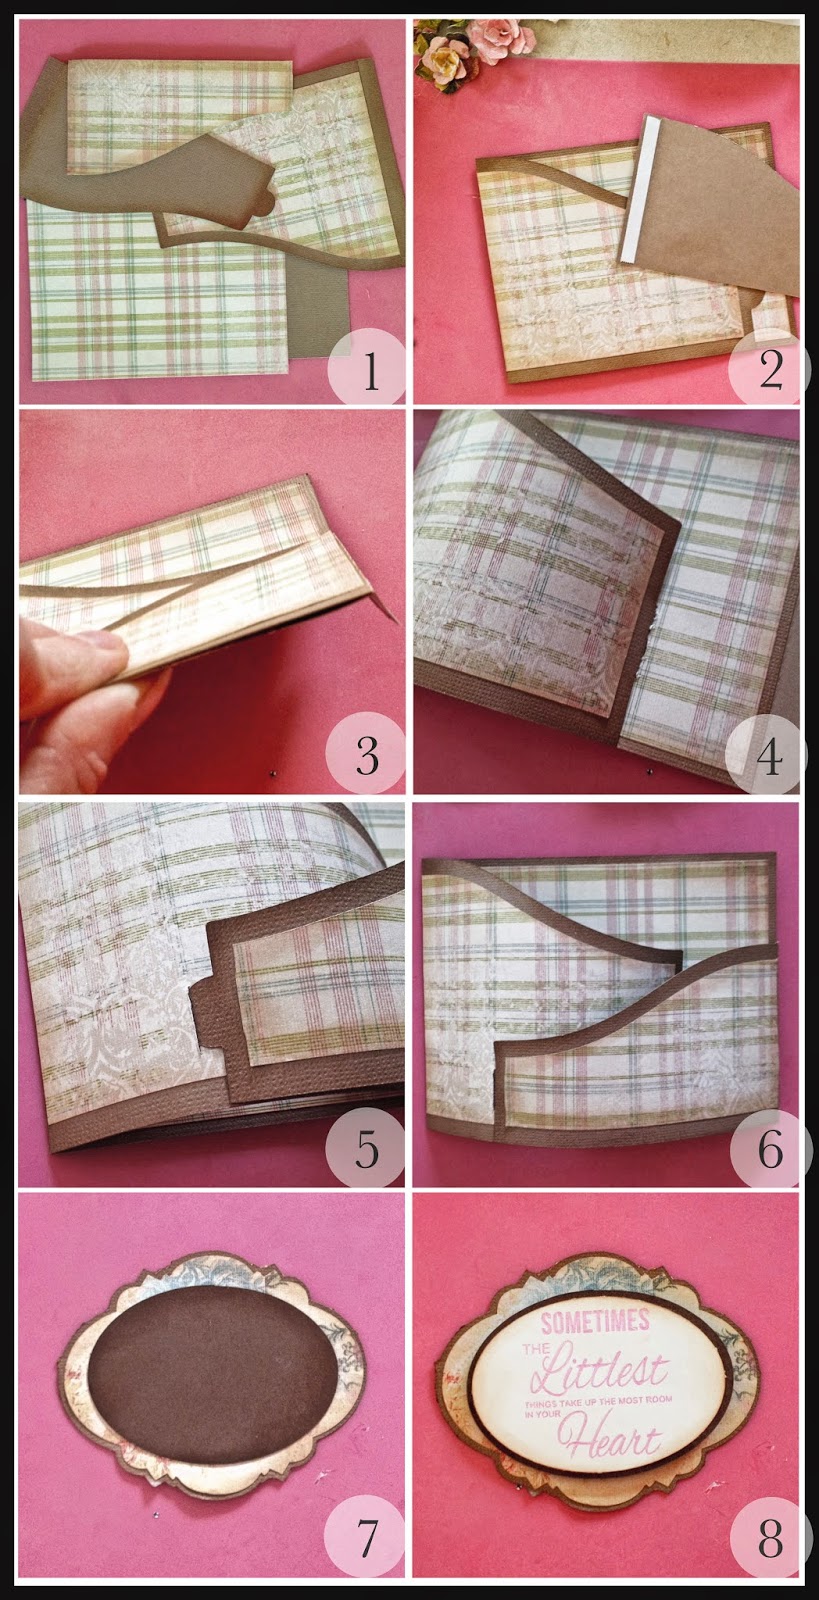
  1. Cut out all of the pieces for the Sloped Bendy Card along with an inset for the patterned paper. Adhere the patterned paper to the card pieces.

  2. Add adhesive tape to to both flap edges.

  3. Align fold with the bottom of the card base and adhere to the card.

  4. Fold in the large flap (left) and attach the tab in the pre-cut slot on the card base.

  5. Fold in the small flap (right) and attach the tab in the pre-cut slot located on the front of the large flap.

  6. This is how your Bendy card should look when assembled.

  7. Cut out a label from the 5 Label Set along with an inset for both the label and oval. Assemble all of the pieces.

  8. Use a Sketch Pen or a Print and Cut for the quote on the label. Attach to the oval mat and adhere to the card base.

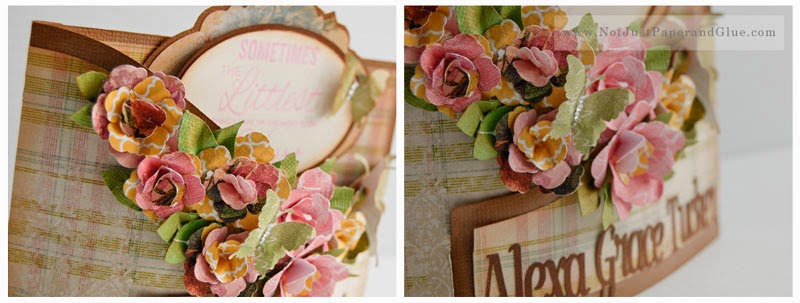
For the finishing touches I cut out various sized flowers from different patterned papers along with a couple of butterflies. After adding the name to the bottom of the smaller flap, I attached the flowers along the top edge of the card. I added some hand-cut leaves along with the two butterflies.


 The left-over flowers and butterfly were used to accent the Card Box and a lightweight magnet was added to the box lid to keep it closed during the presentation.

Rarely do you ever hear me bragging on my own work, but I have to say that this is one of my most favorite cards that I have made in spite of the circumstances surrounding its creation.

Products Used:
Samantha Walker: Bendy Card Box Basic in the Silhouette Online Store Samantha Walker: Bendy Card and Envelope Sloped in the Silhouette Online Store 

Samantha Walker: Butterfly in the Silhouette Online StoreSamantha Walker: Flower Spiral Gardenia in the Silhouette Online Store


Monday, March 17, 2014

Clover Leaf Gift Bag with Tammy Malone


I feel like one "Lucky" gal to be sharing this tutorial on the Samantha Walker blog today!


Speaking of being "Lucky", I wanted to make a gift bag for friend and the Clover Bag Topper was just the right accent that I needed to make this gift a little extra special. 
Clover Leaf Gift Bag; Skill Level: Intermediate

To begin you will need:

You will first want to make an offset image of the Clover Bag Topper file. 
To do this, watch the instructions in this video. 

)

How to assemble your Clover Bag Topper

Clover Leaf Gift Bag; Skill Level: Intermediate


1. Cut the Offset topper from solid cardstock and the original from patterned paper. Using the clover from the patterned paper as a template, freehand cut a clover from the Double Sided Adhesive sheet. You can also create an offset of the clover and use your machine to cut the image.

2. Cut apart the patterned paper topper on the fold line. Add the clover that you cut from the adhesive sheet to the back side of the patterned clover so that the adhesive is exposed through the front of the image.

3. Sprinkle glitter over the exposed adhesive making sure the entire surface is covered. Brush off the excess.

4.Apply adhesive to the back sides of each piece of the patterned paper toppers. Align over the solid colored topper making sure to provide an even margin on all sides.


Their are many ways to attach the topper:

  • Staple it to your bag
  • Punch holes in the top and add a ribbon handle
  • Use brads
  • Cut a slit along the top fold line just wide enough to allow the handles to slip through (this was the method I used for my project)

Use the extra clover and cut out one or two more (like I did) to embellish the bag.
Have a happy St. Patrick's Day!


Related Posts Plugin for WordPress, Blogger...
