Ads 468x60px

Showing posts with label Nicole Stark. Show all posts

Sunday, November 30, 2014

Above the Mantel by Nicole

Hey everyone!  Nicole here on the blog today.  I've become a little obsessed with the space above my fireplace mantel.  I keep changing it out with every holiday and find that I absolutely love having this focal point in our living room. When we started decorating for the holidays I knew I wanted to make some kind of Christmas wreath to hang in this space.  I wanted it a little homemade looking and also knew I couldn't spend anything to make it.  That's when I remembered the holly shape from the Santa advent calendar.  I'm all about using elements from cut files in a new way.

To begin I opened the file in the Silhouette program and copied/pasted the holly leaf filling the whole mat.

I cut the leaves from three different hues of green cardstock and then a few from book paper.  

I inked the edges of the green cardstock leaves to add a little dimension and contrast.


 The book paper leaves I outlined in glue and sprinkled with green glitter.


The base of the wreath is a piece of cardstock I cut into a circle.

Before gluing the leaves to the base I scored the middle and folded slightly to add dimension.  


I then glued all the leaves to the base overlapping them and spacing the book paper leaves evenly around the base.  
I finished it off with some holly berries and ribbon.  Not a very complicated project, but the perfect finishing touch to my mantel space.  My silhouette and Samantha's cut files made this little project come together quickly. 


Here is a look at the whole space:  the chalkboard is actually the back of an old cork board that I painted.  The 3D deer head is made from foam core and was requested by my son after spying something similar at a boutique.    

Hope you had a wonderful Thanksgiving holiday and are gearing up to decking your halls.  Thanks for stopping by the blog today and happy crafting!

Saturday, November 01, 2014

Turkey Place Settings by Nicole

Hey everyone, Nicole here on the blog today.  Now I know Halloween was yesterday, but as a crafter and mom I have learned I need to quickly change gears as soon as one holiday is over and stark preparing for the next.  This year our little family decided to stay home for the holidays and I thought it would be fun to make these sweet little turkeys to decorate our table.


I started with Samantha's Turkey cupcake holder.
I cut the tail feathers from three different papers and inked the edges of each before assembling.  The names I cut using Samantha Walker's SW Perfect Susan Font from yellow cardstock.
A bit of packing tape secures the base.  .
I then assembled the rest of the turkey using all three pattern papers offset for the background tail feathers.  Once finished assembling I used a regular cupcake paper and glued it to the inside.  


The glued cupcake paper inside make for a pretty secure little treat holder.  I filled mine with yummy toasted pumpkin seeds.  We'll see if there is any left by the time Thanksgiving comes ;)


I know I'll be glad I prepared these early as the big day gets closer.  
Thanks for stopping by the blog today!

Tuesday, July 01, 2014

On the wall with Nicole

 One of the fun things about moving is having blank walls to fill with pictures and things that make your new place your own.  I've been going crazy doing home decor projects the last several weeks.  Among them have been a few canvases to hang above my bed in the master bedroom.  After searching through Pinterest I came across a quote from Audrey Hepburn and decide I would use it on this large canvas.

I started with this 12x12 stretched canvas.


I painted it with two coats of black acrylic paint.

I then went into the Silhouette program and pulled in Samantha's leafy spring wreath and enlarged it to a fit the 12x12 mat.  I typed in the quote using Samantha's Perfect Susan font and welded the letters together.  I also added in who the quote was by in a smaller font at the bottom.


I then loaded my gold vinyl into the machine and cut.  Here is the finished result.  I love that it was simple but made for a striking impact against the black background.    


Remember home decor doesn't need to be complicated or time consuming.  Here is my wall so far.  I'll probably keep adding a few more things here and there as I find them or make them.    


Thanks for stopping by the blog today.  Happy Crafting!

Saturday, April 26, 2014

Kite Interactive Card and Sentiment Tutorial by Nicole

The school year is ending in a little less than a month for us.  With it comes lots of changes for our family.  One big change for my Wesley is it's his last year in elementary school.  His teacher has helped him learn to be more independent and really get ready for junior high (too bad she couldn't help me get ready to have a junior high student!).  When I saw Samantha's new interactive card this idea immediately came to mind and knew it would be a great thank you card to give to his teacher.  


I used the bicycle card as my base, but modified it slightly putting the cut out section on a slight angle and shortening it length wise.  


I decided to print the sentiment right on the card base and did this with the print and cut feature in the Silhouette program.  It's not hard once you get the hang of the registration marks and it makes putting the card together a breeze.  

First you'll need to select the text tool.  
Select the (2) font, (3)size, and then click on your project and type.  Once you have your text exactly like you wanted it printed you'll need to do a few things to make it ready to print.  

Click and highlight the text.  Go up to Fill Color and select the color you want your text to be printed.  Then click on Line Color and select the same color as the fill color you just selected.  

Now go up the the Cut Style Window and select your text.  In the Cut Style menu click the "no cut" feature. 

No go to (1) page and select (2)letter in the menu to change the background size.  
-I probably should have done this at the very beginning to set it up to print size, but didn't think about it-

You'll now need to select both the card base and the text by clicking and dragging to highlight both and rotate them to fit on the new 8.5x11 size.  

Select the (1)Registration Marks Menu and click the box next to the (2)"Show Reg Marks".  
The marks will now appear on your background.  (3)You just need to now make sure your card base is inside the red lines and not in the grayed out areas.

Go up to File and select Print.  Follow the onscreen directions.  
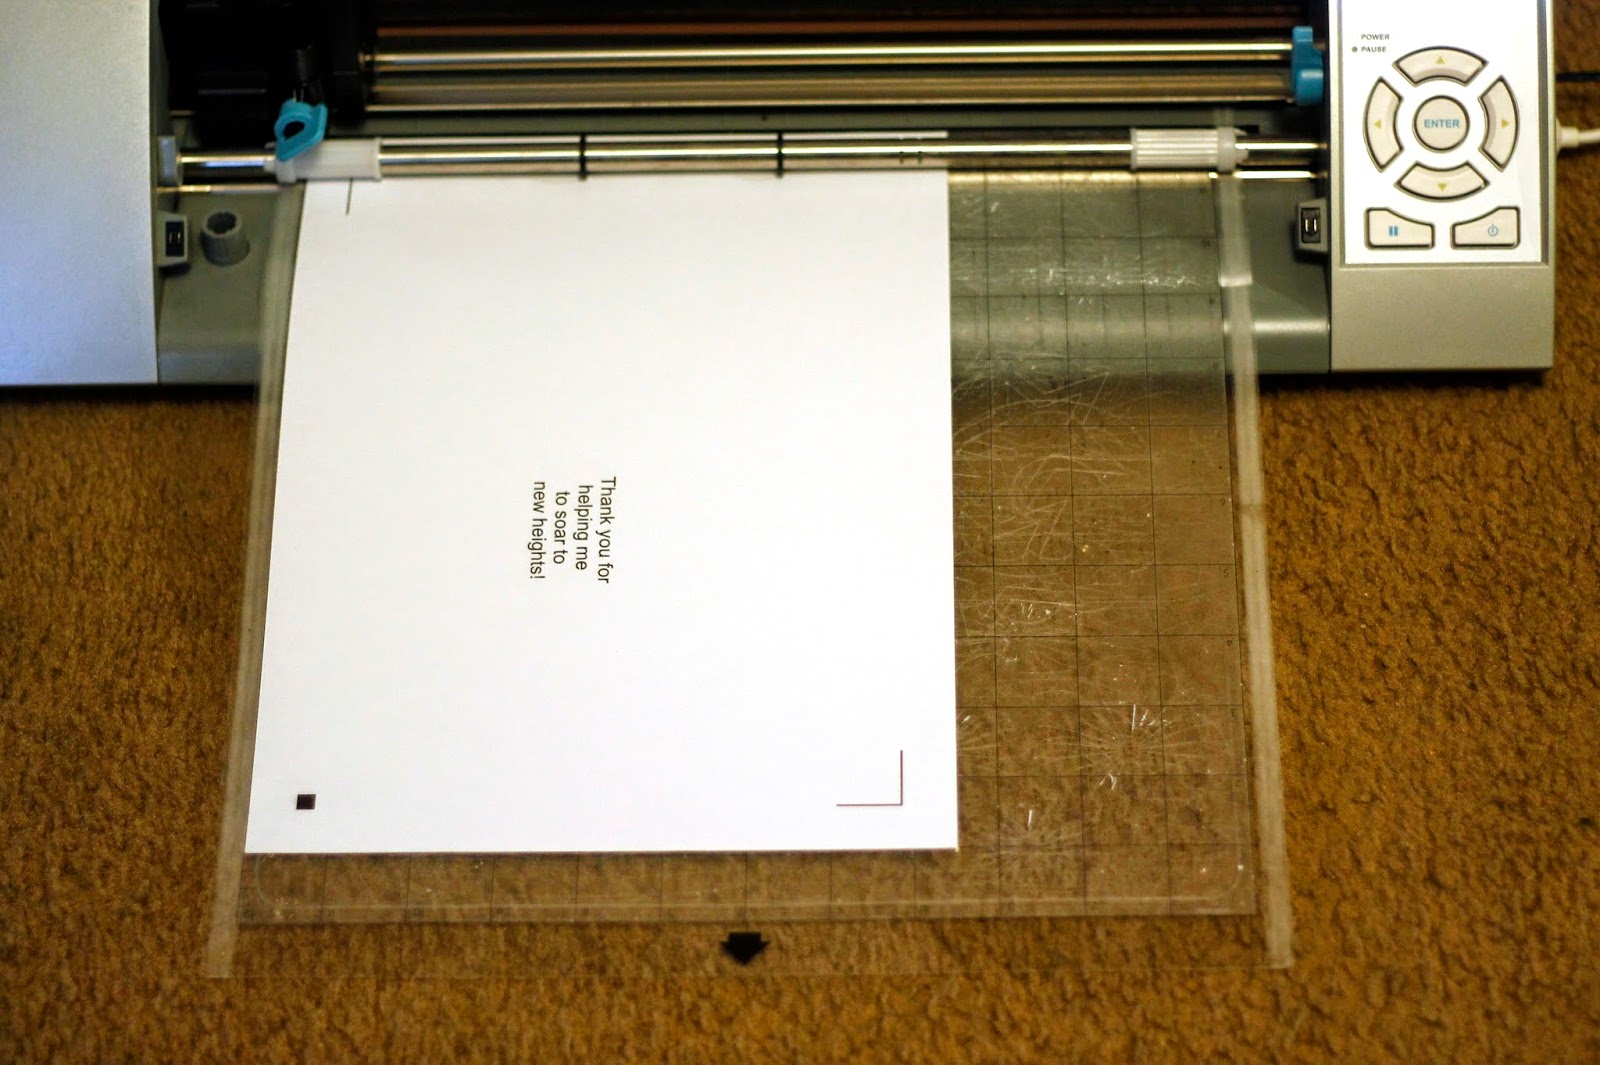
Here is what it looks like after printed.  

Place the paper onto your cutting mat.  Make sure you place your paper on your mat according to how the mat looks on your computer (the first time I did it wrong and my machine couldn't read the registration marks).  Load into machine and cut. . 


Once my card base was cut I then cut the decorative elements from Samantha's Cool Summer line for Carta Bella.   The kite is an older file that I'll link to in the bottom.  

I added the slide to the front and back of the slot with brads and then attached the kite to the top with Helmar Zapdots to add some dimension.  I also glued a little twine to the kit tail to add color.  
  
Here is another look at my finished card:
and with the kite slid to the top.

Thanks so much for stopping by the blog today and I hope you give the cut and print feature a try as well as these fun new interactive cards. 


Supplies
Pattern paper: Cool Summer by Samantha for Carta Bella
Cardstock: Georgia Pacific
Twine: Doodlebug
Chalk ink: Martha Stewart Crafts
Adhesive: Helmar 450 Quick Dry Adhesive, Helmar Quick-fix Adhesive, 
and Helmar Zapdots 


Tuesday, March 18, 2014

Signs of Spring - Flower Tutorial with Nicole

Here in Utah there are signs of spring everywhere!  The daffodils in my neighbors yard are in full bloom, the grass is turning green, and best of all the days are starting to warm up.  I've been bringing the spring into my crafting as well.


I wanted to make a card with some daffodils and chose Samantha's flower 5 to create a daffodil looking flower.  I opened it up and placed several of the base and the centers on my mat in Silhouette Studio.  I then brought in just the grass from the Easter Bunny file.  


I placed all my cardstock on the mat and hit cut.  I slowed down my machine just a touch from the textured cardstock setting since the cuts on the flower centers are tiny.  The Cameo is amazing and cut them out perfectly!


I then added a little texture to my petals and flower center by curling them up.  The centers are so tiny that I used the end of a colored pencil to help.  
I then took orange chalk ink to ink the edges. 
 I assembled all my flowers with small dots of glue.  

Here is my finished card.  I just love the added dimension these small flowers create.   


 Supplies Cut files:  Flower 5 and Easter Bunny (links below); Pattern Paper: Carta Bella; Stamps: JustRite; Vellum: Darice; ink: Martha Stewart (chalk ink) and Tsuikeniko; cardstock:  Bazzill; embroidery floss: DMC


Hope you are starting to see the signs of Spring wherever you are, Happy Crafting!

Related Posts Plugin for WordPress, Blogger...