


Both of these box cutting files will work for both the Silhouette Portrait machine and the Silhouette Cameo machine. I prefer cutting boxes on the Cameo as you get a larger end product, but the Portrait machine will also work fine too. If you use the Portrait, you will need to adjust the Tie Top Hex Box to 85% and the candy box to 70%. You will find this option in your Silhouette Studio software under: Object/Transform/Scale Options. Or you can manually scale the boxes by selecting and dragging the corner of your selection to the size you like.
****Please note:
These boxes have been uploaded into the queue at the Silhouette store. They might not be available immediately as they have to process through the store, but will be there shortly. I will post links as the become available.
Tie Top Hex Box Instructions:
Select a double sided cardstock or pretty solid for your box. I used my Prairie Flowers paper from My Giddy Up Girl collection that I designed for Carta Bella.

Fold the bottom and tabs to the inside.

Fold the sides of the box inward.

Turn the box upright. Start gluing the tabs to the bottom of the box with a strong hold paper glue like Tombow Mono adhesive. (The bond is really strong...the paper will tear before the glue gives way--which makes it perfect for gluing the bottom of a box.)

Continue gluing all the tabs to the bottom of the box.

Make sure corners line up.

Make sure the sides of the box align with the bottom of the box.

Align the last tab and glue it to the bottom.

Hold the last tab in place to let dry.

Put glue on the side tab to glue the side wall together.

Hold in place.

Accordion fold the angle folds at the top of the box. (the part with the holes will end up in the center, the part that I'm pinching on the box in the photo above ends up out.)

This is what your box should look like now.

Thread a narrow (3/8 inch or less width) ribbon or cord through the holes as shown above.

Insert a small bottled gift such as olive oil, bubble bath, fancy vinegar. (box stands 7 inches tall with a 3.5 inch base if cut at maximum size on the Silhouette Cameo.) Tie the ribbon together and pull tight to close the box.

Ta Da! Now it's ready to gift to a favorite friend or neighbor.
Candy Box instructions:
Select a fun candy colored double sided card stock. Stripes, or dots are a good choice for this project. I used my Mid-Summer Sky paper from my Cool Summer collection for Carta Bella. It has a fun chevron stripe on one side, and patterned clouds on the other side.

Cut the candy box file. Crease the ends of the box to the center.

Crease each of the sides of the box.

Crease the side tab.

Bring the side around to the tab and glue together.

Hold down side to let glue dry.

Open up the box.

Now for the tricky part...folding the ends.

Grasp the end of the box where the end is "split" (there are 4 splits.)

Fold the angle where the "split" is to the first corner of the box.


Continue creasing this box all the way around. Make sure that the point of the "slit" angle points to the inside of the box as you fold.


Now try to "push" that fold all the way around until it closes into a flower shape.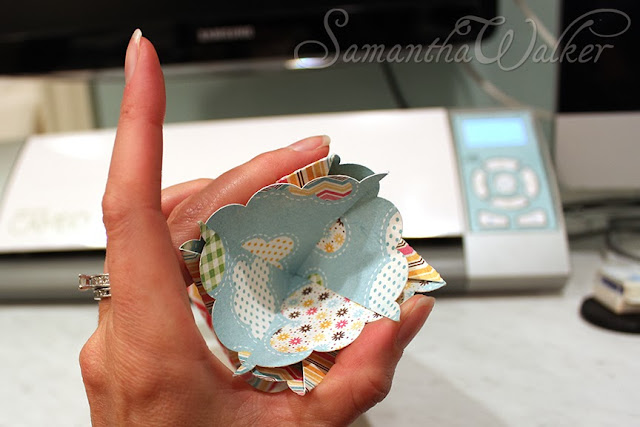

You will think that it isn't working until all the sudden, you realize that it is now all locked into place correctly.

I'm going to show you the under side of the end and how the slit comes in the middle of the two angles coming together--almost like it is folding on top of each other. (this is why there are photos...it's hard to put this into words....please just see what I'm trying to illustrate in the picture here.)

Here is the finished end from an end view.

And here is the finished end from a side view.
Cool thing about this box...is that it requires no glue to close the ends.
The only glue is to join the sides together.
Use your imagination to fill this treat box. The box when cut on a Silhouette cameo, at maximum size is 9 inches from end to end and nearly 3 inches on each side.
The box area between the ends is about 4.5 X 3 inches.
Happy Crafting!
Samantha Walker


