Ads 468x60px

Showing posts with label Unity Stamps. Show all posts

Friday, August 19, 2011

A Perfect Match!

Like Peas and Carrots, PB&J, and cranberries and turkey...this is a perfect match!  I'm so thrilled to be designing coordinating products for Unity Stamps and Spellbinders!  If you haven't heard yet, all of my Spellbinders sets have matching stamp set coordinates.  That means...you can stamp images with my Unity stamps, and cut them out with Spellbinders dies!  How easy is that!

This release also included a new concept that I came up with when designing for both Spellbinders and Unity.  That is my Stacker sets---stamps you can "stack" to get a plethora of creative combinations.  There are two of these sets available through Unity.  Blossom stackers, and Ornate Artisan Stackers.  We are always looking for the perfect background shape for our cards....or interesting journaling block...or gift tag...these sets with their practically endless combos offer just the right look you are going for!

Here's a peek at what kind of combos you can get with the Blossom Stackers...I'll feature combos for the Ornate Artisan stackers in a few weeks.  This should get your juices going for the meantime:


I got to squeeze a little paper play time in this weekend, and it was fun!!!  I concentrated on my stacker sets and coordinating dies.
I wanted to show what can happen if you cut some of the tags and backgrounds in half....you can come up with a whole new shape!  The biggest background in this stamp and coordinating die set has flourishes on either end.  When cut, the flourishes can create a place to tie a ribbon.  That's just what I did with this gate fold card!  
I used paper from my new Blossom Collection for Creative Imaginations.  It's a fun and funky 70's inspired paper line. 
Jennifer Ingle has also been playing with my Unity Stacker Stamps.  I LOVE this card she created!  So feminine,  so very beautiful!  That gauzy flower epitomizes Summer!


Tuesday, July 19, 2011

So Happy to share my new dies with Spellbinders!

Yes, you heard right...Spellbinders!  This die cut and embossing system is so dear to my heart. I've been a lover of this system since it was first brought out into the market place.  I was first introduced to it by my dear friend Kim Hupke, many moons ago, where we both attended a scrapbook camp in Dearborne, Michigan.  She introduced me to Stacey, the inspiring owner of Spellbinders. With a constant twinkle in her eye, Stacey can't help but captivate you with her warmness and energy. That beautiful spirit does not stop there with just her, and if you've been to CHA before and stopped by the Spellbinders booth, you know what I'm talking about! This is where you get to experience ALL of the warm,  kind and amazingly creative the people that make up the Spellbinders Family!  I've made it a point to stop by their booth every CHA I attend, because they always WOW me with their innovations and creativity, and it's nice to catch up with old friends. And now, I'm so proud to say that I get to be a small part of the Spellbinders family!
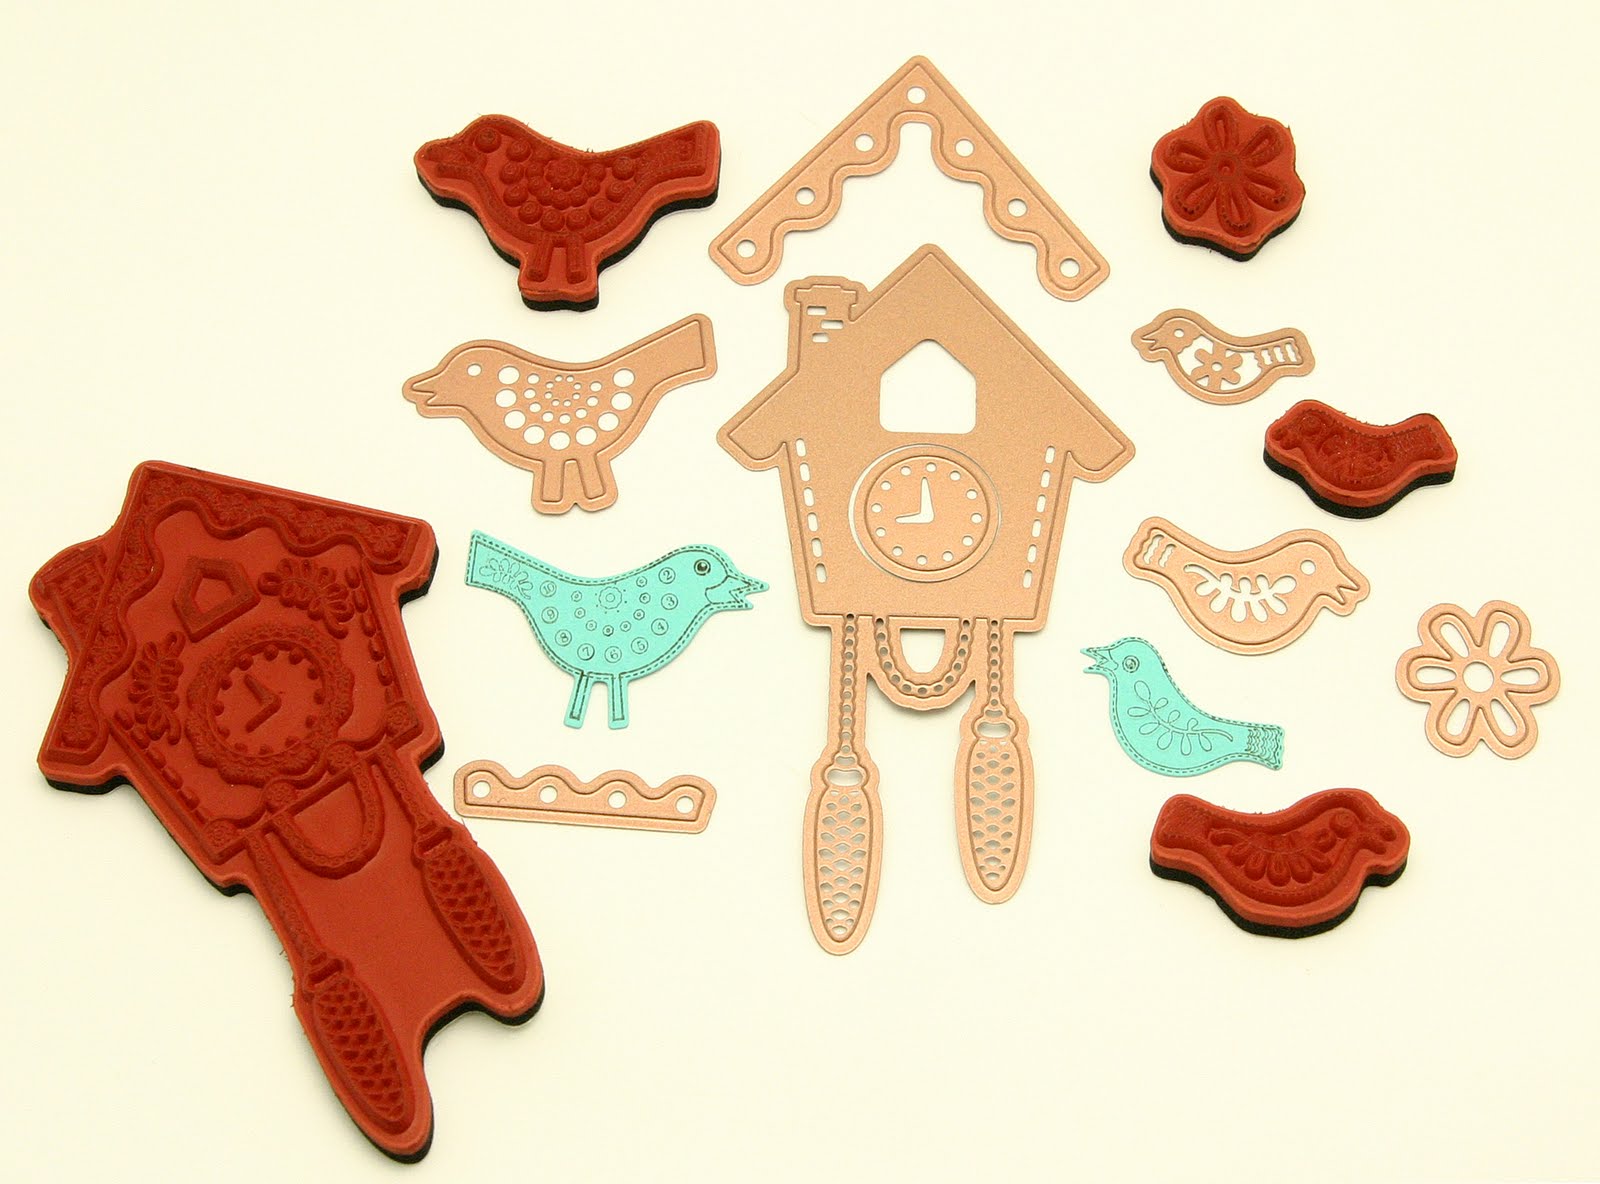
The set I'm sharing with you today is called, "Cuckoo Clock." The fun thing about this set is that it coordinates perfectly with my Unity Stamp set also called Cuckoo Clocks. Watch for SEVERAL coordinating stamp and die sets in my Spellbinders and Unity stamp collections. For this card I stamped the image of the clock on the paper two times.  Once on Green paper, once on Blue paper.  I laid my Spellbinders die over my stamped image being careful to line everything up.  I taped the die to the paper so that it would not shift during cutting. I did the same with the blue paper...lining everything up just so.  Then I put it all together with a little dimension by using Pop Dots.  I added a strip of paper from my Heidi collection at the top and the bottom of the card over a strip of my Holey Cardstock.  


Some of the above stamps are not at the correct scale relationship to each other.  The cuckoo clock on the right is rather large and not the same size as the bird on the left.

Wednesday, July 13, 2011

Denim Flower Purse

It's July?  Why is it July?  I don't remember much of June or May...so how can it already be July?  Yet here we are!  This month of the year is always exciting as it is the month that hosts the Summer 2011 CHA trade show...the show that showcases all of the latest and greatest new crafting products.  I won't get the opportunity to travel to this show...but you can bet I'll be there for the Winter CHA show. With that said...I am excited to announce the release of 6 new stamp sets with Unity stamp company...including my brand new Stacker Stamps Sets (looks like Unity just added the new sets in with my existing sets on their site.)  I will tell you more about them later this week, but if you look closely, you will find a few sneak peeks of these sets if you hop through all of the blogs on our blog hop list. I also have two new paper/sticker lines releasing through Creative Imaginations...watch their blog starting TODAY for sneak peeks. Most exciting of all...is that I have my first release of cutting dies that will be available through Spellbinders.  I've been friends with the ladies down at Spellbinders for years...they are an awesome group of ladies!  Finally the time is right and we get to work on some projects together. These dies will coordinate PERFECTLY with my rubber stamps through Unity.  Imagine being able to cut out what you stamp and have perfect edges all the time.

The project I am sharing with you this month is a purse that I made from an old pair of jeans. I wanted to share with you non-sewers out there, that you CAN sew!  Start easy with little "cheats." For instance, I did not have to put in a single zipper, or construct any pockets.

 I just took the best of my old pair of jeans and repurposed them by sewing the bottom of them with a straight stitch--creating a pouch for my purse, and embellishing them to death with girly flowers and buttons.  YOU CAN DO THIS!  I used fabric from my Wanna Be a Cowboy 2 collection for Riley Blake Designs.  

 The flowers lining the pocket are mini "yo-yos." I did them on the machine too...using my widest stitch.
This is a close-up on the shoulder strap.


Wednesday, May 18, 2011

Easter!


Yikes...time keeps on ticking and not pausing for a moment. This month went by in a whirlwind as we count down to quilt market--which starts tomorrow! If you are going to be at Quilt Market...stop by and say, "Hi." I'll be hanging out by the Riley Blake booth.

Last blog hop, you may remember me asking for your help on choosing fabrics for my daughter's Easter dress...there were so many fabulous ideas for fabric combos, Tara's  comment won. She suggested that I use the cream with brown dot, the pink calico, the plaid, from my Cowboy 2 collection for Riley Blake, and a more solid color to set it all off  (which I interpreted as the tone on tone paisley.) This worked out quite well, as I wanted to design some appliques for the front of the dress. I also added in a few other fabrics from Wanna be a Cowboy 1 and 2. Well I'm thrilled to say that I finished it!  This was the most ambitious project I've attempted yet.  I used the Feliz party dress pattern from the book "Sewing Clothes Kids Love" by Nancy Langdon.  It's a super book for pointers on technique and embellishments, and ideas to make clothing unique for kids. I'm thrilled with the result. I could not have done this without the ideas in this book!
A little about the appliques...I knew I wanted a fun "spring scene" on the pinafore of the dress. I started shaping bunnies and flowers with scissors, then laying them out on the front of her dress. When she came home from school she looked at what I was doing...I thought she would love it...but to my surprise she said, "Those weren't the kind of bunnies I was thinking of." Truthfully, I was stuck with the arrangement and it wasn't going as smoothly as I had hoped...so I asked my daughter, "what kind of bunnies were you thinking of?" She said, "Well an Easter bunny...you know, Mom...the kind that's white with a pink bow and standing like this." She turned to her side and posed the way she thought an Easter bunny should look.  It made me smile...of course...that is why the applique wasn't going so well...I didn't involve my daughter's help.  She's full of good ideas.  So I cut a bunny that she liked (it's the white one with brown polka dots) and started my arrangement again, and everything clicked.  She knew just what the dress needed, and I was glad to have her help.  
On the back of the dress I used prints from both my Cowboy 1 and Cowboy 2 collections. If you are a store and you carried Cowboy 1 and have a little left on a few bolts, you can blend the Cowboy 2 with the Cowboy 1 collection perfectly.  (That goes the same for you sewers out there who still have Cowboy 1 in your stash...Cowboy 2 is a perfect match.)
So my 3 year old son, who is totally mesmerized by machines, sat and watched me make Sydney's dress for many hours.  He finally said, "Mom, can you make me a dress too?"  I told him I wouldn't make him a dress, but I would make him something he would love.  So I made him a bowling shirt, with cowboy appliques.  There's a boot on the front, and a suede star on his back (washable suede...the coolest stuff--I had to sacrifice an old Eddie Bower skirt that didn't fit right, but was made of a gorgeous tan washable suede.) Colin was thrilled.  When we walked into church on Sunday, he gripped his cowboy boot on his shirt and told everyone as we walked down the isle, "My Mom made this, My Mom made this." He embarrassed me a little...I swear he wasn't coached, but it made me smile because he was so proud to wear it. The smile says it all!
Now I've got three kids, and it really isn't cool to sew for two of them and not the third...so I sewed a tie for my oldest child, Talon. He was a good sport to wear it. 


Thursday, January 06, 2011

Creative Team Spotlight: Eva Dobilas

Each month at the begining of the month I am going to feature one of my creative team members so you can get to know them.  This Month, I'm starting with Eva Dobilas.  I love her flair for design and bright color choices.  I know I enjoyed getting to know her better, I hope you will too!

Love card created by Eva Dobilas with Ooh La La collection by Samantha Walker for Creative Imaginations.
Eva used Silhouette dies: artisan_rectangular_C00444_19210, abstract_flourish_border_C00447_19210
I interviewed Eva, and this is what she said:

Q: What is your favorite technique?
A: I don’t have a favorite technique per se, I simply like to try new things that attract me. Sometimes, it’s an old technique, that is was just rediscovered strikes me and gets me inspired to create. One thing I love is using my Silhouette, so if that can be called a technique, than that would be it

Eva used papers and stickers and ribbon from Sweet Tooth and Christmas in the Kitchen collections by Samantha Walker for Creative Imaginations.
Q: Where did you learn how to design?
A: I have been creating for 13 years or so, and throughout these years I learned a lot from my peers, just perusing magazines, online galleries, and I have been fortunate to take classes from well known artists and you could say I picked up a lot of things from them. But I always say, if one has the passion for something, they will learn everything that helps them to achieve their goal and my heart is in designing, so you could say I have done a lot of “homework” and practiced a lot. It’s been a fun journey and it’s something that I am still on as I continue to grow.
Eva used Silhoutte die joy_word_snowflake__C01091_19210  to create this ornament.
Q: What influences your design choices?
A: I lot of things can influence my design choices, not all at once, of course, but here are a few to mention. Silhouette shapes, colors, textures, papers, fabrics, stamps, coloring mediums….
This card was created with papers from the Ooh La La collection by Samantha Walker for Creative Imaginations.
Q: Who are your artsy inspirations...
A: Throughout my years of drooling over gorgeous creations done by other designers, I have collected a lot that inspire me and that I just adore. Here are a few, but really there are so many designers that I just love, so it’s hard to narrow them down to just a few: Amy Sheffer, Betsy Veldman, Jennifer McGuire, Tim Holtz, Christine Middlecamp.


Q: What do you enjoy doing besides crafting and designing…
A: I enjoy cooking, baking, in fact I am thinking of writing a dessert book based on my mom’s recipes, which are all incredibly amazing Hungarian yummy pastries, nothing like that on the market and everyone should have something sweet in their life…lol. I also love to knit, and just recently made a really pretty scarf for my hubby. My other favorite thing to do is reading anything spiritual and coaching people to change their perception about things that may have held them back in the past and help them achieve happiness and peace in their life.
Eva used paper and stickers from Wanna Be a Cowboy collection by Samantha Walker for Creative Imaginations. She used Silhouette Die set: 3_nesting_artisan_shapes_C00493_19210  


Eva is quite creative, and has shared with us a step by step to create this fun embellished T-shirt.
Eva was inspired by a technique she learned from Amy Tangerine’s t-shirts and also her son’s sweatshirt design inspired me to do this.


1. You will need a t-shirt, fabric and Silhouette machine.

 Silhouette SD Machine Lot - w/Extra Blade Mat Pens
2. Cut out Love Letters Silhouette shape and cut large enough design for t-shirt. Eva used fabric from the Enchanted Garden collection by Samantha Walker for Riley Blake Design. Eva also used Silhouette die: love_letters_C00754_19210 

3. Trace pattern on the fabric and cut it out, leaving enough space around it, so you can stitch around it.

4. Turn t-shirt inside out and place the cut out fabric on the inside, where you would want your design to be.

5. Hand stitch on the traced line.

6. Once all stitched, turn t-shirt right side out and cut t-shirt inside the stitched lines, so the fabric will show through.

And the end result gives you a designer t-shirt.

Wednesday, December 08, 2010

Rag Quilt Tutorial


I have photos for most of the steps and will verbally walk you through the other steps.
Time investment: approximately 8 to 12 hours.
Step one: Cut 42 squares of lightweight batting into 6 inch squares.
Step 2: Cut 84 squares of high quality flannel into 7 inch squares.

Step 3: Sandwich the batting between two squares of the flannel so that it leaves a 1/2 inch gap all the way around the batting, and the pretty sides show when your "sandwich" is closed.
Step 4: Sew an X in the middle of the flannel square so that the sandwich is "quilted together." Repeat on all 42 squares.  

Hint: The first rag quilt I did, I mixed the front and back pieces so that they were not the same, so when I laid out my quilt, I had to think of what the front and back side would look like.  This created quite a conundrum. I had to do a lot of flipping of fabric and flipping in my brain.  So I got smart and decided the next on that I did (like this pink one) that I would do the front and back side of the quilt with the same fabric so that I wouldn't have to worry about both sides as I lay out my squares.  It would also be cute to do solid on one side and patchwork on the other side.  
Step 5: lay two of your X quilted squares on top of each other. 

Step 6: sew them together on one side, leaving a 1/2 inch seam. 


Step 7: Now add a third square and sew so that the seam appears on the same side. 
Continue this process until you have a row of 7 squares.  

Step: 8 Now make 5 more rows of 7 squares for a total of 6 rows. 

Step 9: Now seam together the rows so that the seam appears on the same side as each square seam. You should now have your basic blanket with 6 rows of 7 squares.


Step 10: The Binding...you can do this several ways. You can simply leave 1/2 inch raw seam around the quilt and sew the seam twice for good measure. Or you can choose a fancy edge like the triangle edge I did for this quilt. (I know there is an official name for this...but I am not a quilter {yet} so I don't know the specific term.)   

Triangle edge: cut 52 6-inch squares of flannel. Fold each square in half diagonally.
Now fold each triangle in half again creating a smaller triangle.  
 Your triangle will have an open end.  Use that open end to insert the neighboring triangle. 
 Evenly space a row of 12 triangles so that they expand the same space as the top of the quilt, and secure with pins.  Make a second set of 12 pinned triangles to expand the bottom of the quilt. Now make two more rows of 14 pinned triangles to expand the same length as the sides.  
Sew through the triangles with a 1/2 inch seam on the edge.

Attach your triangles to the quilt...now I opted to reverse the side where my raw seam would appear...so that there was a fluffy edge on the opposite side of the quilt.  You can opt to keep all of your raw seams on the same side though.  To attach, lay flat on the quilt and line up your straight edges. Make a 1/2 inch seam to attach the triangles to the quilt. When you have attached all 4 sides, go around on that 1/2 inch seam one more time with your sewing machine for good measure.  

Clipping your seams:  Now that your quilt is all attached and sewn together, you are left with an ugly bunch of half inch raw seams. We are going to make them look fantastic by cutting into the seams with 1/4 inch snips that go nearly all the way to the thread of your seam. Do this step carefully through all the seams, just continue to snip in 1/4 inch increments. Be very careful not to snip through the thread on your seams...just cut up to that point. If you do happen to catch a thread with your scissors...just bring the quilt to your sewing machine, and seam that edge again. 

Washing the Quilt to "rag" it: When the entire quilt has the raw edges snipped (including your binding seam edge) then you will put the whole quilt into your washing machine.  Do not wash this with anything else in the machine at the same time, unless you want the other items to be lint and thread ridden.  After you wash the quilt, empty the lint trap in your dry. That step is very important, as you will fill your lint trap when you put your quilt in the dryer until completely dry. Remove from dryer and enjoy your fun fuzzy rag edges.  

I tried a different binding than I did last time I did one of these rag quilts.  I really like the way it turned out.  I'm still not sure if I should have just left all the rag edges on the same side, but I opted to do a reverse rag edge with the binding so that the ragged edge showed on the "clean" side.  I may try it the other way around next time.  I still like how this turned out, though.


Related Posts Plugin for WordPress, Blogger...