Ads 468x60px

Showing posts with label For All You Do. Show all posts

Sunday, May 25, 2014

For All You Do Card Tutorial by Pinky

Hey there SW friends, 
It's Pinky today with a step by step tutorial for this card. 
We all know Samantha has some pretty incredible designs out there and
this is no exception. The "For All You Do" Card file is beautiful. 
I am going to share just how I created this card today. 

Pull "For All You Do" Card file up in your Silhouette program,
and cut file from a 12X12 sheet card stock. I used a pale green. 

 Remove card and using Krylon coral spray paint lightly spray edges.
(Head outside it's spray paint after all!). 
 Remove sentiment carefully and run through sticker machine. 
(or use wet adhesive, I prefer a machine). 
Trim out corrugated paper slightly smaller than card and adhere 
to front of card so the coral edges still show. 
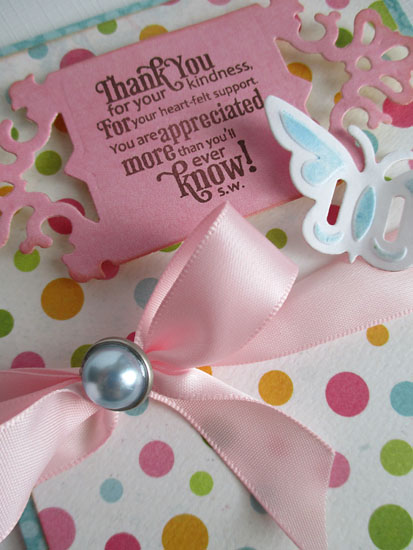
 Rub and peel sentiment from sticker paper and
apply over corrugated paper. 
 Add Liquid Pearls to sentiment as shown or randomly
to add texture and a pop of color. I used Flamingo Pink. 
 Adhere flowers to bottom corner. 
 Add buttons and sequins, then add pearls to the middle of the buttons. 
 Lastly punch out 1" butterflies from pastel paper, and adhere
to card, then ink edges in coordinating blue color for that gradient
effect which is subtle but very pretty in person. 
 Now you have an incredible card that will be a gift to anyone who receives it. 
I hope you enjoyed my project today!
Until next time- keep on creating.

Saturday, May 24, 2014

Candy Jar Card by Diana

Hello! Diana Fisher here with you today. 

There is nothing better than bright colors on a card — it's like gifting sunshine. For today's post, I am sharing how I made this candy jar card using a Samantha Walker Silhouette file and enamel dots. 


This is the candy jar as it is from the Silhouette store. Ungroup the file and delete the circle meant for the candy pieces, the little circles on the jar and the lid, and the reflection piece on the jar and the base.

Below is what you should have left for your cut file.


I used gray card stock to cut my jar and a piece of Samantha Walker's Echo Park Keepin' Cozy for the interior of the lid cut. 

Once I had jar positioned on a piece of white card stock, I began to layer in a variety of enamel dots in different colors and sizes.


The finished card is bright and cheerful. To add a sentiment, I cut a teeny tiny tag that was attached to the top of the lid with twine. The "sweet!" stamp is from Samantha Walker's JustRite stamp set called For All You Do Vintage Labels Three.


Saturday, March 08, 2014

Stencils with Silhouette Studio Files by Diana


Hi! Diana Fisher here today to talk a little bit about creating a custom stencil using a Silhouette Studio file. 

After I finished my stenciling, this is the finished card that I made. Read below for more on how I achieved this look.


I started with the Card Triple Heart Corner Pocket studio file from Samantha Walker.


After I ungrouped the pieces of the card, I isolated the single hearts. Then I created a pattern of falling hearts that you can see below.


You can buy a stencil material to cut out stencils you plan to use for a long time, but if you are just going to use this stencil a handful of times, you can use a 80 - 100 lb paper that is stiff and will hold your pattern well.


I held down the stencil with a small piece of taps and began to put down my colors. I started with a light pink and got a nice base color for the hearts.


After getting a good pink color, I began to add a little bit of a hot pink color. This is a raspberry ink from Avery Elle.


I added the color so that it was richer at the top and lightened as it progressed to the bottom. This works well with the falling hearts pattern I have on this card.


After I had the colors just the way I wanted, I removed the tape and the stencil. This is the fun part! 

As you can see above in the first picture, I then decorated my card using a sentiment from For All You Do Vintage Labels Stamps from JustRite, some vellum and sequins. I wanted the stencil to be the star on the card, so a minimal sentiment and embellishments did just the trick.

I hope you enjoyed my stencil tutorial today! 


Saturday, July 27, 2013

Thank You Card by Daniela Dobson

Hello, Daniela here with a Thank you card.


Samantha Walker products used:

1. Make card base from Cool Summer paper collection. Cut a smaller piece from polka dot paper and adhere to the front. 
2. Die cut ornate square from pink 6x6 paper pack and stamp a sentiment from For All You Do Vintage Labels Three stamp set. Adhere to the top of the card using 3D foam squares.

3. Die cut and emboss butterfly from Butterfly Corners dies in white cardstock. While the cardstock is still attached, color the exposed/embossed parts with chalk.


4. Adhere butterfly to the card with 3D foam square. Tie ribbon into a bow and add a brad.


Thank you for stopping by today and let me know if you have any questions.


Related Posts Plugin for WordPress, Blogger...