Ads 468x60px

Showing posts with label SW Par-tay Thyme. Show all posts

Tuesday, May 06, 2014

Paris CD Holder with Allie!

Hi, it's Allie from My Card Party and I have a fun tutorial for you today, a decorated CD Holder. I thought this would be the perfect gift for a friend's Mom - it will hold a CD filled with pictures and music inspired by their recent trip to France.

You'll need three of Samantha's files and a font, along with a sheet of her fun Parisian Poodle paper from the Carta Bella collection Paris Girl.

Cutting Files:
Eiffel Tower (#41675)
Curved CD Holder (#46575)
Font: SW Par-Tay Font (57535)

I start by cutting out the CD Holder, at the exact size it appears.
Next, I cut the 5 Flower Corner - I like to layer it right onto my other shape to see how it will fit.


I delete the CD Holder, leaving behind the foliage.
Then, I ungroup the foliage and drag away the parts I don't need at the moment.


I cut the bottom outline in green.


I delete the outline and bring back the foliage. I eliminate what I don't need, and cut the leaves in green. I've put an x over the parts I delete.


Next, I cut Paris with a few modifications. I swapped a small circle for the dot on the i and weld everything together. Size shown.


I pull all my files back together and size the Eiffel Tower to fit, then remove the other parts and cut it from black cardstock.

Assemble as shown. When adhering anything to the outside of the CD Holder, make sure to ONLY put adhesive on the bottom corner, so that your CD Holder will open.
I inked the foliage and applied Shimmer Texture to both the bottom layer and the separate leaves. The leaves are attached only by the stem, for a fun 3D effect. I also bent them slightly.
I used hot glue to apply the flowers to the foliage.
I use a pin to apply adhesive where the letters will touch the flowers.


Supplies:

Digital Cutting Files: Samantha Walker: Eiffel Tower (#41675); Curved CD Holder (#46575); Five Flower Corner (#7638); Font: SW Par-Tay Font (57535)
Patterned Paper (Parisian Poodle)
Cardstock (green, black)
Flowers (Wild Orchid Crafts, Prima)
Rhinestone Flourish (Want2Scrap)
Heart (chipboard painted, inked and embossed)

Thanks for joining me today. Happy Mother's Day.

Saturday, May 03, 2014

Creating your own Frozen Party Decor by Christine Meyer

Happy National Scrapbooking Day!  Christine joining you today with a crrrrrazy suggestion! Let's go back to winter for a little bit today!  I hear the collective sighs....but if you have a child in love with the movie "Frozen" you are probably still seeing winter type things around right???  My sweet daughter wanted a "Frozen" birthday party last month.  Newsflash...there is not "Frozen" party decor to be had yet.  If it exists, I could not find it.  So I had to get creative.  And in came Samantha Walker with her gorgeous winter files to the rescue.

Now, we're talking about a 7 year old here.  So I wasn't going to go overboard with decorations.  But I definitely wanted a banner and snowflakes.  I got my Silhouette cranking and cut full size snowflakes on 12 X 12 cardstock and then also some reduced size ones.  
I like to create a backdrop for her parties that we can take pretty pictures up against.  I started with an aqua blue colored fabric (could be a cheap tablecloth too - I just happened to have some shimmery material on hand.  I draped twinkle lights behind it.  I then taped the snowflakes at varying lengths to the the ceiling making use of some bakers twine. 

 Next came the banner.  I used Samantha's Par-tay Thyme Font to cut out her name.  The L in Lucy just has to be in a script font right!?!  
I simply attached those to some metallic cardstock (yay for shimmer) and punched a cute border along the bottom. A hole punched in each top corner allowed me to string it up and space it out easily.

This all took me about an hour and the personal touch I was looking for.  Beyond creating those special decorations I added some of my Christmas winter decor in coordinating colors and of course Olaf!  Finding him was a pleasant surprise and a perfect decoration addition since I had little else.  I was really pleased with how it came together and satisfied that I was able to make it work for her even without a party store's help!

Doesn't it look just beautiful!?!  I should mention that I created a couple of tissue paper pom poms (you can see them in the upper corners) those were also very easy - think back to your elementary art class days and making flowers!

I came up with games to go along with several of the songs and the girls loved it!  
Here's what we did:
Do You Wanna Build a Snowman?: For this I gave them toothpicks, big marshmallows and little marshmallows and told them to build snowmen while the song was playing.
Fixer Upper: They used toilet paper rolls and fixed up one of their friends as a lovely snowman.
Let it Go: This one was the most fun...I gave them big marshmallows and they had to stand behind a line and throw them at my hubby's head trying to knock a cup of it (yes he's that good of a sport).
In Summer: We did the traditional "hot potato" game but used a chunk of ice instead of passing something else.

Now of course I had to document the party and share that with you today also!  It is National Scrapbooking Day after all! 

I used Samantha's Par-tay Thyme Font for my title but other than that I stuck to using her Keepin' Cozy line from Echo Park.  The colors in it just worked perfectly!  I did lots of fussy cutting and then topped it off with stickers!  

Now, let's get back to spring!

Samantha Walker Supplies Used:


Saturday, April 05, 2014

TEXTING Silhouette Style by Allie!

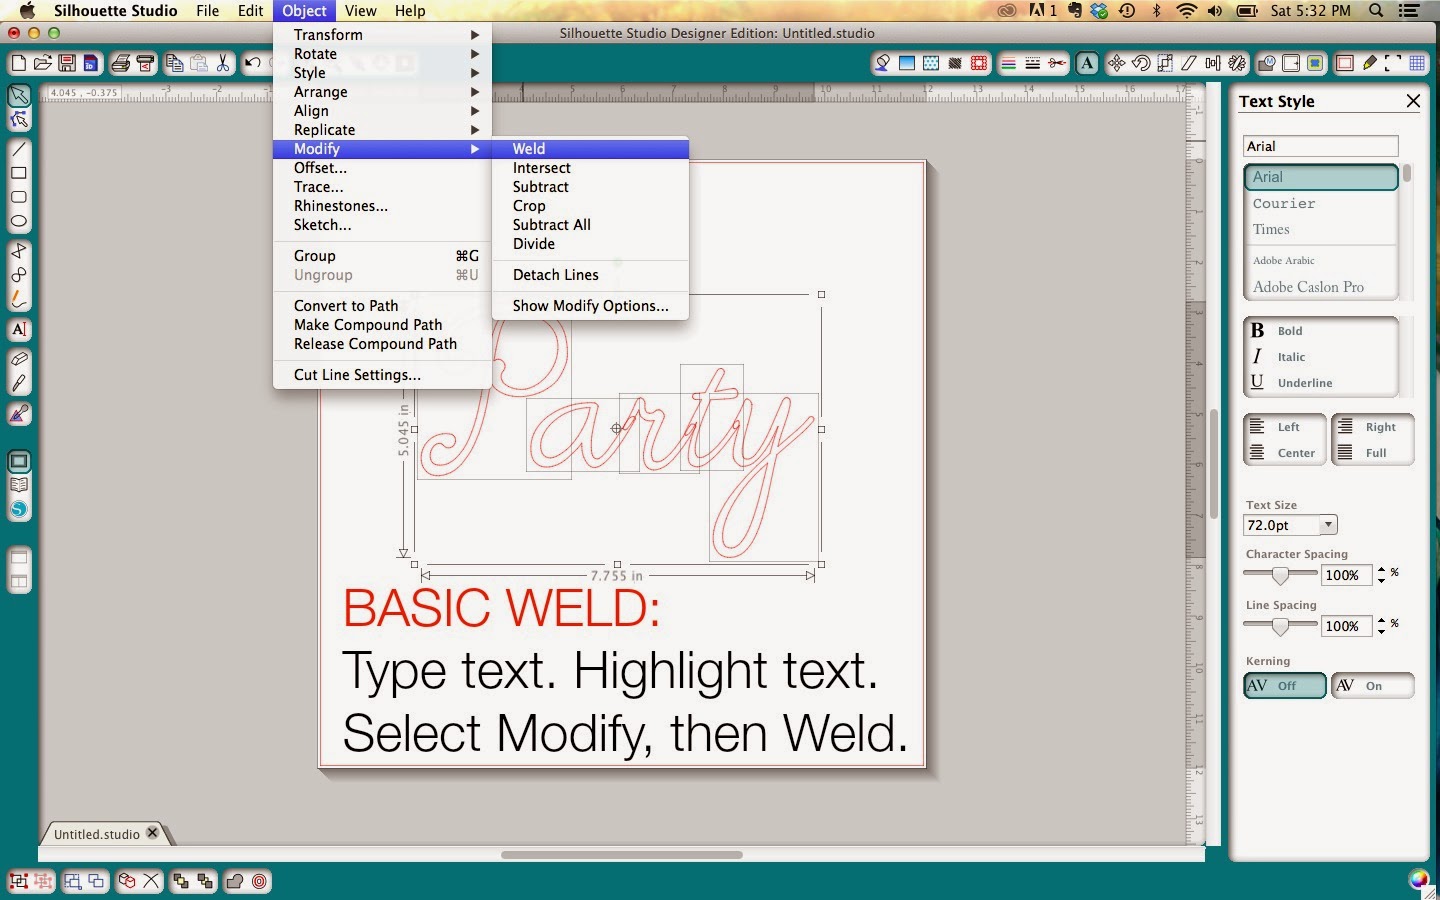
Samantha has this fun new Par-tay Font [#57535] in the Silhouette Online Store and much like the image states, it welds well!

Have you welded? Welding makes applying text to your projects easier, especially for vinyl projects. In addition to welding, let me walk you through some other fun things you can do with fonts to make your projects more fun.

Fun things to do with fonts
New Par-tay Font from Samantha Walker

For a Basic Weld, type your word, select the text and choose OBJECT then MODIFY and select WELD just as it's shown below. Any overlapping letters will then be combined.


What if you want to weld your words and make them shaped, for example the word Rainbow over an actual rainbow?

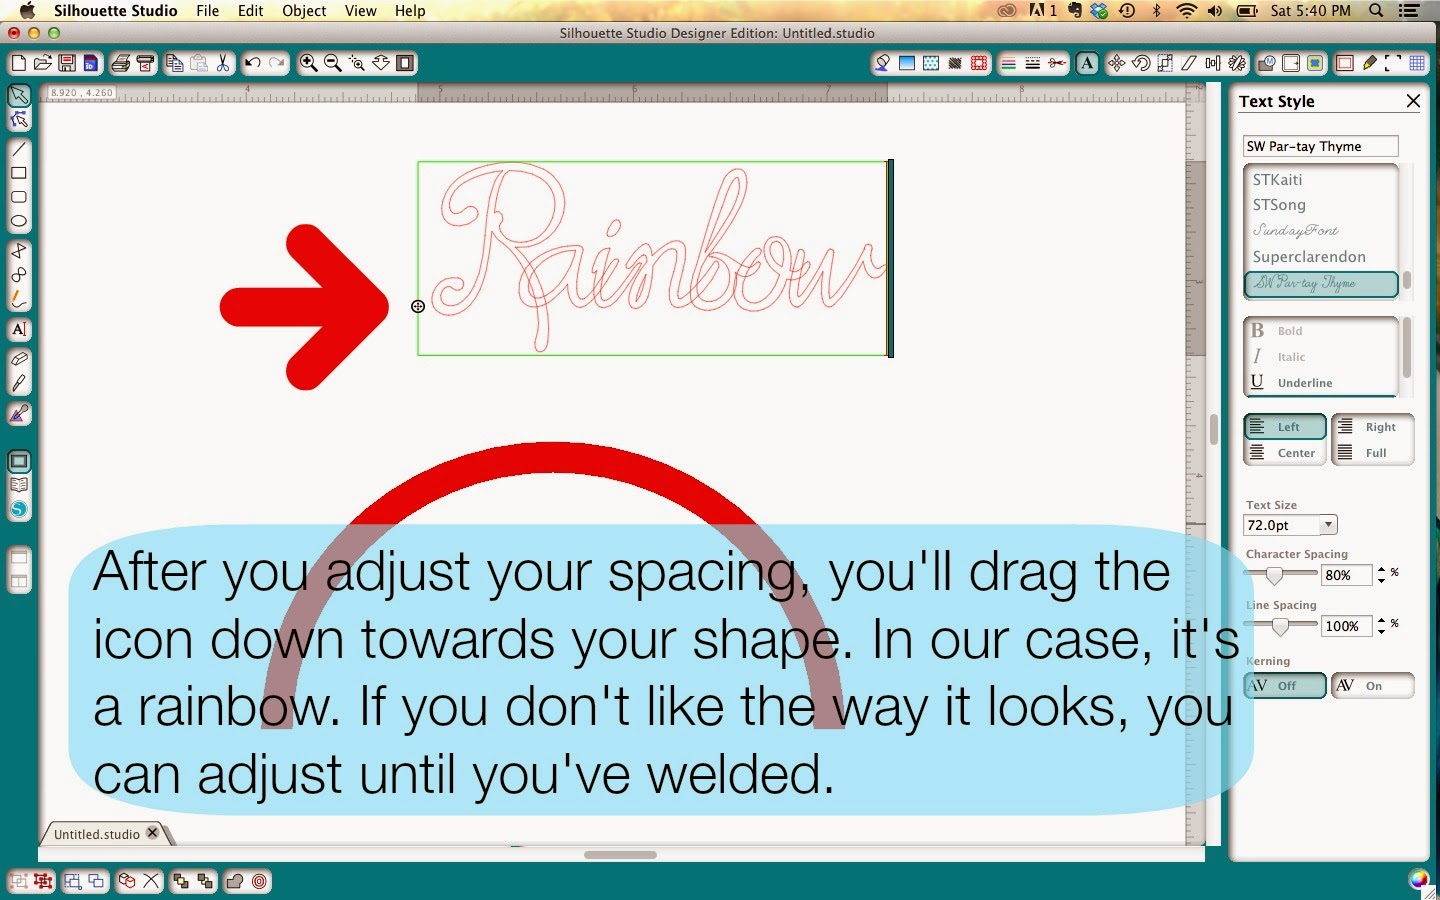
Since you're curving your text, you need to space the letters a little closer together. Adjust your character spacing. When you click on the little A to type your text, the Text Style menu opens. The arrow below is pointing to the Character Spacing option. I found 80% to work well for the Par-Tay font. Sometimes, a little trial and error is necessary.

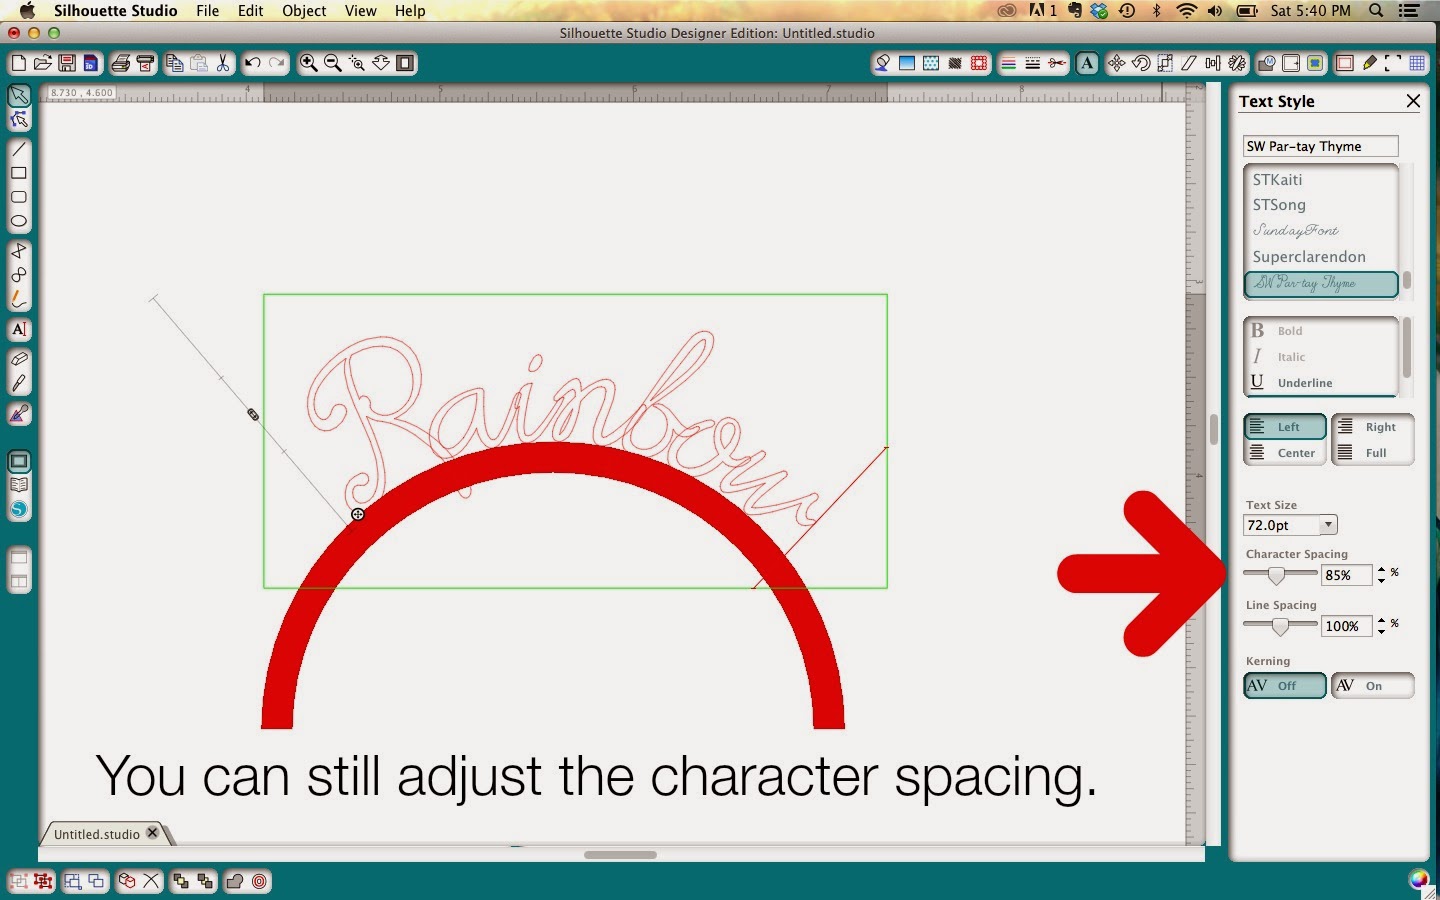
 If you adjust and then curve your text and it's too far apart, or even too crowded... you can still adjust the Character Spacing until it's welded.


To curve the text, you'll click on the little round circle (shown above - on the lower left side of the box of text). Pull it down to the object until it curves. You can drag it along and place it wherever you like. This works on any shape, and can even be used inside the shape - just pull past the shape.

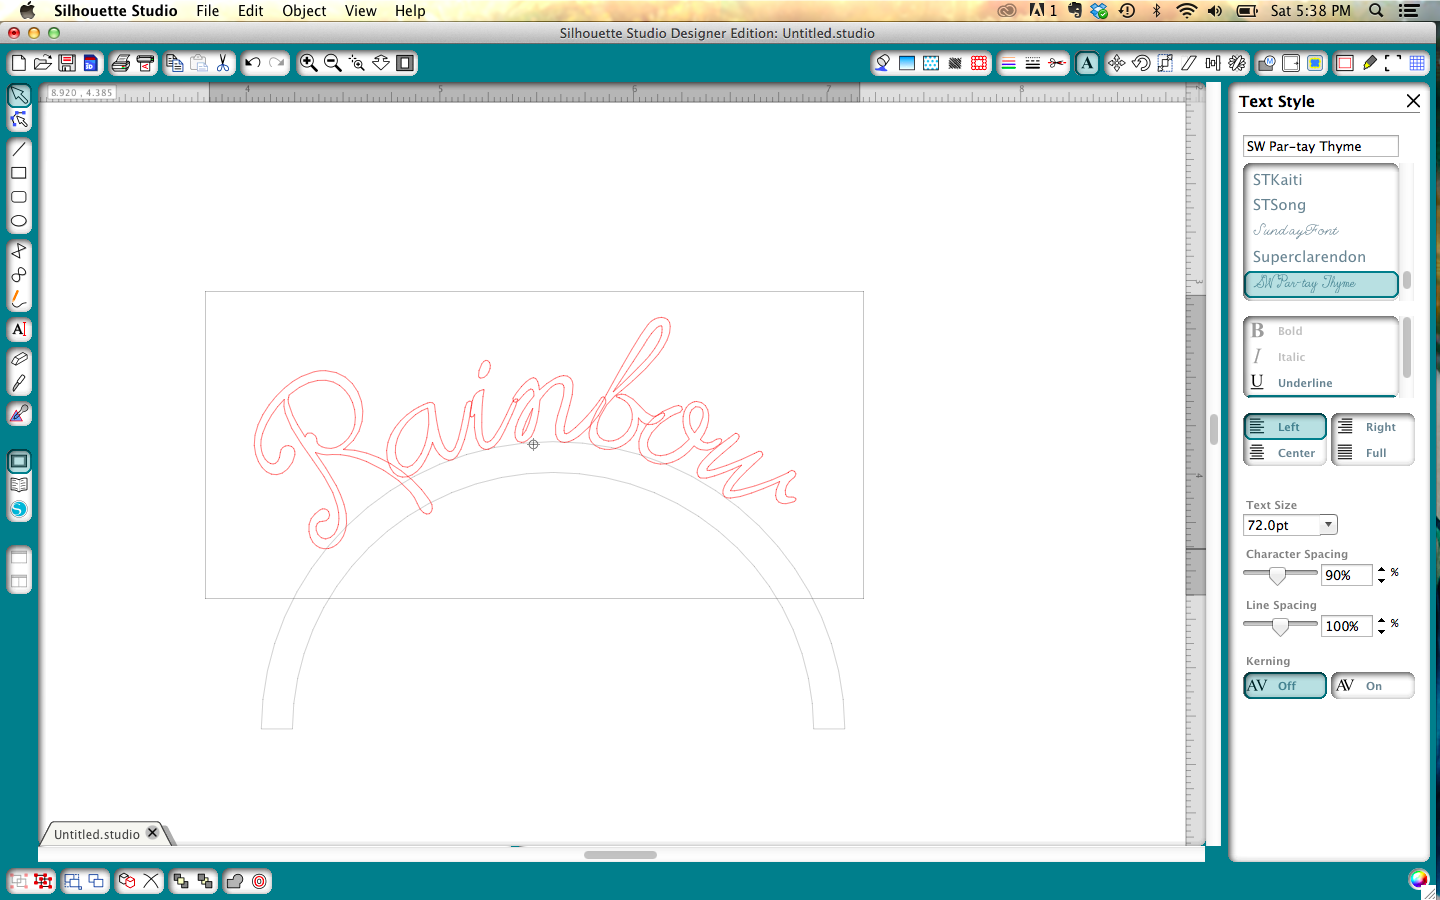
 Voila, you've curved some text. Note, I've turned this upper layer of the rainbow red just so you can see better.

Now don't forget to weld!  (not shown)


 If you're still with me, and you've mastered all that, let me walk you through some of your other text options.


There's a little icon that looks like a forward slash ... just like this character -  / 
This tool opens the SHEAR menu and lets you adjust the shear horizontally or vertically, also known as kerning.

Each picture shows you what that option would look like.

HORIZONTAL SHEAR PLUS 30º

HORIZONTAL SHEAR MINUS 30º

VERTICAL SHEER PLUS 30º

VERTICAL SHEER MINUS 30º


Obviously you can kern more or less, using any of the tools, and you can even customize. You can still curve (that is, shape) kerned text as well.

I really like to customize text and make it work for my projects.

I'll share one more thing. Some text is just too thin, and maybe you're frustrated because you like it but you can't cut it out of certain materials. Lavenderia Script was just like this for me, but I thought it was so pretty.

Note: If you want to shape your thin text, you will want to shape first and then proceed with the offsetting. You'd also follow this procedure to mat words.

I offset the word Merry to .07. You can easily do this with the Par-tay font as well.


Thanks for joining me today.

Happy TEXTING!


Related Posts Plugin for WordPress, Blogger...