Ads 468x60px

Showing posts with label crafting. Show all posts

Friday, August 09, 2013

Silhouette Cutting File Tutorial: Stationary Box

Craftsy Today I'm going to show you how to put together my new A2 Stationary box. This project will maximize the use of two 12 X 12 pieces of double-sided card stock. You can put it together with or without the lid, you can add all contrasting panels or use just some. The box will hold A2 sized stationary (8.5 x 11 quarterfolded cards.) Customize the box how you want with ribbon and embellishments!


First, you will want to open the design in your electronic cutting machine's software. I'm demonstrating the file on the Silhouette Cameo using the Silhouette Studio Designer edition.

First off...I recommend using a double-sided card stock with a detailed design on the front and a subtle design on the back. I used my Antique Damask cardstock from my Traditions collection for Carta Bella. This worked perfectly, as the yellow on the back was a subtle complimentary color to carry the detailed damask on the front.
 When you open the design, half the cut lines will appear in the active area. 
Go ahead and set up to cut this in this position.
Now you will want to select the design with your move tool, and shift the entire design over 12 inches so that the other half of the design appears in the active cutting area.
Now that the design is cut, find these two pieces as shown above. Be careful when finding the piece on the right side with the angled corner--there are two other similar pieces, you will want to choose the one that is the larges of the three. The smaller two will become the contrasting panels for the sides of the box. 

Now glue the tab on the larger piece to the piece on the right.

Fold all the score lines, and glue the tabs to attach the angled sides to the bottom, as shown below:
Put glue on the front tabs and glue them to the angled sides.
Find the lid piece, and add contrasting panels if you wish. I only added the front artisan shaped panel and left the panels off of the top of the lid to expose more of the yellow card stock.
Glue the tab on the lid. You can choose to glue the lid on the inside or the outside of the box. I chose to glue the tab to the outside of the box...I'll show you why in just a second... 
 When glueing, I hold pressure on the glue point until adhered.
I like to use a good paper glue like: Tombow Mono Liquid Glue. This won't warp paper and when it dries...the bond will not fail. It is permanent--and when I say permanent, if you try to pull your paper apart, it will tear your paper before the glue is compromised. It's really good stuff.
Remember how I chose to glue the tab to the outside of the box...you can see my joint...
as I said...
I did this for a reason...
Here's the reason for glueing the tab to the back. I chose to use a contrasting panel on the back of the box. I placed the panel over the tab on my lid, as the tab would be strengthened by being between both the box and the panel--cool huh!
Fold the tabs on the optional interior divider. 
Place the optional divider where it suits your needs. You can add more than one divider...
you'll just have to ungroup the design in your cutting software, and select more to cut. 
Here's your finished box with the lid closed. 
It would be really cool to add thin magnets to latch it closed.
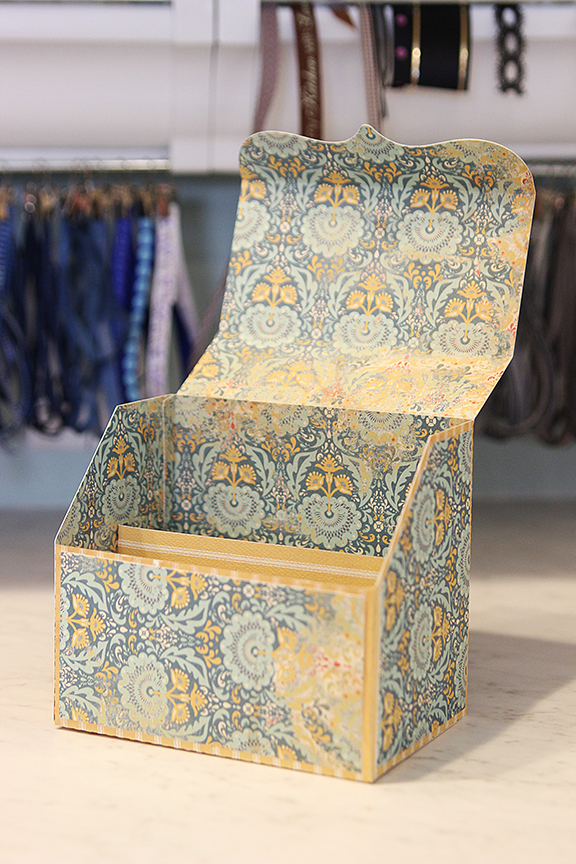
Here's the box in the open position.
Here's the box filled with a few cards...
Have fun customizing your box!

Happy Crafting!
Samantha Walker

Here are some of the supplies and other fun stuff!


 Get Amazon Prime Membership! Enjoy Free 2-day Shipping on Prime products, plus access to Free digital content like videos, books, and more!

Wednesday, August 10, 2011

Sweet treat T-shirts!

So glad you stopped by! You are in for a treat! This month my team has taken some of my fabric and has created some very cool projects to get your creative motors going.  Not all of my team members are seamstresses...in fact many of them are general crafters that I encouraged to use fabric in a crafty way.  I knew they could, because they are innovative. You see, when creative people are presented with a new medium, "out of the box" thinking starts to happen.  I can hardly wait to see what my team has prepared.  Contrary to popular belief, fabric does not require sewing.  Some of my girls sewed, but from what I hear, others used glue guns, hand stitching, and other unconventional methods to show you news ways to think about fabric.  

This month, I'm sharing a couple of shirts that I made for quilt market. They use fabrics from my Wanna Be a Cowboy 2 fabric line for Riley Blake.  I made a fringe applique with machine stitching.  I used a variety of decorative stitches from my machine, and just turned my fabric slowly to sew.


Sunday, July 24, 2011

Creative Team Member spotlight Jennifer Ingle

Cuckoo Clock Card created with Cuckoo clocks stamp set by Samantha Walker for Unity Stamp Co. Papers are the Kokeshi collection by Samantha Walker for Creative Imaginations.
I have the privilege of sharing the work of Jennifer Ingle with you today. She is such a fun spirited member of my creative team. Her designs always have an innovative twist.  She not only works with paper...but also fabric in her one of a kind art dolls, which she affectionately names.  I asked Jennifer a few questions about herself and here is how she responded:
Ice Cream card was created with "The Sweet Life" Stamp set by Samantha Walker for Unity Stamp company. Papers are from the Heidi collection for Creative Imaginations.
Q.  What is your favorite Technique?

That's a hard question, but I think lately it has really been paper piecing.  I love cutting out the tiny pieces from various papers and putting them back together like a little puzzle and the results are just too fun!

Butterfly card was created with "Be You" Itty Bitty by Samantha Walker for Unity Stamp Company. Paper is from the Blossom collection by Samantha Walker for Creative Imaginations.
Q.  Where did you learn to design?

Well, I've been making stuff since I developed fine motor skills, pretty much, so I'm not sure if I can define where I learned to design.  I pick up new techniques by looking at the art of others, working with new supplies, and coming up with ideas and then trying to find a way to make them work.  I am constantly learning in every aspect of my life and since my creative life is such a huge part of who I am, learning and growth is something I am always striving for.

Flower card was created with paper and stickers from the Blossom collection by Samantha Walker for Creative Imaginations.
Q.  What influence your design choices?

Product.  I think that might be a horrible answer, but it's true!  When I get a new product in my hand, be that a fresh pack of paper clay, some great new patterned papers, a set of stamps, or a vial of vintage buttons from the antique shop it generally spurs me on to create something!  I am pushed by my desire to try out new things and make them work in my own way.

Doll was created with Wanna Be a Cowboy fabric collection by Samantha Walker for Riley Blake Designs
Q.  Who are your artsy inspirations?

Well, she will kill me for saying this, but Eva Dobilas is an amazing card maker and I am constantly inspired by her work.  Becky Shander  and Terry Stevens are wonderful mixed media artists and Rachel Wetzel and Abi Monroe are some really inspiring art doll artists.  I could keep going, as there are so many fabulous people out there creating so many fabulous things!  

Organdy Ribbon card was created with the Heidi collection by Samantha Walker for Creative Imaginations.
Q.  What do you enjoy doing besides crafting?

There is stuff other than crafting???  HA!  No, really, I love to read and I collect children's literature.  I like to make cupcakes when I have time and I absolutely LOVE hanging out with my fabulous Hubbums and my two beautiful black labs, Maggie and Thatcher. 

Ear rings were created with shrinky dink film. They were stamped with the Kokeshi stamp set by Samantha Walker for Unity Stamp Company.

Sympathy card was created with Encompassed Grace stamp set by Samantha Walker for Unity StampCo.
Jennifer has such a fun blog as she writes from the heart and her delightful personality shines through.  You will have to visit her blog frequently.

Thursday, November 18, 2010

Introducing creative team member Eva Dobilas!

Last month I selected a team of 10 fabulous crafters to work with my product over the next year.  I selected them because each of them had a unique "something special" about the way they design.  Some love bright and bold...some like a simple graphics approach, some love to make cards, some paper mache, and others are true scrapbookers at heart.  I have had the joy of watching them post projects on my Facebook page that feature the use of my products.  I would love to introduce you more in-depth to each of them over the next week.  


Today, I am starting with Eva Dobilas.  


Let me introduce you to Eva.  She is a delightful person to know...always up-beat and positive and it's catchy...not only in her words, but also in her craft.  I discovered her beautiful work about a year ago, when she did a lovely project with my birdhouse Silhouette die. I loved how she added so much life to this simple die design...and particularly loved the stamps she was using.  To make a long story short...she was the one who introduced me to Unity Stamp Company...and the rest...is history.  I am grateful for that introduction as I have been having so much fun designing stamps for Unity! Eva loves to use bright colors, and pays attention to detail.  Here are some of the things she has been busy making over the last 6 weeks...I bet you she crafts every day...because this is just a sampling of many projects she has created in the last little bit.  She has a true love for design.
To make this gorgeous fall card, Eva used one of my digital cutting files from the Silhouette digital download store called:  2_layer_swirly_leaf_C01028_1921010/19/2010.  I love her choice of fresh gingham ribbon to make this card POP! 
Eva used stamps from the Ippity Fall for You set  (this is Unity Stamp Co. sister company)  to create this festive fall pumpkin. The Thanksgiving sticker is from my Harvest Collection for Creative Imaginations and the label that holds the cute arrangement of  stamps at the top, is one of my digital dies: 1_label_frame_tag_C00885_1921008/09/2010, available from Silhouette designs.  Here adorable project was created with papers from my Harvest paper line by Creative Imaginations.  I love Eva's detail in her rolled flower at the top of her pumpkin!  

For this lovely card, Eva used my fern_artisan_C00375_1921012/17/2009 Silhouette cut set and my Encompassed Grace stamps from Unity. Eva started out with white paper, but she inked it up with Ranger Distress inks--very cute! Love it, Eva!


This cute pair of dimensional projects by Eva, make me smile! She made this adorable little Halloween House with my birdhouse die from Silhouette, papers from Basic Grey (a company I LOVE--they are good people) and stamps from Ippity and Unity stamps.  Eva's second project uses another one of my dies from Silhouette called, spider_web_treat_bag_C017107/07/2009 , which you can fill with candy for your favorite little trick or treater.  She also used Copic markers, which Eva is really good at...as she demonstrates on the witch in this project. The bats are also some of my digital Silhouette cuts, bat_circle_set_C01015_1921010/18/2010.  I think these projects are precious!
Eva created this card base with my Silhouette die: jack_o_lantern_card_C20090904130829_19210
09/04/2009 .  Her card turned out so fun with all of her extra layers and embellishments, including stamps from Ippity.  I sure love it! 

Eva used my Ooh La la paper collection from Creative Imaginations to complete this cute card.  My favorite thing about this card is her choice to add an unexpected pop of blue!  Clever way to add spark!
I have to Credit Eva for inspiring me to design this snow globe die for Silhouette (christmas_snow_globe_C01068_19210)  She asked if I could do it for a project she had in mind...I was happy to oblige...as I knew Eva would do fabulous things with it! I added the scalloped border around the snow globe knowing this kind of motif is something Eva already loves to do with her cards.

Eva used My Wanna Be a Cowboy papers from Creative Imaginations and all the shapes were cut with the following Silhouette digital cutting files:  

Here is another card by Eva.  For this card she used papers from my Harvest collection for Creative Imaginations, and coordinating stamps from my Fall Family Memories set for Unity Stamp Co.  Eva also used my artisans_nesting_rectangular_C00685_19210 05/04/2010 available as a digital download on the Silhouette die cut machine site.

Make sure to check out Eva's blog.  She is a regular blogger and always has inspiration to share.  

Monday, November 08, 2010

Mom's Quilt! She's Amazing!

I was so glad to have special "pop-in" visitors today...my Mom and Dad came by--only for a brief visit.  But any visitors right now, whether long or short, were welcomed. I've felt a little house bound this week with a my youngest being sick with a nasty cold and pink eye. Having one sick kid certainly changes the mood around the house as he's been a little touchy, and my other two kids have been stir crazy as we haven't gone anywhere all weekend. That's probably why Talon decided he would go to church by himself today...it was just nice for him to get out of the house and do something else. I was proud of the initiative he took to get there...he rode his bike, and stayed until the end. He's a good kid.

My Mom came with the newest quilt she put together. This one is for my sister Sara's little baby...to be born this week. I absolutely adore this quilt! It is just yummy! In my Dad's words...he said, "it screams Baskin and Robbins." Which is quite appropriate as that is where my sister worked all through high school. My Mom used my Wanna Be a Cowboy fabric from Riley Blake. She used the soft cotton flannel from this collection on the back. I love how she used cream to offset the stars showing off the variety of fabrics she used. So cute! The pink border sets everything off so nicely...it matches more closely, the photo turned the color more lavender...which it is not.  My Mom's smile is my favorite thing about this photo...she looks so pleased with her work of art...and she should be, because she did such a beautiful job!  I think she is up to 15 quilts for 15 grandbabies...way to go, Mom!

Wednesday, September 22, 2010

Guest Designer, Eva Dobilas...WOW!

I am thrilled to be featuring guest artist, Eva Dobilas.  She is actually the reason why I am designing stamps for Unity Stamp Company.  Eva was the one who introduced me to Angela the owner of Unity.  Eva's designs caught my eye when she used my birdhouse Silhouette die to create a beautiful project I featured her on my blog a few months back.  It is a truly amazing project, and worth looking at again if you haven't had a chance to see it.  What I like about Eva's designs is that she has such a knack for creating such beautiful color combinations, and adding cute little details.  I'm sure you will see what I mean after you look at these WOW cards.  Eva used a combination of Stamps from my collections at Unity, and digital die downloads from the Silhouette machine store.  Thanks, Eva for being the featured artist on my blog...you are incredible!

What got you into paper artistry?
The first time I bought a stamp was about 18 years ago, as a stay at home mom trying to make a little cash and selling cards at school shows.  I sold Christmas cards and bookmarks and I was hooked on embossing, stamping, and coloring.  13 years ago a friend invited me to a scrapbook party, and I started working with pretty papers and layouts, and till today I blame her for all the hoarding I do…hehehe


What is your favorite technique?
I don’t really have a favorite technique; instead I am a lover of all different techniques and love to try anything new that attracts me.  I love Splitcoaststampers for all their challenges for the techniques.


What do you think makes your work unique?
That is a hard question to answer, but I will try my best.  I love the pretty feminine look, semi distressed more with inks.  But I also love the grungy look, although I tend to pretty that up, too..hehehe.  Somehow I manage to add feminine touches to most everything.  Love ribbons, still on the crinkled ribbon craze as you can see from my cards.

What inspires you?
I get inspiration from other artists, blogs I visit, and Etsy is a great site, their daily e-mails sometime trigger the best work out of me.  But really I am mostly inspired by colors and sketches.

Besides crafting...tell a little about yourself... and anything else that might interest readers.
Other than the love of stamping/crafting, I also have 4 boys in my life, my wonderful partner, Michael, who loves me almost unconditionally and I just love him for that, my amazing son, who I am totally crazy about even though he is 20 already and 2 sweet kitties, Fuzzy and Louis, who make me laugh and feel loved every day I spend with them.  I love my life with all the curves and ups and downs it provides me and try to carry my own sunshine wherever I go, at least most of the time and love to help and inspire others to do the same.

Thursday, June 03, 2010

Silhouette Build a Damask Set

Well a great idea came through on my Facebook fan page on Tuesday from Angela Thomas, for a Silhouette die design, and I ran with it. (I still have other requests on my list that I haven't gotten to...so there is a good chance your request will still be created, if I told you it's on my list. However, as an artist, I sometimes get carried away with one idea, and it spawns another...then another, and soon I am on a snowball of ideas--growing and gathering more as it goes. When that happens, I can't stop...as that is all my mind can think about. Building a damask just happened to be one of those ideas.)

Angela asked for a damask pattern that she could make a stencil out of...something where the pieces could be bigger so that she could stencil her wall. So I started making pieces for a damask...then one flourish inspired another...then a string of related borders...then soon, I had all these pieces I could use to build a damask. So I tried to decide how I would arrange them, and realized that there were endless options. So I decided that I would just give you the parts and let you decide how to arrange your damasks...or use the pieces independently as elegant flourishes. I'll start you off with some inspiration with some patterns I came up with...the pieces that I used...and then you can duplicate or make variations of the samples I show. To make a pattern use as many or as few of the pieces as you want, duplicate and reflect pieces...ungroup the designs and use just parts of the images if you want to simplify the look. I was planning on a project to go with these designs...but my husband just told me we are going camping today (we are a very spontaneous family), so that will have to wait until next week. But just to get you started...here are some of the patterns that I created...


I would LOVE to see what you come up with and how you use these pieces. So please send me a picture of your project when you finish show I can share your inspiration with others here on my blog or here. PS...there is no right or wrong way to do this, so feel free to explore and get creative!
Related Posts Plugin for WordPress, Blogger...