Ads 468x60px

Showing posts with label working cuckoo clock instructions. Show all posts

Tuesday, March 24, 2015

Paper Cuckoo Clock Assembly Tutorial

I just finished cuckoo clock #2. 
It took a little longer to finish up, as some other things crept in and took precedence...that's how life happens though, right? We have plans to do one thing, then another thing screams out that it's now on top of the priority list. I'm learning that the trick is to just roll with it, and take it as it comes.

This clock goes together much like the last one at this link here:
It will also use the same basic instruction for fitting it with a clock kit, found here:

and now...you can also create an embroidered 3D cuckoo clock out of fabric.
Details for how you can get this embroidery file and project free, can be found here:

If you haven't seen those two posts, then they will be where you want to stop first.

Alrighty then...ready for this one...

You'll need at cutting machine, like a Cricut Explore or a Silhouette

The file is available at the Silhouette Online store at this link here:

Supplies: 
3 12x12 sheets Aqua cover stock (or thick card stock)
1 sheet any color cover stock for the part that will hold the clock on the inside.
2 12x12 sheets Red cardstock
1 12x12 sheet dark aqua card stock
1 12x12 sheet cream card stock
1 12x12 sheet brown card stock
1 sheet white card stock for clock face (optional if making decorative non-working clock)

You will need a really strong, non-warping paper glue like Tombow Mono Adhesive (I like to buy it in bulk packs...I go through a lot of this stuff and hate running out.)

Size:
When made at given size, this clock measures approximately: 18 1/2 inches tall by 10 wide, by 3 1/4 deep. Without the pinecone weights the house part measures approximately 10 1/2 tall. 
1-6. Fold chimney, attach tab to close box. Fold bottom flaps out. Slide through rectangular hole in the roof and fold the bottom flaps out and attach to the backside of the roof.

7. Fold decorative chimney topper, then glue. 

Attach both rectangular roof rectangles together so the single tab joins them at the top, leaving the other two fold lines at the ends. 
REFER to the pictures in the previous cuckoo clock tutorial for attaching roof strips together. 

8. Find the rectangular roof pieces, and the wavy roof shingle pieces that have the fold lines on them. Fold these roof shingle pieces then attach one of them so that the fold line of the shingle lines up with the second fold of the rectangular roof piece. Do this to both sides.

9. In the file I have a few roof shingle pieces that have a section removed from them so that they can go around the chimney. I have provided this piece two times, once for the darker pink, one for the lighter pink to leave you with options on spacing.  Depending upon how closely you space your shingles, you may end up needing the lighter pink or the darker pink when you come to the base of the chimney. 

10. Find the side shingle pieces that will go on the sides of the chimney. Alternate the dark pink and light pink pieces until you come to the top of the chimney.

11. Place the appropriate shingle piece at the top of the chimney. Once again, I've provided this piece twice, once for the dark pink paper, and once for the light pink. This way you have them both so you can choose your spacing.

12. Keep alternating shingle strips until you come to the peak. Fold the center shingle strip in half and straddle it over both halves of the roof.

13. Apply your decorative pieces to the clock, then follow the clock kit instructions here: http://samanthaleewalker.blogspot.com/2015/03/part-2-cuckoo-clock-tutorial.html Now line up your pieces and we'll start to assemble according to the instructions here: 

14-16. I took a close up photo of the trickiest part of assembling the clock, and that is the part where you fold the roof around the eaves. The end tab of the roof goes inside the cuckoo clock. The small tabs in the picture go on the inside of the eaves. 

17-18. Fold the tabs from the front and back of the cuckoo clock inwards, apply glue, then bring the roof up and around the roofline. You will end at the roof eaves on the other side of the clock. You will insert the end of the roof tab into the slot that is formed, so that the little tabs go on the inside of the clock. You will be able to put you hand inside the clock from the back if you choose the open back design, to make it much easier to smooth these parts together. 

19. When finished with the eaves (underside of roof), it should look like this picture.

If you make one of these...I want to see your clocks! Please share them with me! 
Keep on crafting!

Thursday, March 19, 2015

Part 2 Cuckoo Clock Tutorial


Last week I started a cuckoo clock tutorial to show you how you can assemble this project as a decorative clock. This week I'm going to share one way you can make it into a working clock. You will want to follow the original assembly instructions except for a few optional parts that you will use instead. I also have a second cuckoo clock at this link here: http://samanthaleewalker.blogspot.com/2015/03/paper-cuckoo-clock-assembly-tutorial.html
and now...you can also create an embroidered 3D cuckoo clock out of fabric.
Details for how you can get this embroidery file and project free, can be found here:

You will need one of my cuckoo clock cutting files available at  the Silhouette design store.You will also need a clock kit. Clock kits come as either hands, with the mechanical workings behind a face that you create, or as an entire kit with the face. We will be using a face kit with a round back. Some clock kit backs come square. You may have to adapt the file slightly depending upon the clock kit you get. Pay attention to the clock kit size you choose. 

So let's start there...chances are, your clock kit may not be exactly the same as the one I used. You will be able to adapt this file to accommodate a clock that is within 1 inch of the recommended size.
Even kits declared as 3-inch clock kits can vary amongst themselves. But don't be discouraged, a few minor tweaks will make this file fit your clock. My original cuckoo clock file comes with pieces that will accommodate a 2 3/4 inch clock. I have a second cuckoo clock that will fit a 3 inch clock. 

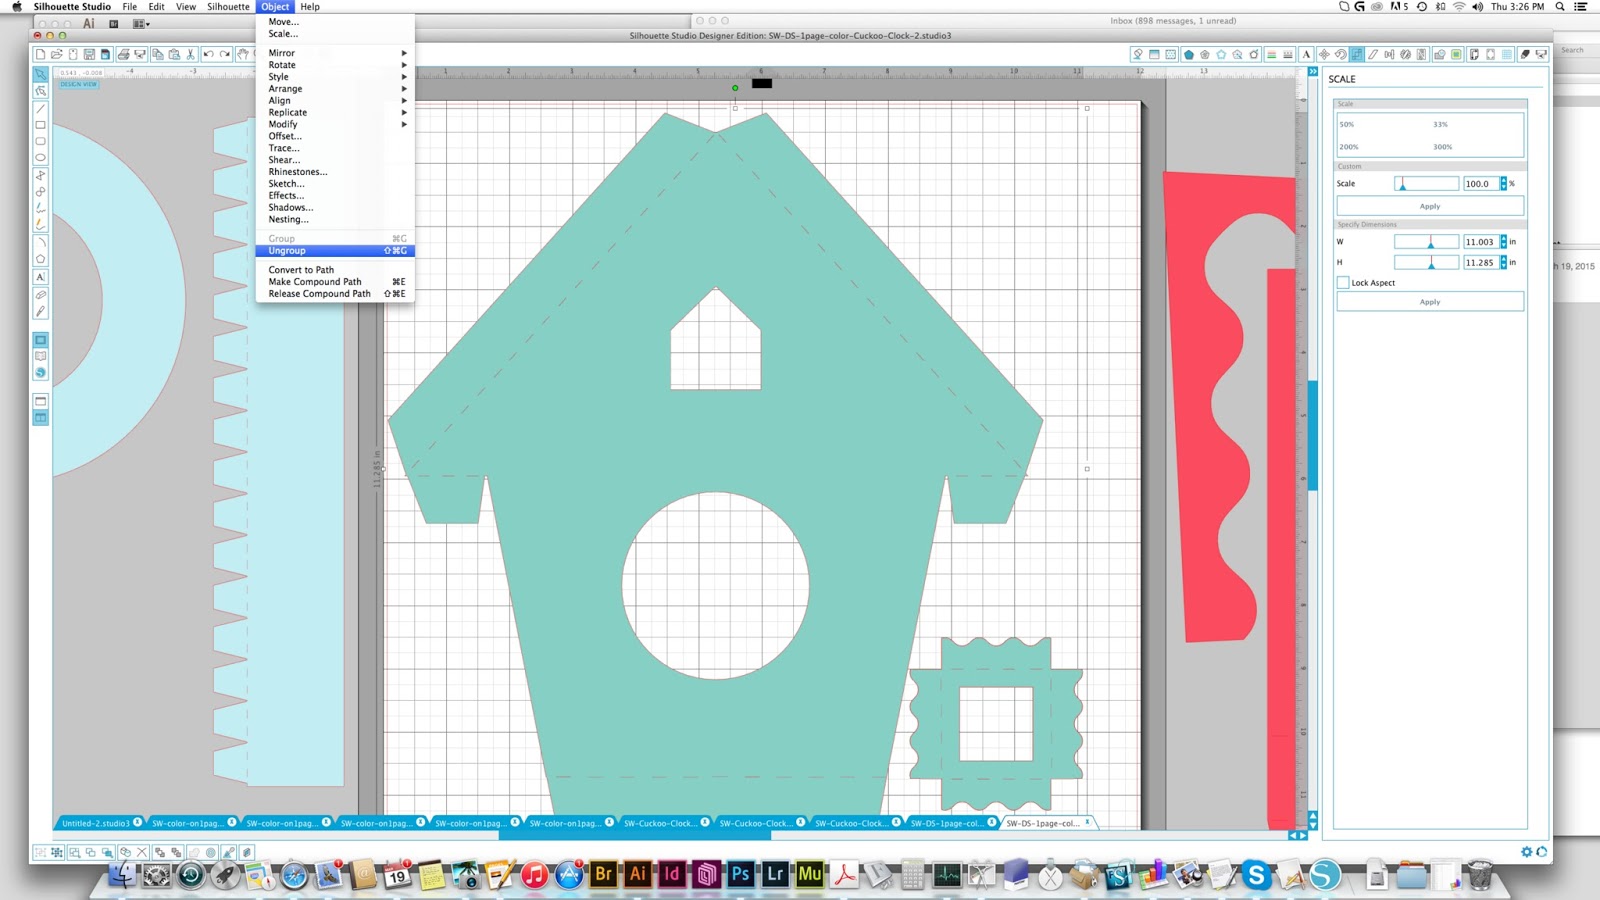
Open your file in your cutting software. For Silhouette users, your file will come with all the pieces opened at the same time...and look something like this:
For Cricut Explore Design Space users, you will open several separate files, that will look something like this:


Your file is grouped by colors that will also fit within the 12x12 cutting area. So ungroup the entire file once, then you can move each color grouping into the live cutting area as you work through your different color papers on your cutting mat. 

Let's get started!
Before we cut the pieces, you will want to measure your clock. Some clock kits will come with an instruction sheet that will give you these measurements, but you may want to double check. Most circular clock kits come in two pieces that can screw together: a clock face, that screws to a backing. If these two pieces are not already unscrewed then go ahead and do so.

Now stick with me for this step, as it will sound confusing...refer to pictures 2 and 3 in the assembly pictures below.

Turn the clock front over to the back side, now measure the back of the clock front piece. Write it down.
Then measure the front of the clock back piece. Write it down.
These two measurements may be the same, or different.

The front of the clock should have a beveled ring that will cover the edge of your circle opening to cover any gaps. It is usually about 1/4 inch larger than the measurement you took from the back of the clock front piece which gives you a slight margin of error.

Now go to your cutting software and select the cuckoo clock front that has a circle hole in it. It is important to note, this circle may not be the same size as the clock kit you are using. This is why we measured our clock kit pieces. If the back of your clock front is a different size than the circle in the file, you will need to change this to your clock's size.

To do this, you will need to ungroup this part of the file. By selecting the pieces, then going to object ungroup. Ungroup once, only so that the dashed lines separate from the house piece.

Then under Object select "release compound path."

Then select the circle, and change the measurement of your circle by typing in the size of the back of your clock front plus 1/16 of an inch. (.0625)
 That's all you need to do to the front...it will now cut with the proper sized hole.
 Next, you will find the strip and donut pieces. In some of my clock kits, the donut has one flat end so it doesn't interfere with the window.

You will also ungroup, this file, then release the compound path of the donut piece, and change the inner circle to 1/16 more than the measurement of the front of your back piece.

Then you will select the strip that has the teeth on it. If you had to make a larger circle, stretch it out an inch to make sure that it will go all the way around your circle with a little overlap so you can glue it together.
Alright...now you are ready to cut. Select your colors, and make sure to cut out all the pieces.

1. find your front piece, your strip with teeth, and your donut piece.
2.-3. (this was for the measuring that you already did.)
4. Check that your back piece fits in the donut shape. Center it in the donut. Take your strip with teeth, and curve it around the clock backing. The ends should overlap.
5-6. You will stick this through the donut so the teeth end up on one side and the strip part on the other.
7. See the teeth are on one side.
8. Glue the two ends together now.
9. Apply glue to the teeth.
10. Press the teeth down.
11. Smooth them down from the opposite side.
12. Now your clock backing should fit snugly.

13. Check the circle opening on the front of the cuckoo clock, it should fit your clock face. If it is too small...make an adjustment with an X-acto knife. It doesn't have to be perfect as the beveled edge will cover any imperfections. If it is too big (but not by much), make a donut shape that you can glue behind the cuckoo clock front that has a slightly smaller opening.
14. Glue the donut assembly to the back of the cuckoo clock front.
15. Make sure that it is centered.
16. It should look like this now.
17. Fit the front of your clock into the opening.
18. Turn it over, place the backing on.
19. Screw the two pieces together.
20. Ta Da! Now you may wish when you complete yours to add all your details to your clock front before messing with the clock kit. It may be easier that way. I did it backwards as I wanted to show you mainly how to use the clock kit in this tutorial.

Now below I'm showing you that some of the cuckoo clock cut files may come with a different looking donut that has a flat end. It will work the same way. I'm including these photos so you don't panic if you find that yours looks different. The flat edge is there so that it doesn't interfere with the window at the top of the cuckoo clock house.
Now...most important part...if you make any of my cuckoo clocks...I want to see them! You can share  them to one of my Facebook pages. My design page

Related Posts Plugin for WordPress, Blogger...