Ads 468x60px

Showing posts with label Tombow. Show all posts

Sunday, October 06, 2013

Hexi-box Silhouette Tutorial

If you saw my Silhouette house box tutorial yesterday, this box is put together in a very similar way. I almost put this tutorial with that one as a variation, but there were enough differences, that I thought it needed it's own. You may want to reference that tutorial as well for further help.

This project will cut on the Silhouette Cameo, or the Silhouette Portrait. If you use the portrait, you will need to scale down the file to 90%, and make sure your paper orientation is used to your advantage.
First you will need to cut two of the carousel horse box pieces. Cut all the other pieces in the file using this method described in the link.

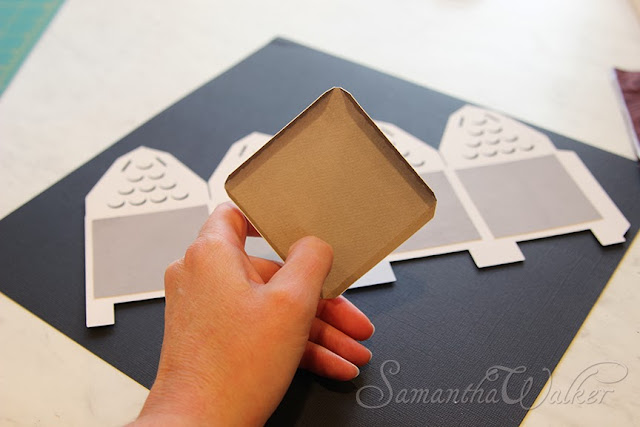
After you've cut all of your pieces, organize them, then find the triangle and rectangle panels. Put glue on the back side of the carousel horses and glue around the edge of the panel, then center the panel over the horse so that the panel is on the inside part of the box. (I like to use a good paper glue like Tombow mono adhesive so my paper stays flat.)
 Now after all the panels have been glued on, glue the two box pieces together at the tab.
Now crease the box bottom at the dotted line...
Work around the box with glue to attach the walls of the box to the bottom of the box. I use these cute little clips to hold it together while gluing...They are designed for quilting and sewing, but I hijacked them into my regular craft stash as they are sooooo handy!


 Work all the way around the box glueing the tabs as you go.
Keep going all the way around the box until you come to the tab at the end, then glue both the tab at the end and the bottom of the box tab to complete the box.
 Remove the clips, then thread ribbon through the slits in the carousel roof.

Pull the ribbon so that the roof pieces come together, then tie a bow.

Now find the flag piece and get a pin or a toothpick to use as the flag post. Put a decent amount of glue between the layers--without being so much that it oozes when you press the sides together. You want your paper to become somewhat pliable while the glue is wet, so that you can curve your flag like it is rippling in the wind. See the transformation below.
Because this box comes in two pieces, it finishes up at a nice size. The base of the hexagon is approximately 7 inches across. You can fill it with treats, or a gift.

I also have a few other variations of this box:


Happy Crafting!
Samantha

Saturday, October 05, 2013

House boxes Silhouette Tutorial


Today I have a fun series of boxes that have cute little feet which make the box portion sit above what the box is resting on. (If you like this box, you will want to see my carousel hexi box tutorial too.) These instructions will work for all of the variations of the box in the Silhouette Online store.

First off, this box will work with both the Silhouette Cameo and the Silhouette Portrait cutting machines. If you use the Silhouette Cameo, you will not have to resize the box, it is already at the maximum size for 12 x 12 paper, so skip the Silhouette Portrait users paragraph.

Silhouette Portrait users only:
You will need to make sure that your paper orientation is right, and then in your Silhouette Studio software, you will need to select the cutting file, then in the go to the Object menu and select the first option:"transform" then select "scale options," then in the dialog box on the right  hand side of the screen, scale this to 90% by typing in 90% in the box that says 100%. After you have successfully scaled your cutting lines, then move the design onto the live cutting area of your screen--making sure that not edges hang off. You will need to cut the main box portion and the contrast windows separately to fit all the pieces.

Cut all the pieces and lay them out.
 Please note that I used double sided card stock, so that I didn't have to use two different papers. (Card stock is: Carta Bella double sided card stock All Hallow's eve collection Marshmallow Kraft)
 Orient your cut object so that the color you want on the inside of the box is facing up.
 Then glue on the backside of the design, and around the edge, then press on the contrasting "window." Make sure that you have the correct side facing out the window. My box will be a kraft color, with white showing through the windows.
 After you've glued on all 4 squares, then find your square that has tabs on all sides.
 Fold up each tab along the dotted line.
 Now crease your box on all dotted lines.
Now we are going to set in the bottom of the box. I like to use a good paper glue like Tombow Mono Adhesive.
It won't warp or wrinkle paper--and it sticks REALLY good. I buy this stuff by the case...literally.
I hate to run out in the middle of a project, and I've become quite a fan of this glue.

Now orient your main box so that the side without the tab is on the left.
**IMPORTANT step** Glue two of the tabs in this way:
One tab go ahead and make a glue bead all the way across the tab.
On the second tab, Glue about 3/4 of the way across the tab--leaving a 1/4 inch making sure there is no glue on that end.

Find the 3/4 glued tab and line it up with the box side on the left that doesn't have a tab. We are leaving this glue-less portion to make sure we can tuck in the tab on the opposite side of the box. Now Line up the next side with the bottom box piece, this will naturally form your first corner.

Note:
I'm not a self proclaimed octopus. I wish I were. It would be dreamy to have eight arms while crafting--being able to hold multiple things while waiting for glue to dry. Recently, I found a way to mimic having 8 arms. I discovered these quilting clips a few weeks ago for my new obsession with fabric.

These clips have seam markings on them for 1/4 and 1/2 inch seams.  While they are intended for aiding sewing projects, I've discovered that they are fantastic for so many other things--like holding things together while you are waiting for glue to dry. I can hear the angels singing hallelujah praises over these little clips.
Now go ahead and glue the other two tabs on the bottom of the box and attach the remaining two sides of the box around the bottom piece.
Now we are going to glue the box tab--make sure you put the glue on the correct side. (Hint: the correct side to glue is the side that is the same color as the outside of the box.)
Go ahead and tuck that side tab in--remember, we saved space for by not glueing that one portion of the box bottom tab. Voila! It fits!
 Now fold all of the roof pieces outward.
 Thread a ribbon through all of the little slits on the roof tabs.
For the finishing touch, tie a cute bow in a complimentary colored ribbon, and you are done!
I also have these variations of the house box or tent-top box:


Happy Crafting!
Samantha


Monday, June 25, 2012

Spellbinders Blog Frenzy Project Follow Up & JustRite Stamps sneak peek!


Get ready for an uber long post chock full of pictures...
Don't let all the steps to the project scare you away...
the project goes by fast...
I just wanted to make sure I took photos of all the details 
so you could successfully make the project too.
First off...I'm going to give you the instructions for making the Eiffel Tower...so let's start!

I made a new one in Pink just to show you another version of this fun and simple project.

I'll walk you through the steps of how I use my new French Frills die set from Spellbinders 
to make a three dimensional Eiffel Tower.


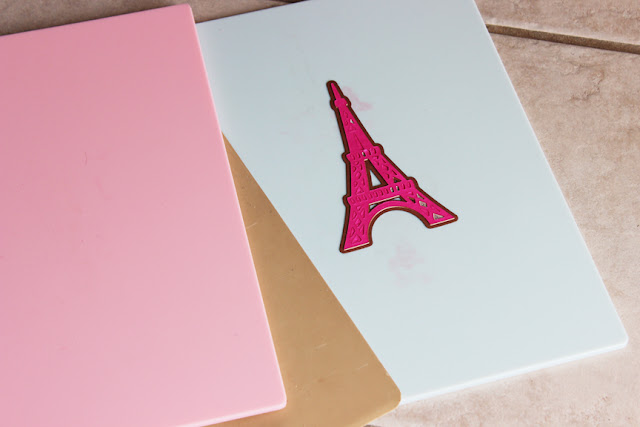
First I placed my Eiffel tower die on the base plate blade side up, then layered a piece of wax paper over my die (for easy release) then paced a piece of hot pink paper on top of that.
(In this picture...I'm showing the sandwich in reverse order...only so that you can see how the layers go together...here is the cutting plate, my die blade down, the pink paper, the wax paper and the die, over which I will place the base plate. I alway keep my baseplate on the bottom to help remind me that I only need to replace the top plates with something different between cutting and embossing passes.)
To learn more about using wax paper with detailed dies...
here are a few fabulous video clips from Spellbinders:
 Botanical Swirls Projects
 Majestic Elements Projects

Next I run this through my Grand Calibur® to cut my first Eiffel Tower. 
Then I replace the cutting plate with my rubber mat, and my pink embossing plate and run it through my Grand Calibur® again to create the emboss. (see how easy it was to just leave the Eiffel tower die in place on the base plate and only switch out the cutting plate for the rubber matt and pink embossing plate--that's why you start with the base plate.)

Now that I've embossed it...
I want to show you the pretty details that you get in the emboss pass with this die...
Next step is to cut and emboss 3 more Eiffel towers. 

Now gather them all up.
We will work with them in sets of two.
Take the first one and lay it down so that the embossed details are on the backside. Then take a high quality paper glue such as Tombow Mono Multi, and apply a very thin bead of glue just along the edge. This glue is latex based--it dries fast, and will not wrinkle the paper. Don't use "school glue" (water based glue like Elmers.) For this project, it just won't dry quick enough and will warp your paper--this will just frustrate you. If you don't have a latex based glue like Tombow Mono adhesive, you can try some of the stronger tape runners out there...or that double sided tape that has the removable red film on both sides--you'll have to cut that in very thin strips.
Important! If you happen to get too much glue in any area...make sure to clean it up so that the glue is only on the edge. I used a wooden skewer to clean up this blob.
Now lay your second Eiffel Tower exactly on top of the one with the glue. Make sure that the one that you lay on top has the embossing detail on the front (so they are back to back). Work the edge together with your fingers.  Make sure edges line up perfectly together.
Do this same step with the other two Eiffel towers so that you have two sets each with one glued edge.

Now we are going to open each of these and make a crease on the corner where they meet.
You will fold along the glued edge on both tower pieces.
This will form a ridge where the glue holds the tower together.
Keep on opening it up all the way to the top.
Crease and make an edge on both sets of towers.
Now take one set and put a thin bead of glue along the edge. 
 Now join the two tower sets together along that bead of glue.
Now all sides are joined except for one. Lets get that side secured too.
Very carefully hold open the two unattached edge. Put a thin bead of glue on one edge and squeeze the two edges together--making sure that they line up perfectly.
Okay...now everything is all glued up...but it doesn't look quite right yet. We need to give it some shape so it doesn't look so distorted.

 Work with the newly glued edges to crease them as you did with the other glued edges.
 One tip to get a good crease...fold the edge one direction...
 Then fold it the other...
Then bring the edges up. Make sure all four corners look like this.
 Next I get a skewer (a pencil will work too) and I make sure to push out the sides as it narrows toward the top--making sure they aren't all bunched up together there.
 A skewer will poke all the way through to the narrowest point in the tower to help you give it great shape.
Now make sure that the bottom is square...and then you will know if it will sit right.
The final project should look like this:

Now I'll quickly show you how to do a letterpress technique 
with your Spellbinders dies and Grand Calibur.
Do you remember this card from yesterday...I used a letterpress technique in a very subtle way to enhance the emboss details. Please note, you can use dark ink with this technique to get a very dramatic effect...that just wasn't what I was going for here, because I wanted to also show off my stamp detail.

Alright...ready for quick and easy???

First cut your image as you normally would...
and take your cut paper piece out of the die and set it aside.
Now for the magic step...
Simply ink your die with stamping ink...either with an applicator like I did above...or directly with the ink pad to your die. Then carefully fit your cut paper piece back into the die.
Lay it back down on your base plate, put the rubber mat and pink embossing plate on top and then run it through your Grand Calibur®
Remove the cut paper from the die...notice how the ink gets pressed onto the paper. The 
Super Simple!
Cool...huh! 
Now imagine the possibilities.

I used this technique on my card...but I stamped my cut pieces BEFORE I "letterpress embossed." 
This technique gave my card an entirely new dimension. These are clear stamps which make them super easy to line up with your die cuts. You can see the full set below.
Now that you've seen my two new die sets from Spellbinders...
I wanted to show you the new coordinating stamps I created for JustRite Stamps  
I'm thrilled to be designing for JustRite--they are an industry leader in coordinating stamps 
with Spellbinders dies. I'm especially excited about my first two sets which will work perfectly with my French Frills and Botanical Swirls die sets.
You will find these two releases at CHA Summer.


Here's the Botanical Swirls set in action with the dies...so many mix and match possibilities.

Related Posts Plugin for WordPress, Blogger...