Ads 468x60px

Showing posts with label Silhouette Portrait. Show all posts

Wednesday, September 17, 2014

Silhouette instructions: Halloween Candy Bar Crate and Gable Boxes

Due to an "interesting" summer, it's been a while since I've had some new releases in the Silhouette store. I hope you had a great summer. Mine was good, but busy and challenging beyond belief. Now that the kids are back in school, and things have settled down for the moment; I hope to catch my breath and have a more regular release-schedule of Silhouette designs. 

To start things off this Fall, I have designed a grouping of Halloween-themed boxes and crates. I hope you will find them useful for Fall gift giving. I would love to see what you do with them. Remember, you can share your projects with us through my blog e-mail address found in the sidebar.
For these projects you will need this Equipment:
A Silhouette Electronic Cutting machine. This file works great with both the Silhouette Cameo and the Silhouette Portrait cutting machines. If you use the portrait machine, you will need to rearrange the pieces to fit in your cutting area. To move the pieces around individually, ungroup the file under edit.

For those of you who are new to my blog, and may not have heard about the Silhouette electronic cutting machine(the machine I used to cut this file out,) I put together a product review at this link. You can read other's reviews of the machine here. This machine will change the way you craft, and most importantly, you will get lost in the fun of it all!

Adhesive:
Glue (use a good paper glue like Tombow mono liquid glue it will not warp your paper.)
-and/or-
Double Sided adhesive. (I use a Scotch ATG 714 gun. Scotch got smart and made a similar one for crafters the Scotch Cat 085--it's quite a bit less $ than the 714. I like that it has a seemingly endless roll of adhesive. It saves a ton of money in the long run when compared to little craft adhesive dispensers. Especially if you buy the adhesive reels in bulk.)


You will also need these Silhouette Files:
spider and web gable box #66773
Halloween witch gable box #66750
Gable Box with Candy Bar crate #66749
Candy Bar Crate #66747
Design can be created with 1 sheet of 12x12 card stock

Candy Bar Crate instructions:
Cut the design out of double sided card stock that has a complimentary color or design on the reverse side.

1. Crease the center handle piece on dotted lines.
2. Crease both of the side boxes as shown.
3. Glue bottom tabs to the inside base of the box. (do twice. Once for each side box.)
4. If your small side tab is in front of the larger side tab, as in this picture, reverse them so they look like step 5.
5. Glue the small side tab to the inside of the side box. Flip down the scallops to reveal the reverse side of your card stock and secure it with glue or tape. (do twice. Once for each side box.)
6. Your side boxes should now look like this picture.
7. Now we are going to take the center handle section of the crate and attach the side boxes. Glue the back of the side boxes and the large side tabs that are sticking out. Attach the back of the box to the center handle section.
8. Wrap the large side tabs around the handle center piece so that it lines up with the scored dotted line. We will be folding this part underneath the bottom of the box. Look at the picture for placement.
9-10. Fold the bottom flap of the center section underneath each of the side boxes and use adhesive to secure.
11-12. Cover the bottom with the rectangle piece.
13-14. Cover the sides with the rectangle pieces with the fold-down scallops.
15-16. Fold the divider section, and glue to the inside of each side box.
17. Ta Da! You are done. Admire your work, look for anything that needs a little tweaking. Add a ribbon if you wish, then fill with your favorite candy bars.


Witch Gable Box instructions:
1. Open the file in the Silhouette Studio software. You will notice that color recommendations are made for different parts of the design. You can place those colors on your cutting mat at the same time according to the grid and how they show up on your screen. That is what I did in photo 1.
2. Glue the light green pieces to the black box as shown. I have designed this so it has as few pieces as possible for easy assembly.
3. Glue the eyeballs, teeth and tongue onto the box.
4. Glue the nose on, (it is the large oval with the little oval cut out of it, and the little oval that was cut out with the light green witch face parts.) Insert the light green highlight to the oval hole in the large nose piece.
5. Crease the box.
6. Fold the box around. Layer the bottom flaps as shown. The two slanted sides have a rounded rectangular piece that tucks slightly under the straight edge.
7. Insert the flat top triangle tab into the slot that is made. Adhere the side tab with glue or double sided-adhesive. Close the top by Inserting the top gable tabs into the slots on the top triangle pieces.
Now you are done! Fill it with goodies for your little goblins.
Candy Bar Gable box instructions:
This box combines the candy bar crate and the witch gable box instructions. With a few small differences.
Silhouette Studio set-up: This project requires 2 sheets of 12x12 card stock. You can resize and rearrange your pieces if you are using the silhouette Portrait.
Cut the Gable Box piece out of a contrasting color if you wish, fold it as instructed in the witch gable box above.
Now we will follow the numbered picture instructions.
1. Find your side box pieces for the candy bars.
2. Fold down the scallops and secure with adhesive.
3. Crease the side boxes as shown.
4-5. Fold the side boxes and apply adhesive to the tabs, as shown in pictures. You will end up with a box-like shape with extended sides jutting out.
6-7. Apply adhesive to the back of the box, and the jutting side pieces. Position the back of the box to the center gable box as shown, with the jutting side pieces lining up at the sides, then adhere.
8. Do this for both side boxes.
9-10. Cover the jutting side tabs with the fold over scallop rectangle pieces.
11-12. Fold the crate dividers.
13. Insert the crate dividers into the side boxes, secure with adhesive.
Fill with candy! You are done!

Monday, September 15, 2014

September Silhouette Promotion!

It’s time for our September Silhouette Promotions!
This month we are focusing on the Silhouette Portrait, bringing you a fabulous bundle filled with fabric goodies!  We are also running a special for 40% off the Adhesive Cardstock!


All this for just $149.99
​Save over $100! 


Head over to http://www.silhouetteamerica.com/september
and use promo code SAMANTHA 
to get this amazing bundle!


You can also get 

To take advantage of this offer, click on the link 
below and enter promo code SAMANTHA!


Tuesday, November 12, 2013

Silhouette Tutorial: Cutting Detailed Designs "Leafy Basket"


Yes! Whooo Hooo! We are tackling cutting detailed designs with your Silhouette today!!!


What?
Don't go now...
STAY...
I'll try to make this painless for you!
Promise!

Step 1 is for newbies to detailed designs:
Stop holding your breath...you can do this!
For all you detailed veterans and self proclaimed gurus on cutting detailed designs...I'd love for you to chime in on how you are able to achieve smooth cuts when going detailed...so feel free to comment with your tips and tricks!

Alright, I know there are some of you out there who have bought detailed designs but have yet to cut them due to fear. I'm going to set you up with a surefire way to achieve success!

Okay...if you've stopped holding your breath...you made it past step one.

Onto step 2...equipment check!
if your blade is old...or even somewhat old...set it aside. You will want to use a fresh blade for detailed cuts. This is the number one reason why people aren't successful with detailed cuts. I know that the blade you have in your machine is probably still good for other projects, so just set it aside, and mark it somehow. We'll use this new blade for this detailed cut. You can always put the old blade back in the machine for other projects. I set my old blade aside tonight...it's been cutting non stop for a few days...but will use it again for simple cuts. I like getting as much use out of something like the next person.

Step 3...mat check.
Check your mat make sure it is sticky enough that your design won't slide around. If it has been slipping, even a little on your last designs, then it's time for a new mat--but keep the old mat...it's still good for more simple cuts. (tip: use tape on the edges of your paper when cutting with an older mat...still works well on basic designs.)

Step 4...paper choice.
Detailed designs usually cut best on a regular card stock. You may be able to cut a design on paper, but you will have to slow down the cutting speed (see below.) If the paper starts tearing, you may have to choose another medium. That is just the nature of detailed designs. If you choose to cut thicker than normal card-stock, you will definitely need to do select the double cut setting (see below.)

Step 5...it's all in the settings!
Open your file in your Silhouette Studio software. Select cut, then change your settings as outlined below.
A. Speed: The first thing you will want to change is the speed...slow it down to 2 or 3.  This is the most important setting for getting your detail to cut correctly. Slowing the speed helps the blade turn corners nicely and not bunch up the card stock. If your card stock is bunching up, slow your speed down.

B. Depth: if you are cutting a paper or cardstock you have cut before, use the depth settings that has worked in the past for you. In addition, if you are cutting a thicker card stock, I recommend using the double-cut setting just to be sure that the design cuts all the way through. If you are unsure what settings are good for your paper, use the settings Silhouette recommends for your paper type, then choose test cut...which will cut a small area so you can see if the settings will work for your paper. If it's good to go...move on and click that cut button.

You may ask why select double-cut when you could just set the blade deeper. That may be an okay choice for simple cuts...but for detailed cuts...it's best not to try to "push the paper" too much as it will have to make lots of turns during the cut and might "chunk up" the corners. When you see your paper pushing up at the corners and not cutting all the way through, it means the blade is too deep. When you select double cut, it may not cut through on the first pass...which is fine, but in most situations, it will cut completely through on the next pass.

I am using Carta Bella Premium textured card stock. I like that it doesn't clog up my blade. The fibers are dense and work fantastic for detailed cuts. The settings that I use on detailed cuts are: speed 2, blade depth 4, and double cut.


 ****Please Note: In most cases, you should be fine after step four...but steps 5 and 6 will save you if things didn't go perfectly with that round.****


Step 6 Check your cuts before you unload!
I cannot stress this step enough. When your design finishes up, do not automatically press the unload button on your machine. Carefully lift a few edges of your design to see if you cut all the way through. Even if your test cut did fine, detailed designs can be a little trickier to achieve complete cuts. If your design is still attached in spots, leave the mat in the machine, and press cut again! You should be fine after this round. Then make a note to yourself that you probably should have gone one setting more on the blade depth. Even though you had to wait for it to cut all over again...it sure beats trying to battle freeing the design with an x-acto knife.
This should peel easily from the cutting mat. You want nice smooth edges like this, if they aren't, your settings need to be adjusted.

Step 7...Did I mention X-acto knife? 
Okay...usually this is totally unnecessary after all the above precautions...But if by chance there are 2 or 3 areas that are still attached where they should be cut through, you'll notice when you remove your design from the mat. Don't panic. Just get the X-acto knife out and carefully cut the areas that are still attached. You can put the design back on the mat to do this step.

Okay, now that your design is cut out, and quite nicely I might add...it's time to assemble it!
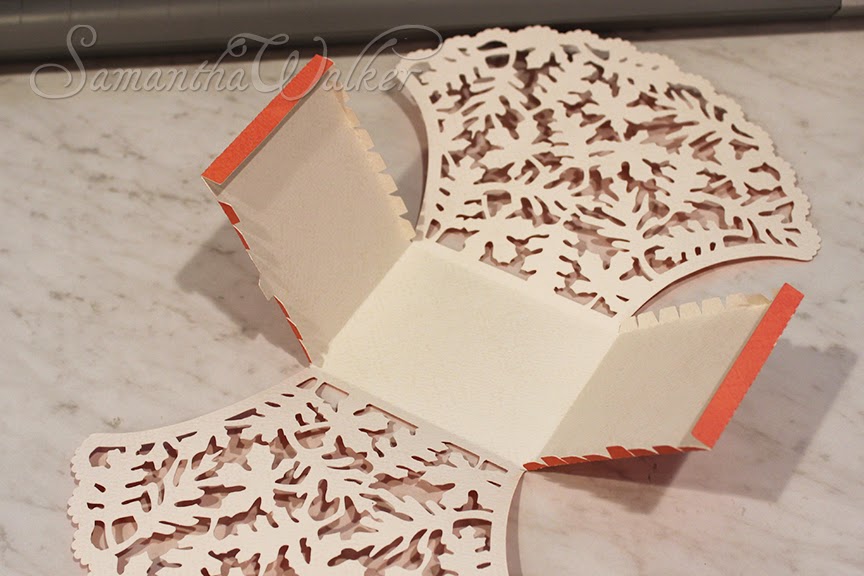
 For this basket, you will want to fold the sides first.
 Then glue down the reinforcing edge.
 Then curve the sides to "train" them into shape before glueing.
Put a dot of glue on each tab...a quick drying paper glue is what I suggest. This will get tacky fast and dry with a strong hold without warping the paper. FYI...Tombow Mono adhesive is latex based...so if you are allergic, choose another paper glue.

Clip or hold the tabs around the curve until set.
To clip the sides, insert the clip into the spaces that are between the leaves and pinch a tab and the basket side with the clip. There are only a few spaces on the sides that will fit a clip, so you can also pinch the front with the side as shown with the front middle clip in the picture above. It will warp the basket only for the time that it is pinched, then you can reshape it after the glue is set. You can also use your fingers.
Keep on gluing and clipping the sides to the front.
Now find the strips of paper for the basket handle. Please not the strip comes in three pieces. You can cut the basket smaller and just cut a single 3/4 X 12 inch strip of paper for the handle. However, I wanted to cut the basket at maximum size to show off the detail. If you have a silhouette portrait, you can resize this, to fit on an 8.5 X11 you will need to scale the design to 75%. You will want to cut the handle separately if working on a portrait so that you can maximize the design. The handle strip should measure approximately 3/4 X11 in that case.
Glue the handle pieces together.

Then glue the handle to the basket. You can hold this or clip it until set.
Bend the handle as shown above. (I've since added score lines here, I usually realize a couple of minor changes when I assemble a project for the first time...this is one of the changes that I made, so your design will have score lines for the fold here.)
Now pat yourself on the back! You did it! You cut a very detailed design and made a beautiful basket!

This basket will make a perfect table centerpiece!
-Samantha Walker

Monday, October 28, 2013

Silhouette Tutorial: Candy Box and Tie Top Hex Box


Both of these box cutting files will work for both the Silhouette Portrait machine and the Silhouette Cameo machine. I prefer cutting boxes on the Cameo as you get a larger end product, but the Portrait machine will also work fine too. If you use the Portrait, you will need to adjust the Tie Top Hex Box to 85% and the candy box to 70%. You will find this option in your Silhouette Studio software under: Object/Transform/Scale Options. Or you can manually scale the boxes by selecting and dragging the corner of your selection to the size you like.


****Please note:
These boxes have been uploaded into the queue at the Silhouette store. They might not be available immediately as they have to process through the store, but will be there shortly. I will post links as the become available. 

Tie Top Hex Box Instructions:

Select a double sided cardstock or pretty solid for your box. I used my Prairie Flowers paper from My Giddy Up Girl collection that I designed for Carta Bella


Fold the bottom and tabs to the inside.
Fold the sides of the box inward.
Turn the box upright. Start gluing the tabs to the bottom of the box with a strong hold paper glue like Tombow Mono adhesive. (The bond is really strong...the paper will tear before the glue gives way--which makes it perfect for gluing the bottom of a box.)


Continue gluing all the tabs to the bottom of the box.

 Make sure corners line up.
 Make sure the sides of the box align with the bottom of the box.
 Align the last tab and glue it to the bottom.
 Hold the last tab in place to let dry.
Put glue on the side tab to glue the side wall together.
Hold in place.
 Accordion fold the angle folds at the top of the box. (the part with the holes will end up in the center, the part that I'm pinching on the box in the photo above ends up out.)
 This is what your box should look like now.
Thread a narrow (3/8 inch or less width) ribbon or cord through the holes as shown above.

Insert a small bottled gift such as olive oil, bubble bath, fancy vinegar. (box stands 7 inches tall with a 3.5 inch base if cut at maximum size on the Silhouette Cameo.) Tie the ribbon together and pull tight to close the box. 
Ta Da! Now it's ready to gift to a favorite friend or neighbor.

Candy Box instructions:

Select a fun candy colored double sided card stock. Stripes, or dots are a good choice for this project. I used my Mid-Summer Sky paper from my Cool Summer collection for Carta Bella. It has a fun chevron stripe on one side, and patterned clouds on the other side.


Cut the candy box file. Crease the ends of the box to the center.
Crease each of the sides of the box.
Crease the side tab.
Bring the side around to the tab and glue together.
Hold down side to let glue dry.
Open up the box.
Now for the tricky part...folding the ends.
Grasp the end of the box where the end is "split" (there are 4 splits.)
Fold the angle where the "split" is to the first corner of the box.

Continue creasing this box all the way around. Make sure that the point of the "slit" angle points to the inside of the box as you fold.
Maybe a better way to illustrate this is showing you how not to let the points go. See how the point in the photo above is not going to the center it's pointing out. Don't do this!
Now try to "push" that fold all the way around until it closes into a flower shape.
You will think that it isn't working until all the sudden, you realize that it is now all locked into place correctly.
I'm going to show you the under side of the end and how the slit comes in the middle of the two angles coming together--almost like it is folding on top of each other. (this is why there are photos...it's hard to put this into words....please just see what I'm trying to illustrate in the picture here.)
Here is the finished end from an end view.
And here is the finished end from a side view.
Cool thing about this box...is that it requires no glue to close the ends. 
The only glue is to join the sides together. 
Use your imagination to fill this treat box. The box when cut on a Silhouette cameo, at maximum size is 9 inches from end to end and nearly 3 inches on each side. 
The box area between the ends is about 4.5 X 3 inches. 

Happy Crafting!
Samantha Walker

Related Posts Plugin for WordPress, Blogger...