Ads 468x60px

Showing posts with label Halloween box. Show all posts

Tuesday, September 23, 2014

Classroom Treat Boxes and Card by Pinky

Hey friends, it's Pinky today with a fun classroom treat project using the amazing
Halloween themed Samantha Walker Cut Files in her Silhouette store!
If you need a cut, trust me Samantha has it!
For these popcorn treat boxes and teacher card I used the new Web & Spider Gable Boxes along with her "Halloween" word set. Just click on the description for the links. 
 For the popcorn boxes I used glitter card stock on the glitter card stock cut setting
and regular orange card stock, and assembled the boxes as directed but DO NOT adhere yet!
After that take a sheet of acrylic, and trim to the front of the box size.  
Using double sided tape- adhere acrylic sheet inside each design side of the box. 
 This prevents small treats like popcorn from escaping. 
 When the acrylic is in place then assemble box fully including the adhesive strip on the side. 
Then add gems, or other decor. 
For the coordinating acrylic card I trimmed out black card stock to 
4X7" then fold over 1" lip. 
Cut out BOO! using Samantha Walker Halloween Word Set and glitter card stock. 
Trim out 4X6 piece of remaining acrylic, and adhere BOO! to front and center. 
 Edge punch the black card base, then adhere lip to acrylic to create the card. 
 Add gemstones and Liquid Pearls, etc....

Now you have sweet treat boxes for the class party filled 
with popcorn and a sweet card for teacher too!
 Samantha always has the most amazing cut files, be sure to check them out!

I hope you try this project and share with us!

Tuesday, November 05, 2013

Hexi Boxes from Lindsay Smith!


 Good Morning!  Today we are sharing fan photos from Lindsay Smith!  
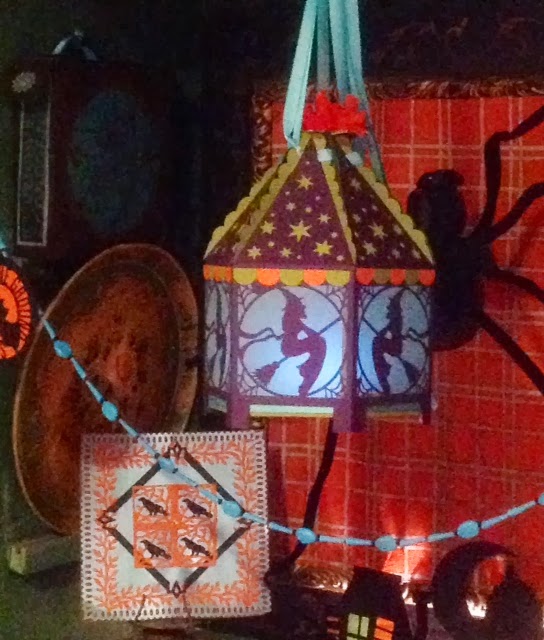
Lindsay wrote to us sharing her versions of the Hexi-Box Witch and 
the Hexi-Box Dancing Skeleton Silhouette Boxes! 
Just have a look… 


She used vellum so that she could use the boxes as lanterns and she used long ribbons so that they could be hung!  Lindsay also shared a fun tip with us…she found that by inverting the hex base that it can slide in and out which makes the box collapsible for easier storage!


You can find these files by clicking on the images below:


A special thanks to Lindsay for sharing her creativity and inspiring all of us!

* * * * * * * 

Tuesday, October 29, 2013

Silhouette Tutorial: Witch Carton

I've got one last Halloween box going in the Silhouette store for the 2013 season. It's this little petal closure witch box. You'll find the instructions below:

 Cut the box out of a good weight card stock. I used Carta Bella's All Hallow's Eve Marshmallow/Kraft cardstock.
Fold each of the sides all the way around the box. Fold each of the curved sections at the top of the box as shown above. (Basically, you are accordion folding here.)
Keep on going all the way around the top of the box. The straight crease goes inward, the curved creases go outward.
 This is how it should look after all the top lines are creased.
Fold the bottom of the box as shown in the tutorial at this link here. You will have to scroll down to the second box in this tutorial. I use this type of bottom on my boxes often. It's a great way to close the bottom of a box and have it hold strong. 
 Glue the side tab of the box to the open side.
 Push the straight folds on the top of the box to the center. 
 Join the two petals at the top of the box at the slits so that they interlock.

 This is what the top of the box should look like when joined.
Now you have a cute little treat box ready for your ghost and goblin visitors this halloween.

Happy Halloween!
Samantha Walker

Supplies used in this project:
Related Posts Plugin for WordPress, Blogger...