Hi...another Friday, yeah! I hope you all have great plans for this MLK holiday weekend. If you are crafting this weekend...I've got another Silhouette "How'd you do that?" tip for you.
My creative team member
Eva Dobilas put together this fun "Kiss Me"card:
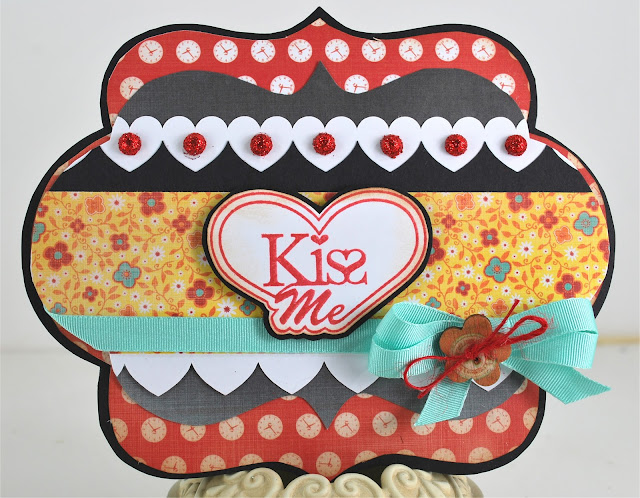 |
| Eva Dobilas designed this project, here is what she has to say about it: Quick tips on how I created this Kiss Me card. I mixed two of Samantha’s card shape files: 3 nesting artisan shapes and merry christmas. For my paper choices I choose Samantha’s Creative Imaginations A to Z paper line. I love the bright look of the papers along with black and white. The focus of my card is the border hearts cutting files, which I cut out of both black and white cardstock to create the layered look. As a final touch I used the sentiment from Samantha’s Unity stamps set. |
I want you to take note of the row of white hearts on her card...there is a fun layering border set, that she used to do these hearts. You may ask, "What's a "layering border?" Here's a picture of the file, and I'll explain how it works.
To get this row of white hearts, Eva cut a scalloped border on the white paper, and a pointed border with the black paper. When you layer the two borders together, you get a row of hearts.
This is especially cute when you place these layering edges over a card edge. Imagine the front of the card cut with the scallops and the back of the card cut with the points...Cute!
One more Silhouette tip for the day...You CAN cut through thick cardstock with your Silhouette. You CAN also accidentally cut through your cutting mat when you get over-zealous about cutting through thick cardstock. The other day, I was cutting thick Kraft cardstock. I was cutting a file with a lot of detail. This project here:
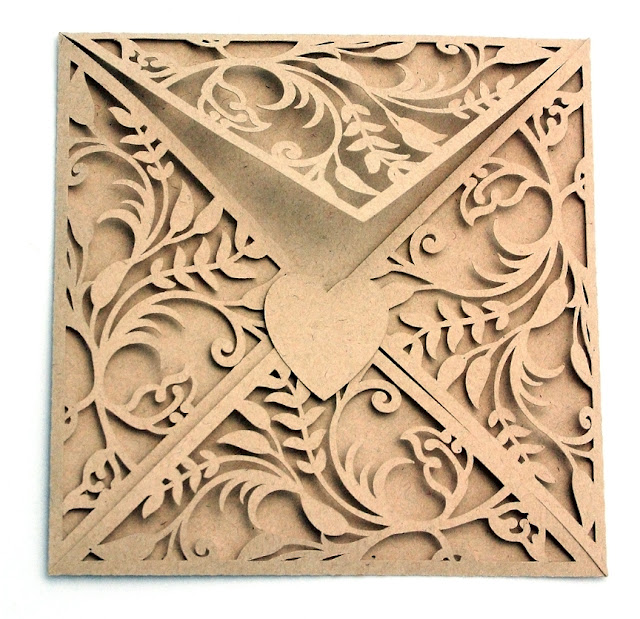 |
| New ornate card wrap or envelope design available in .studio format from the Silhouette store |
I want you to take note of how clean those detailed lines are. This is my second attempt at cutting the design. The first attempt, I had my blade set way too deep. I set my blade to a number 9. I had my cutting speed at 2 and selected double cut in the options. Well, my Silhouette cut THROUGH my mat in several spots...and the details got a little messy around the points. So I tweaked my settings to a blade depth of 5...and a speed of 1. The result, a total crisp cut, no attached cut lines (I hate that when my settings are off and you almost cut through but not quite in some areas) and beautiful detail. So...there is this thing called "test cut" on your cut settings...if you are unsure of how deep to set your blade, check the test cut first...see if the machine will cut through your paper without going too deep or not enough...then tweak and adjust from there.
I'll walk you through where to change your settings...
for some of you this is basic...for others, I hope you have an AH HA moment.
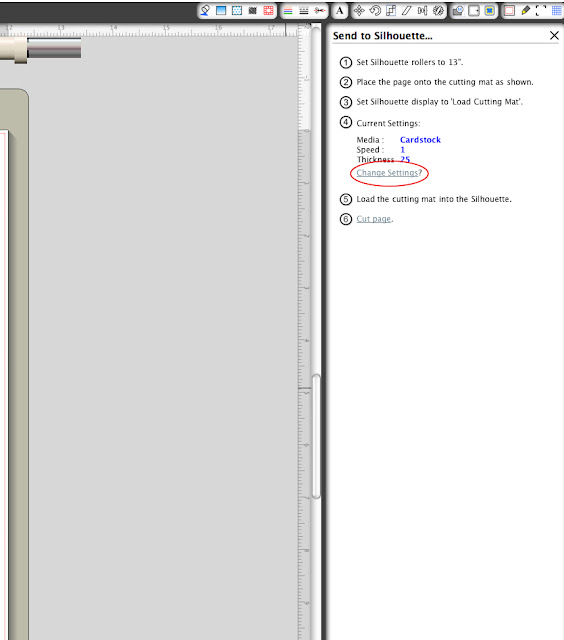 |
When you send your file to cut, you will be presented with a dialog box in the upper right corner of your screen. You can see the dialog box above. Next I want you to notice the "change settings" prompt. I've circled it in red so you can miss it. Click on that.
|
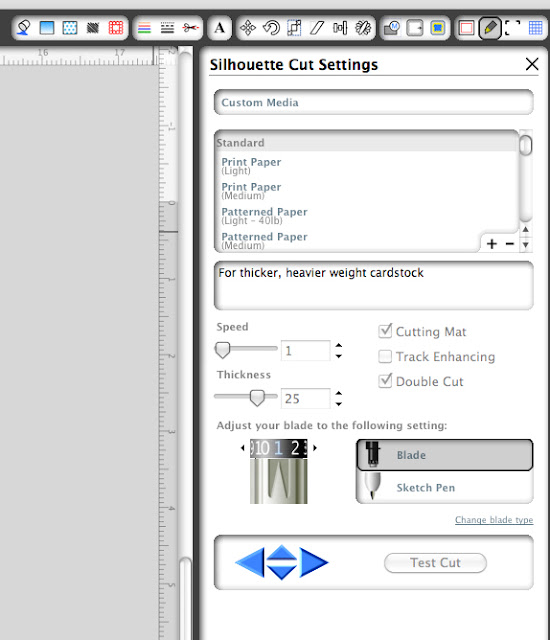 |
You will then be presented with this dialog box shown above. Now you can go through and select your paper type that you are cutting, and the settings will switch automatically for what might work for an average simple cut.
|
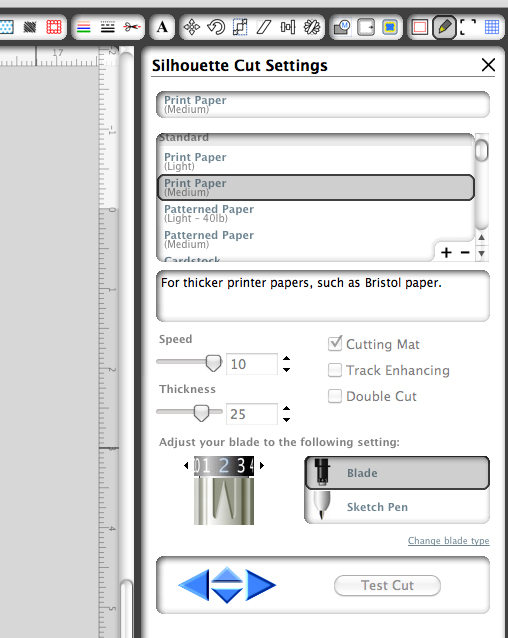 |
In this dialog box, I selected Print Paper. Notice how the speed changed to 10, the thickness automatically set to 25, and recommended a blade depth of 2. (if you are still using the colored caps for your blade depth, I recommend that you buy a new Silhouette blade with the racheting number adjuster...much better blade system.)
|
But since we are cutting cardstock that is heavy, and a very detailed cut, we want to tweak a few things.
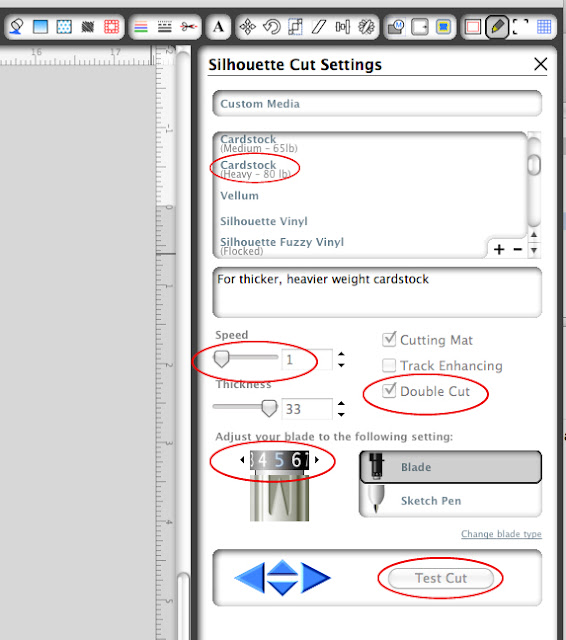 |
Here, I selected Cardstock Heavy-80lb. It changed the cut speed automatically for me to a 2, but I slowed it down even further to a 1 to ensure all my details cut perfectly. Below that, it recommended a blade depth of 3. However, that is not quite enough for the detail and thickness of my cardstock, so I adjust my blade to 5. (hint, you have to physically take your blade out of your machine and rachet the numbers, it won't do it for you by moving the blade depth numbers here on this screen.) Next, to ensure a clean through cut, I checked the box "double cut." Next, if you wish, you can do a test cut with these settings on your paper to see how they work. If you are doing several cards, and these seem to be cutting well at these settings but you feel that your paper or cardstock can handle a higher speed try that out...it's all a matter of trial and error. You will get to know your machine the more you experiment.
|
I hope this basic tutorial has helped some of you out there who haven't fooled with the settings within your Silhouette software. The
Silhouette machine is a fabulous piece of machinery, but we have to know how to tell it what to do. So if something isn't cutting right, chances are, we are not telling the machine to do something at the right speed or thickness or something else. Another thing to watch out for is not to cut really detailed designs too small...you will have a troublesome time as well.
Hope you all have a wonderful weekend!


This is SUCH a gorgeous card!
ReplyDeleteamazing detail. i would love to get a card like that in the mail. ;)
ReplyDeleteGreat Tutorial, Thank you so much!
ReplyDeleteit's so beautiful, and your tutorial is getting me on the right cutting track, thanks!
ReplyDeleteThanks for the tips, it really helped. I cut card with the lace heart pop up, after 3 tries, it's great. But now I need help knowing how and where to attach the lacy heart part to the solid card. Must be a trick, can you help? Thanks
ReplyDeleteJan, after having both parts cut, fold the inner heart part in half so that the hart sicks out and the fold of the card sticks back...while it is folded in half, fold the outer layer around the inner layer and attach the car so that the inner seams meet at the fold. I hope that helps!
ReplyDeleteThe links no longer work... is there any way to get the svg from the ornate card wrap?
ReplyDeleteThanks!
Jen