Ads 468x60px

Showing posts with label mini album. Show all posts

Tuesday, July 15, 2014

Frame Mini Album with Cathy!

Hi!  So glad to have you join us today, it's Cathy hosting the blog.  I have a simple and quick mini album to share with you today that I created for my teenage daughter.  Samantha Walker's new Carta Bella Collection Summer Lovin' is so much fun and perfect for preserving my daughter's summer time memories.  Her plan is to add lots of 3x3 instagram photos.


 I purchased the fun frame at Michaels and removed the inside plastic pieces that hold the photo in.  I then cut the journaling card paper into 12 pieces and punched two holes through the whole stack with my crop-o-dile.  Next, add two one inch binding rings through all of them and hang from the top of the frame.  Easy peasy!


All you have left to do now, is to decorate the frame!
I cut three flowers using two of Samantha's rolled flower files.  I used the Summer Lovin' 6x6 pad for these.  Note: I only ended up using two of these on the frame.
I love how quickly these flowers go together...just roll around a pencil and glue with some super tacky glue.  I used Helmar's Quick Dry adhesive.


Click on the photos below to go right to these files in the Silhouette Online Store.


I glued the flower on and added a few stickers from the Summer Lovin' collection.  


It's a super fun and fast project.  My daughter loves it!


Thanks for joining us today at Samantha Walker!


Sunday, January 26, 2014

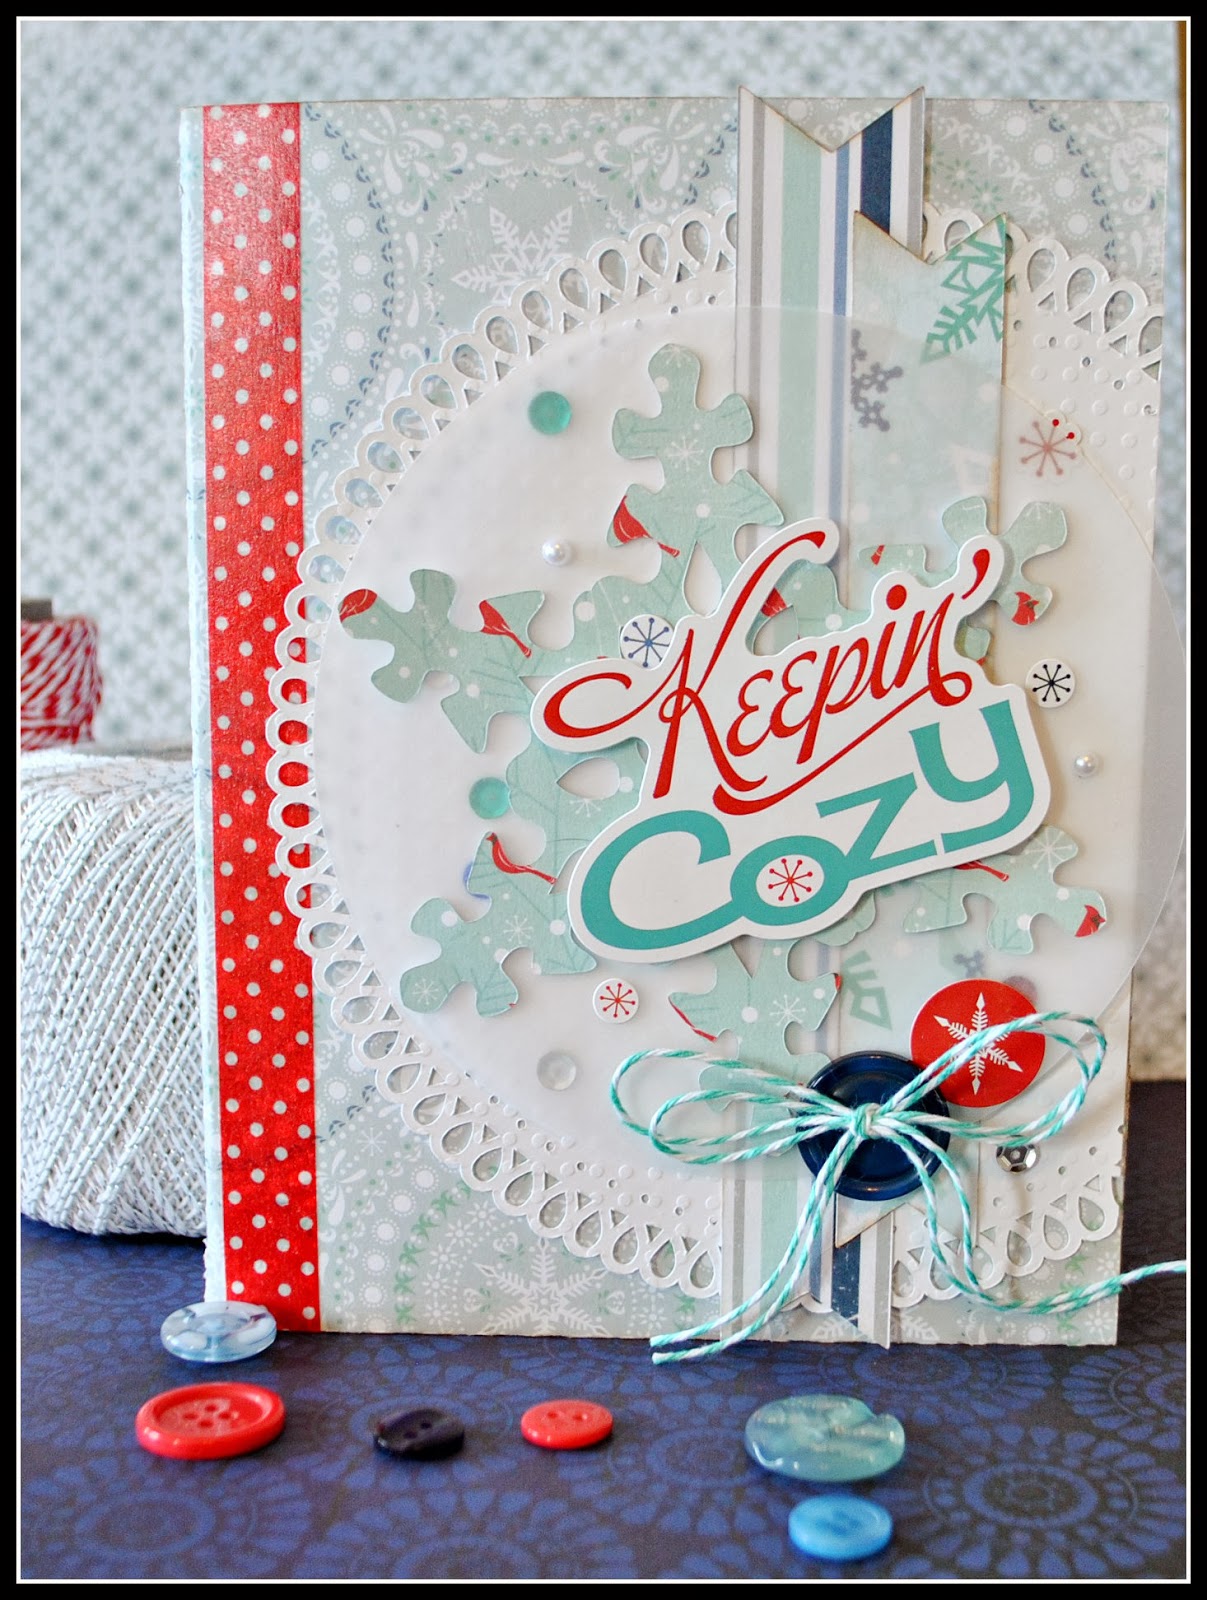
Layered Mini Album with Keepin' Cozy by Cathy

Hi!  Cathy here with a mini album to share with you, featuring several Samantha Walker cutting files and the paper collection she designed for
Echo Park...Keepin' Cozy!
   
A couple of months back, I saw an amazing mini album on the Silhouette Blog.  I loved it and bought the bundle to create my own. Then, when we were assigned our dates to post for Samantha Walker's Creative team...I wondered if I could create one similar with her files.  So that is exactly what I did!


I love how it turned out!

Here is the list of files I used to create the mini and towards the end I will list the files for cover.

I cut all the pieces in the order listed above.  I had to ungroup the hexagon snowflake card, so that I had just the card base.  The only file I reduced was doily lace, which I reduced to 6 inches in diameter. 
Here is a screen shot of the layers.

After everything was cut, I inked all the edges except the white card stock.  I layered the pieces all back together and added a glassine bag for one more layer.  I added a piece of scrap paper, sequins and stickers to create a fun little pocket on one side and then a tag to other.  I stitched through the entire stack of layers...no problem for my sewing machine whatsoever.

For the cover, I used the snowflake that I ungrouped from the hexagon snowflake card, and circle tear drop scallop #4238 reduced to 6.25 inches.  I added a 5 inch circle of vellum for one more layer. Then finished up the mini with stickers from Keepin' Cozy, a little Twinery Twine, then added some miscellaneous buttons &sequins.

I can't wait to send this to my BFF back home, so she can add all of her fun Instagram photos of her kiddos sledding and playing in the snow.  There are so many 
Samantha Walker cut files that you could use to create a mini...the possibilities are endless!

~Cathy

Equipment: 
Silhouette Cameo or Silhouette Portrait electronic cutting machine
Sewing machine
Files Used: 

Monday, September 09, 2013

HSN segment Family Moments Album: for Lisa Bearnson (Inspired Inc.) !

I had the privilege of designing the newest mini album for Lisa Bearnson's Inspired Inc. segment that will air on HSN September 17th! Mark your calendars now, as these album kits are projected to sell out!

Here are the details:
HSN (check your local cable listing)
September 17th, 2013
The segment is called "Paper Crafting with Lisa Bearnson."
Times are: 10:00am, 2:00 pm, and 9:00pm EST.

(I'm not sure which of these sessions this album will be in for sure--as the schedule is still flexible at this point...but it will be one of those times...and if you happen upon one of her other sessions, you won't be disappointed--she has some really great stuff to share!)
I love working with Lisa Bearnson, as she is a woman with a vision! When I got the call from her early this summer--with the project proposal and a quick deadline, I knew that I had to find a way in my schedule to make this album happen.

Lisa's vision centers around the importance of being able to scrapbook your family moments without taking up too much of your precious time. Her company Inspired Inc. provides the way to do that with on-trend products that are quick and easy to put together in a snap.

This kit comes pre-cut with all the parts and pieces you need to assemble a gorgeous family keepsake. Brads, ribbon, chipboard stickers, and flat stickers are all included!

My favorite part about the album kit...


Every pre-cut piece also comes with an adhesive back!

You simply just pull off the backing, and stick it to the page in the right spot. 

It's that easy! 

No cutting, no applying adhesive...it's all done for you!

Now that's my kind of scrapbooking!
I designed each layout with options in mind--Some of the pages have many places to put photos--like the hex page above, and the frame page below...but if you don't want to feature that many photos, there are also pieces of patterned paper to put behind the frames if you desire. You could also add your own quotes to the frames if you desire.

I also wanted to leave you the ability to customize your pages if desired. In my finished album, I added little sewing details on each page just selecting the zig zag stitch on my sewing machine and stitching right through my paper.
A few of the pages come with cute little pockets too--great for putting special messages or more detailed journaling.
The chipboard accents in this book are fantastic! Look at those cute little numbers on this page for detailing your family rules.
 No family album is complete without a "celebrations" page--in our family.
 The album is peppered with great little details like this baker's twine pennant flag on the celebrations layout!
The pennant flag stickers fold right over the top of the bakers twine.
This layout allows you to customize the page with several word options to fill in the hexagons that suit your family's personality.

 Homemade memories includes cards for writing your family's favorite recipes. I need to find a few of mine before I write them in here.
 This "Good Times" page leaves lots of space for journaling in the colored strips...or you can leave them blank as a design feature.
Basically, what I'm trying to say, is that this kit is all done for you...the layouts are all figured out, the pages are all coordinating, the cutting has been done, and your embellishments included too! You just need to collect your photos, and start whipping it together. The framework is all there...you just add the details.

So join Lisa Bearnson on HSN September 17th, as she shares this easy Family Moments album kit,  and see if you can snag one for yourself, and another for a Christmas present for a family member, and maybe even one more for your friend's birthday.

Happy Crafting!

Saturday, June 08, 2013

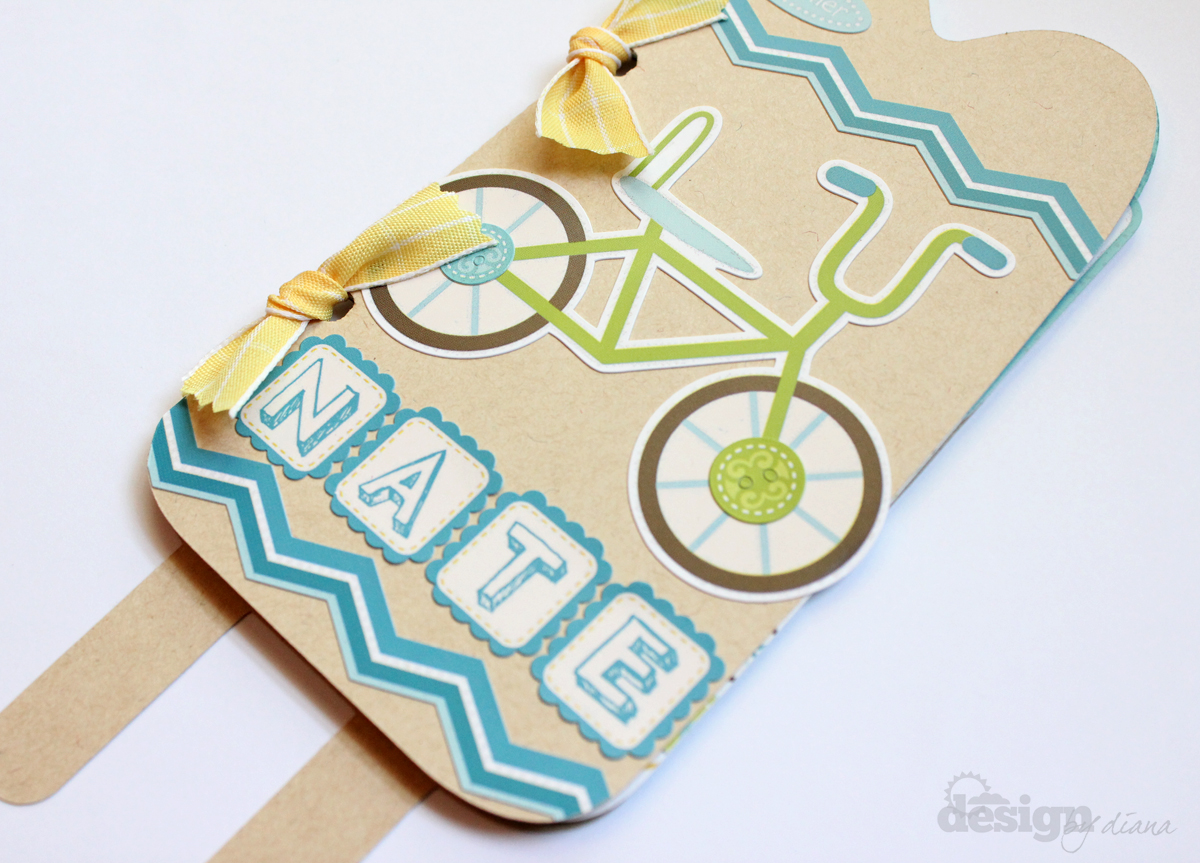
Summer Mini Fun Shaped Card by Diana Fisher


Hi! Diana Fisher with you today. I'm going to share with you how to make a shaped mini album using the template from a shaped card from your digital cutting files.

I used the Frozen Treat Card from Samantha Walker on the Cameo. First, you can see that I chose the file from my library and it opened a new file.


From there, I used the "Ungroup"option in the bottom left corner. That will release all of the selected pieces into the smaller pieces it is made up of, giving you the ability to delete the pieces you don't need.

I deleted the extra sticks and the center lower ovals. I then sized the two remaining pieces to what I wanted them to be. That is key... sizing them together when you are not going to use them at the size the are in the original file. When I take about the pieces and put them on different cutting boards, I still want them to match up, so always know your sizes when working with different pieces that fit together.


I then took the far right non-folded popsicle piece off the board as a "cut" not a "delete" and put it on a new cutting board. I duplicated it two more times and positioned them to cut.


After that, you just let the Cameo do its thing! I cut the outer folded popsicle out of kraft card stock at a  card stock setting. I then cut the other board with the interior popsicles with a textured card stock setting because the Carta Bella Cool Summer paper from Samantha Walker is very heavy and does have a texture to it.


Here are some of the pictures from the final mini. It is going to be a journal for my son for the summer. He often asks me to make him these little bound books he can put stories and pictures in. He's going to be a Project Life or mini album crafter for sure! I just know he's going to love getting this as an end-of-the-school-year gift in a few weeks.


Thanks for stopping in to see how I made a mini album template from a shaped card. I hope it's inspired you to try this yourself sometime!

Products you can use to recreate this project:
 
Get Amazon Prime Membership! Enjoy Free 2-day Shipping on Prime products, plus access to Free digital content like videos, books, and more!

Tuesday, November 23, 2010

Introducing Karen Maldonado

The next Creative Team member I would like to introduce to you is, Karen Maldonado. She has a very ornate, yet graceful style, and loves to work with sultry colors.  She caught my eye because of the little details that she adds to each of her creations.  You can tell she loves crafting as she pays attention to placing everything "just so" on her cards by adding little flowers or ribbons in just the right place.  I know the recipients of her art must feel loved when she passes on a little piece of herself through her creations.  Heck, I feel loved anytime she puts a few of my products into her designs.  I have linked any of the Silhouette dies that she used directly to that file on the Silhouette site to make it easy for you to find the die. 


I love pennants...they just scream Celebration!  Combine them with fun colorful paper, and you've got a paper party going on.  This card is so cute!  For Karen's "Birthday Wishes" card she used die cuts from the silhouette digital download store (Polka Dot Pennant  -C00951-19210) She used two of the four layers to create this string of pennants.  There is an addtional polka dot layer and offset pennant layer you can use too!


Karen gives a festive twist to a Halloween card by creating a hand made paper carnation.  She has a tutorial on her blog for this technique. She used a few of my Sillhouette die cuts to complete her design:
"Bats" (C00927_19210) and The card base is another Silhouette die cut "Artisan Nesting Rectangular" (C00685_19210) which can stand upwards or sideways!!


What kid wouldn't love to receive this little treat bag that Karen created for Halloween.  She used  my Silhouette die,"Scalloped Favor Bag (C0156)" and also used my "Hanging Ghost (C00931_19210)" Silhouette die. She cut two each of the ghost, covered the back of the ghost with black cardstock so the eyes would be black.  This is an excellent tip for minimizing layering details when using the Silhouette. Cute and clever!

In celebration of World Cardmaking Day, Karen created this beauty. The card has a antique vintage feel complete with lace and aged ink techniques. She used my Silhouette (Crown Border Square/C00637-19210) as her card base.  There are also some more of those cute handmade paper flowers...tutorial here.


Isn't this fun? I love the way Karen added a pink bow to my Silhouette "Kitty Cat Favor bag" die.  One of my favorite things about this project is how she used little pearls for the shine in the cat eyes...that's brilliant!!

Karen made a little mini album with a couple of my Silhouette dies (8 piece scalloped round corner set C01032_19210 & swirly frame C00796-19210) which she squeezed so it was more square and omitted the swirly center.  That is something that is always good to remember about the silhouette, you can always choose which lines you want to cut by ungrouping the file and deleting what you won't be using in that cutting pass.  Karen makes use of that feature all the time to make shapes work for her projects. and I tell you what...Karen is like the queen of flower making...here's another cool handmade flower...details for making this sweet beauty are on her blog.

Karen also has a lot of fun with Copic markers...a fun blending markers for stampers...if you haven't heard of them...check them out...very cool stuff!  She used several of my my silhouette dies to create the center of her card including: artisan_with_swirls_C00487_19210, she omitted the swirl part of the design and just used the out line. That is a cool thing you can do from within the Silhouette software. She also used: 8_piece_mini_scalloped_oval_set_1_C01037_19210


I think this card is just lovely.  Karen put an unexpected bright pop of color in the ribbon and the pink pearls--great idea to add contrast against the muted background. She used a few of my dies from Silhouette including the dual_edge_half_moon_scallop and 3_nesting_retro_flowers_C00494_19210 for the base of her flower.  

Karen has a knack for making cute little journals like this beauty. She used one of my Silhouette Dies called "3 Nesting Artsian Shapes" (C00493_19210) " it comes with three different files in this one set!!  Of course you know I am going to say I love her flower and ribbons.  


This card that Karen designed makes me feel warm and fuzzy.  Love the autumn cozy colors of the designer papers she used (Basic Grey's Wisteria collection!)  I love Basic Grey and how they revolutionized the scrapbooking industry when they entered the market.  They are an awesome company. She also used my "Artisans Nesting Rectangular (C00685_19210)" Silhouette die design to mat her cute little stamped girl.  Then, she tucked three of my Silhouette "Snowflakes (C0301)" dies to go with her autumn/winter theme!  She was clever and cut the snowflakes in 3 different sizes.  I think the snowflake die would also be cute cut large and used as a doily under a plate of holiday cookies.

I hope that you enjoyed getting to know Karen.  I certainly have been enjoying getting to know her through her designs.  I hope you visit her blog and frequent it often as there is always some kind of inspiration there for you to enjoy.  
Related Posts Plugin for WordPress, Blogger...