Ads 468x60px

Showing posts with label cristal hobbs. Show all posts

Thursday, October 16, 2014

First Day Layout with Pinky

Pinky is back today to share a fun First Day digital layout 


You can find this kit here:

A TO Z MEGA PACK

In this pack you will receive the entire A to Z collection...that's 9 digital kits! This mega kit contains 12 flashcards, 8 borders, 5 blank fancy tags, 29 school imagery "stickers", 6 frames, 5 journaling blocks, 30 word "stickers", 82 letter stickers, 16 patterned papers, and 9 solid linen textured papers. This is the ultimate pack for designing your kids school scrapbooks and projects. This kit comes in high res j-peg and png formats. There is not a mega kit option for limited commercial licenses. If you wish to purchase a limited commercial license, it must be done for each kit individually.


Tuesday, October 14, 2014

Spooky Halloween Mobile with Pinky!

Hey there SW friends, 
It's Pinky today with a Halloween mobile that is so cool near a window with 
the crystals and shine! This would be fun with a black light behind it. 
Have you seen the newest Halloween Cut Files from Samantha Walker?
They are fun and so easy to use. 
 For the base hanger I took a roll from the inside of a tape and 
spray painted it metallic nickel. 
Then hot glued rhinestone mesh on the outside. 
After that I used my Silhouette to cut the SW SPOOKY cut file
from black card stock. 
On the back I adhered a piece of acrylic to keep it straight but invisible. 
I used fishing line to tie the crystals and the SPOOKY on. 
Then added a fishing wire hanger as well.

This is just too cool lit up in the dark by a candle or porch light,
and during the day it lets off little rainbows. 
Fun project you could make with your kids even...

Until next time- Keep on creating!
Pinky Hobbs: Samantha Walker Creative Team

Tuesday, September 23, 2014

Classroom Treat Boxes and Card by Pinky

Hey friends, it's Pinky today with a fun classroom treat project using the amazing
Halloween themed Samantha Walker Cut Files in her Silhouette store!
If you need a cut, trust me Samantha has it!
For these popcorn treat boxes and teacher card I used the new Web & Spider Gable Boxes along with her "Halloween" word set. Just click on the description for the links. 
 For the popcorn boxes I used glitter card stock on the glitter card stock cut setting
and regular orange card stock, and assembled the boxes as directed but DO NOT adhere yet!
After that take a sheet of acrylic, and trim to the front of the box size.  
Using double sided tape- adhere acrylic sheet inside each design side of the box. 
 This prevents small treats like popcorn from escaping. 
 When the acrylic is in place then assemble box fully including the adhesive strip on the side. 
Then add gems, or other decor. 
For the coordinating acrylic card I trimmed out black card stock to 
4X7" then fold over 1" lip. 
Cut out BOO! using Samantha Walker Halloween Word Set and glitter card stock. 
Trim out 4X6 piece of remaining acrylic, and adhere BOO! to front and center. 
 Edge punch the black card base, then adhere lip to acrylic to create the card. 
 Add gemstones and Liquid Pearls, etc....

Now you have sweet treat boxes for the class party filled 
with popcorn and a sweet card for teacher too!
 Samantha always has the most amazing cut files, be sure to check them out!

I hope you try this project and share with us!

Monday, July 07, 2014

Keepin' Cool Card Tutorial By Pinky

Hey there friends, 
It's Pinky today with a card tutorial for all those fun summer memories. 
Perfect for cards, layouts or whatever craft you are working on. 
I combined the Summer Lovin' 6X6 paper pad with her great Silhouette 
Digital Cut Files and created this. 

Using die cut machine and pink paper from paper pad- 
cut out doily shape at 5". Trim out 9X6" white card stock for card base and
bone fold in half. Cover front with green paper from paper pad. 

 Trim out Flamingo paper at 3.5X5" adhere to front of card over green. 
Run digital cut doily through sticker maker- adhere to top
and bottom of card and trim off excess. (Cut slightly smaller than half). 
 Created paper pinwheels- adhere to card using bright colorful buttons. 
Add ribbons- trim out "Keepin' Cool" quote from paper 
strip Summer Lovin' 6X6 paper pad adhere to front as shown. 
 It's not hard to coordinate all these amazing patterned papers
into a card you can be proud of!


Saturday, June 07, 2014

Layout using Summer Lovin' with Pinky

Hey there, it's Pinky today with a layout created using 
Samantha Walker's newest paper line called Summer Lovin'
and of course the amazing cut files from her Silhouette Store. 
I am going to share how I created this layout step by step. 
Using Square Doily Cut Files and Summer Lovin' Paper- cut out at 11".
Adhere cut page to 12X12 acrylic sheet. 
Using Summer Lovin' paper trim out 4X12" strip. Adhere to layout as shown. 
Trim out 2" corrugated paper and adhere.  
 Using cool patterned paper strips trim out strip and adhere over corrugated paper. 
cardstock and trim out. 
Adhere to top of layout.
 Add flowers and Liquid Pearls (use main photo as reference). 
 Add photo matte. Peel film off back of acrylic and lightly
spray with coral spray paint (Krylon). 
 Add sticker embellishments from Summer Lovin' and twine.
Place photo and there you have it!
  
Beautiful step by step, unique and looks like a million bucks.

I hope you enjoyed my post today- until next time, keep on creating!

Sunday, February 23, 2014

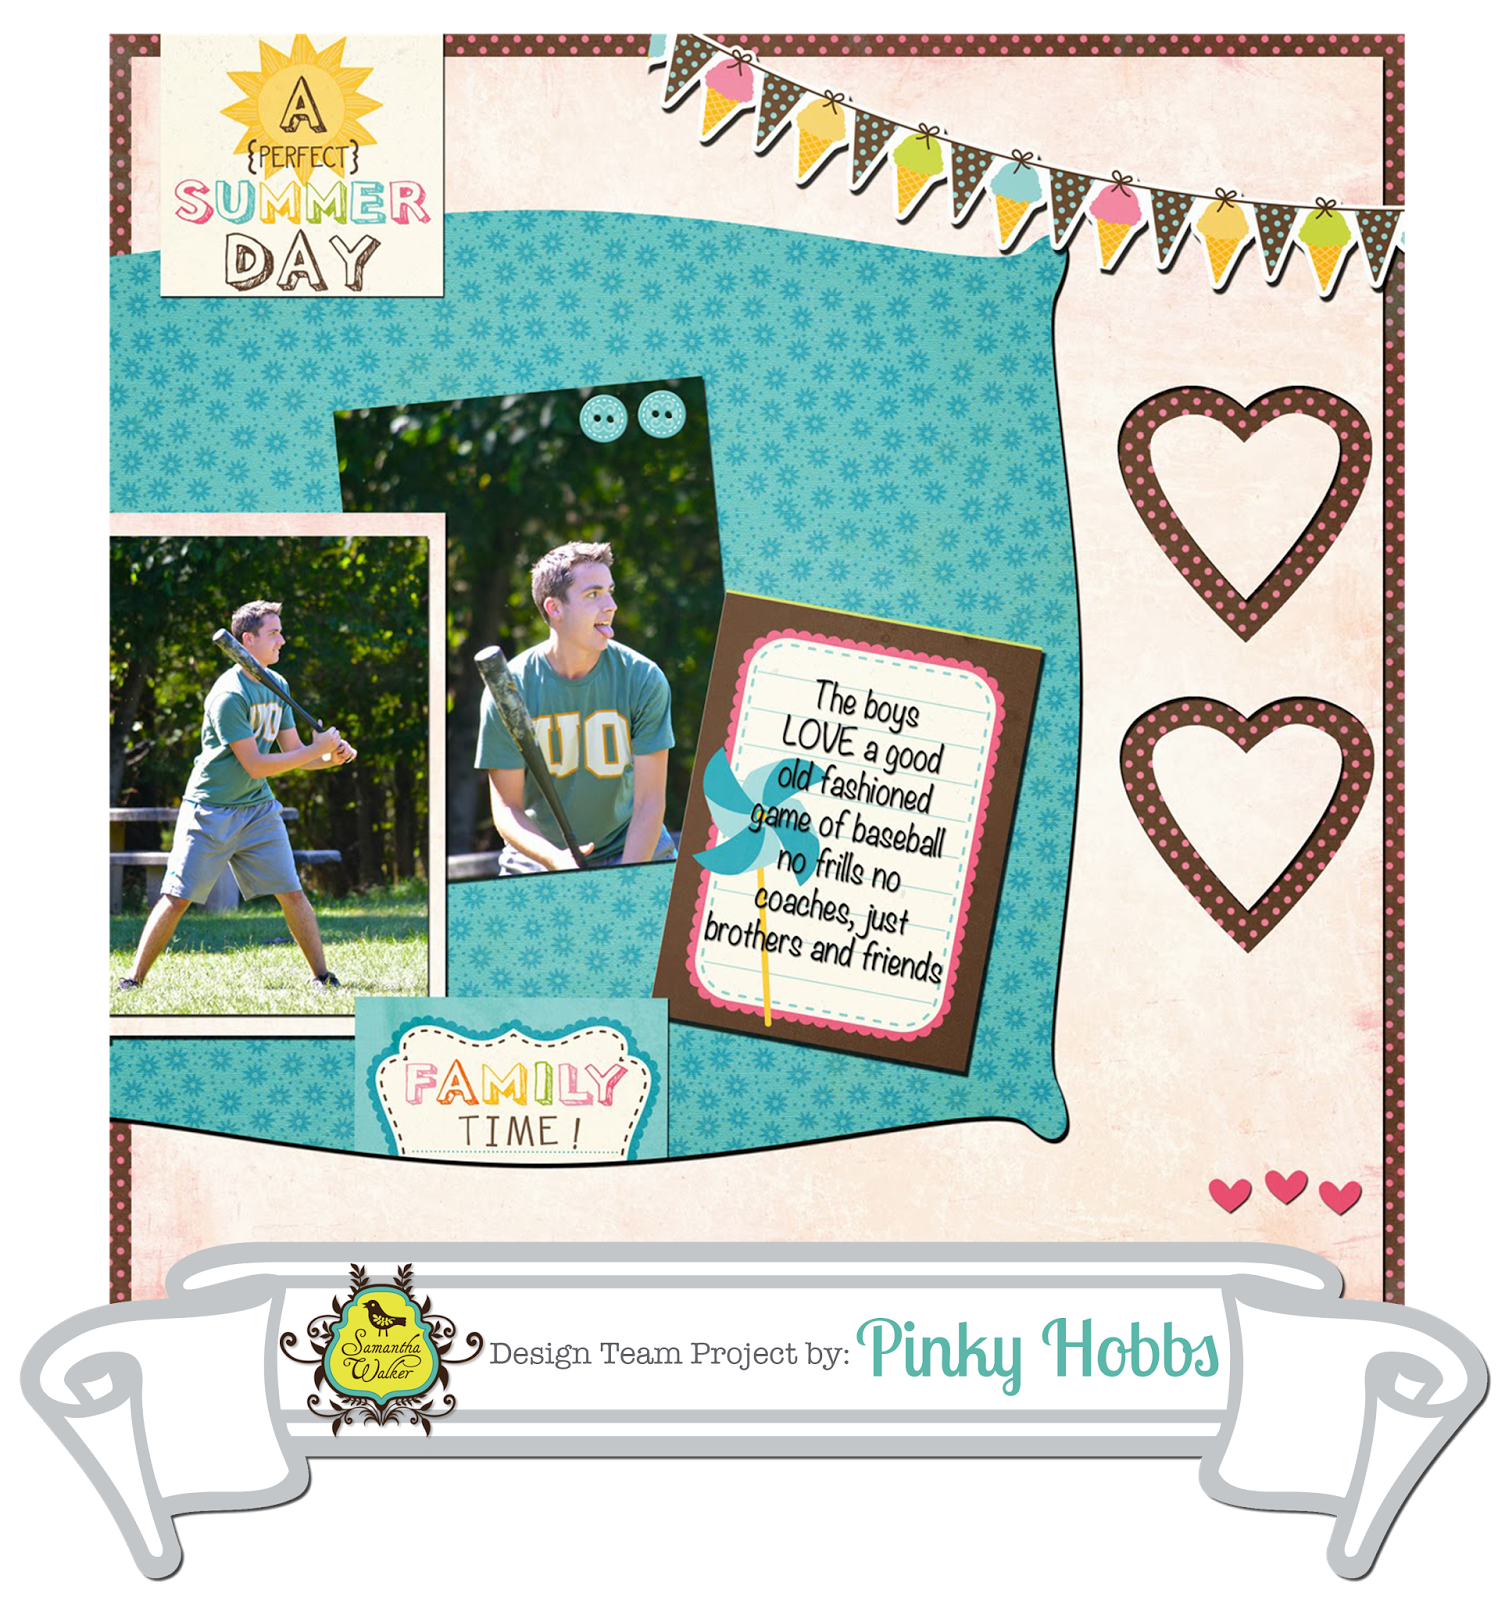
Punching Digital Paper with Pinky!

"Punching Digital Paper!": Using Custom Shape Tools In Digital Scrapbooking

Hey there SW friends,
it's Pinky today and I am so happy to be here!
You know I love to craft with paper, sew with fabric and many
other crafty things but I also love to do digital scrapbooking.

Sometimes it's nice to play with my computer and
just make pretty things but it can also be overwhelming. 
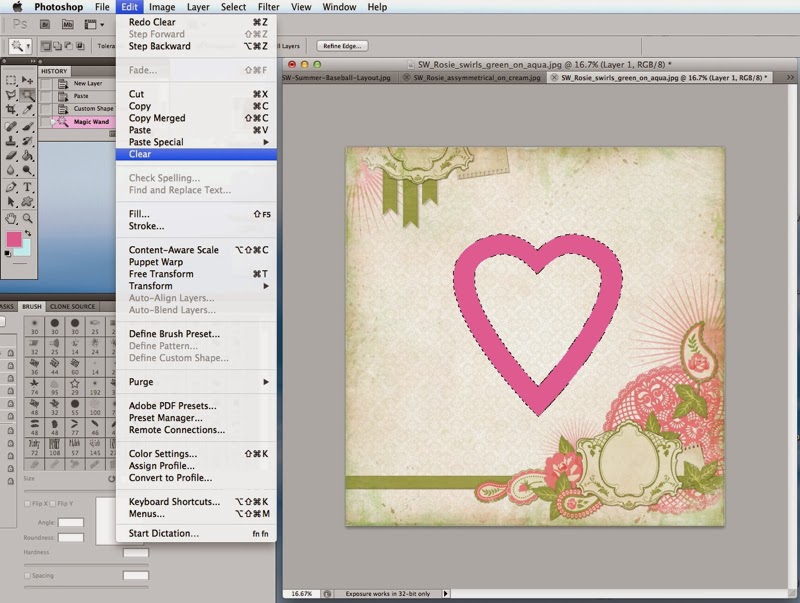
So today I wanted to share how I create "Paper punches" 
using my custom shape tools which are endless for Photoshop.

I am going to share an example by using the Rosie Collection
 but you can see the same results in the layout above using the 

1. Open your base layer and page.
 2. Create a new layer.
 3. Paste new paper onto layer one.
 4. In sidebar find "Custom Shape Tool".
 5. Choose which shape you want.
(All Photoshop programs come with a few to try).
 6. Place Custom Shape Tool design where you want on the top layer.
Size to desired size.
 7. Using "Magic Wand" select shape.
 8. Clear OR Delete shape.
This will leave the patterned paper showing through behind.
9. For more dimension- change style of layer 2- to have a
"drop shadow".
 This creates a paper punched look.
You can also create a beveled look if you change your layer style to
beveled instead of drop shadow.
 Easy and adorable effect! You can apply this with stamps too.
Get ready to DIGI scrap this summer photos. I know I am especially 
in this cold weather, maybe if I scrap it- it will come!

Until next time- Keep on creating!


Related Posts Plugin for WordPress, Blogger...