Ads 468x60px

Showing posts with label Friday Tutorial. Show all posts

Friday, January 04, 2013

Paris Girl Thank You Notes by Joscie

Hello Friends, Joscie here to share a quick and easy thank you card.

  • I cut a piece of 8.5 x 11 black cardstock in half the long way.
  • I scored and folded in half to create a 5.5 x 5.5 card base.
  • I cut two strips from a sheet of 6 x 6 Carta Bella Paris Girl Paper.
  • I took a long piece of silver twine, folded in half and then tied a bow in the middle.
  • I stapled one side to the left side of the paper strip and then added adhesive to the back of the paper strip.
  • I adhered the paper to the bottom of the card and then used the tiny attacher to attach the right side of the twine to the card base/strip.
  • I added adhesive and tucked the second strip above and behind the first.
  • I added a short strip of silver striped washi tape to the top right side of the card.
  • I layered the thank you sticker over the strips and washi.
  • I used a scissors to trim off all the right edges flush with the card base.


If you don't have a silver or white pen to write inside a dark card base, you can always add a white block of cardstock inside for the note.
Thank You! I hope you're inspired to make some pretty Thank You notes!
Love Love,

Thursday, November 29, 2012

Preparing for the Count Down! by Jamie Cripps

Have you seen all of the amazing Advent Calendars in Samantha's Silhouette Online Store?  I am just so in love with each and every one.  We may end up having one in each room this year!  

They are fabulous, right!?  
And remember, they are on sale through midnight tonight (11/30) 
for 50% off!

It's Jamie back with you and today I am working with the Santa Beard Advent Calendar and have a quick tutorial to share!  Just have a look at all the cuteness this guy brings...
 
We will be using cotton balls to cover up the days so once we hit Christmas, his beard will be full and fluffy!  

This file comes with a couple different options for the days.  You can either cut them or do a Print and Cut.  I chose to work with the cuts for this one because I wanted my numbers to be the same red as Santa's hat!

Tutorial:
To start, place the cut file on your mat then click on it to select it.  Once it is selected, right-click and choose "ungroup".

Next, go up to "File" and select "New" to open a new window.  We will open up four windows during this tutorial.
Copy the background, the mustache, and the hat ball to the new page.  I color mine white so I know what color to cut the items in.

Go back up to the "File" and select "New" to open another new window.
Go back to your original window and copy the beard piece then paste it into your new window.  Again, I colored the piece white.

Go back up to the "File" and select "New" to open your 3rd new window.
Copy the numbers from the original window to the 3rd new window and color the items white if desired.

Go back up to the "File" and select "New" to open your last new window.
Copy the items shown and group them with like items so you can place your paper easily.  I have color coded my items to help me with my paper placements!

Cut all of the items, four pages in total then 
follow the assembly instructions below:
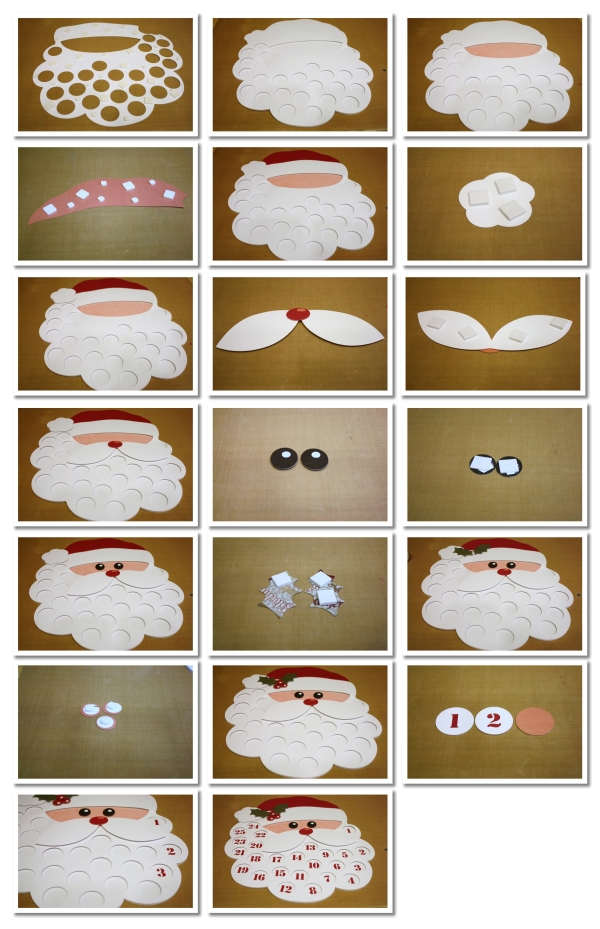
 1.  Place foam adhesive squares on the back of the beard.
 2.  Adhere the beard to the base.
 3.  Apply glue to the back of the face piece then adhere as shown.
 4.  Place foam adhesive squares on the back of the Santa hat piece.
 5.  Adhere the hat on the base as shown in the photo.
 6.  Place foam adhesive squares on the back of the hat ball.
 7.  Adhere the hat ball on the base as shown.
 8.  Assemble the nose pieces and adhere to the mustache.
 9.  Place foam adhesive squares on the back of mustache.
10. Adhere the mustache on the beard as shown.
11. Cut small pieces of white cardstock and apply behind the black eyes.  
12. Place foam adhesive squares on the back of the eyes.
13. Adhere the eyes on the face piece as shown in the photo.
14. Place foam adhesive squares on the back of the holly leaves.
15. Adhere them to the Santa hat as shown.
16. Cut small pieces of white cardstock and apply them to the back of the holly pieces then apply foam adhesive squares on the backs.
17. Adhere to holly pieces as shown.
18. Adhere each white number piece to the red circles.
19. Apply adhesive to the back of each number then place it on the Santa base, pushing it under the beard.
20.  Your project should look like this!
Thanks so much for stopping by today!
If you make one of the Advent Calendars, we would love to see them!  Just link us up in the comments section or share it with us on Facebook! 

Also remember that the Creative Team Call ends 
tomorrow (12/1) so be sure to get your application in!  

Friday, November 02, 2012

Snowman Advent Print and Cut Tutorial by Joscelyne Cutchens

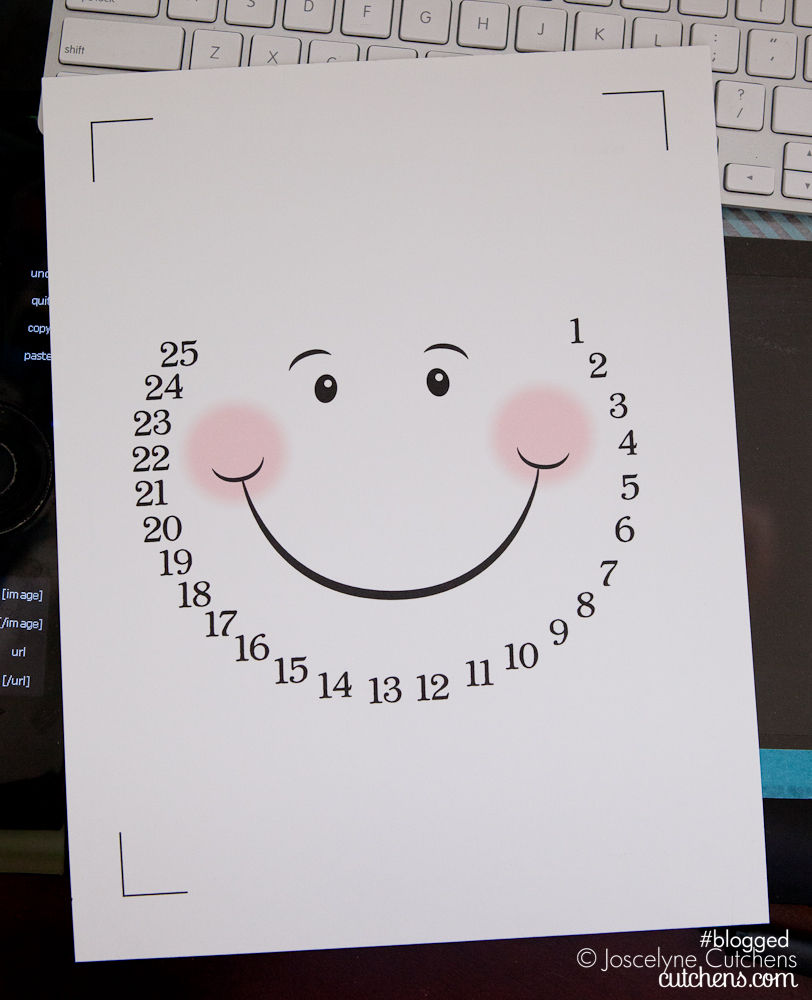
Hello Friends, Joscie here to share with you a new print and cut design from Samantha Walker!  This super cute snowman advent calendar is perfect for helping kids count down the days until Christmas! I am working on an original silhouette and a standard printer, so my size limit is 8.5 x 11 paper. Feel free to click any of these images for a larger view. 
Snowman Advent from Silhouette
Here's how I made it:
  • I opened the file in my silhouette software and ungrouped all the elements.
  • I set the paper size to 8.5 x 11 and turned on the print registration marks setting.
  • I selected all elements and resized together until the snowman face and cut lines fit inside the print/cut area.
  • I printed the snowman face on my printer on white cardstock.
  • I placed the printed sheet on the carrier mat and loaded into the silhouette.
  • Press cut, voila, snowman face. :)
  • Select items that you want to be the same color and place in the cutting area


  • I used foam adhesive to pop some layers.


  • I used an orange mini brad to connect the carrot nose/pointer.


I also added some crystal effects to the holly leaves and berries to add a little shine. Voila! Snowman :)


I hope you will give the print and cut a try!
Love Love and Blog you Later,
Joscie, rhymes with bossy :)

*******
Be sure to check out the Silhouette Store for more Advent Calendars:


Friday, October 26, 2012

Natural Therapeutic Hot/Cold Pack Tutorial by Pinky

Hey there friends, 
Pinky here today with a tutorial for Therapeutic Hot/Cold Packs that are all natural and easy to make yourself. Samantha Walker's beautiful Decadence Fabric line makes them perfect for fall or just to make a stunningly styled hot/cold pack. 

Uses for these?? 
Migraines, aches and pains, bed warmers (much larger of course), lovies (in the shape of animals) bread basket warmer- to keep food warm or cold. 
You can freeze them or heat them,just leave in freezer or heat in microwave for 1-2 minutes. 
Step 1. Cut strips of fabric 2-3"X8-16". 
Your choice depending on area you want to apply it to. 
I chose the shorter ones because I will be giving them to a friend who has migraines. 
I made them the perfect size for the forehead.
 Step 2. With right sides facing together, 
stitch sides and bottom making sure to leave opening at the top. 
 Step 3. Snip corners and thread. 
 Step 4. Turn bags right way. 
Step 5. Pour rice into a bowl. Add all natural oil (just a drop or 3 not too much). 
Stir into rice thoroughly.
 Step 6. Funnel rice into bags. (I use a sheet of paper as a funnel). 
Step 7. Stitch ends closed. 
These make wonderful gifts but you cannot wash them.


Friday, October 05, 2012

"3 Part Layering Card" Tutorial by Karen Maldonado

Hi there! It's Karen here, sharing how to make a beautiful layered card using Silhouette dies, and Paris Girl designer papers & stickers...all designed by Samantha!


Here's the list of all the supplies we will use on our project today!


Supplies (designed by Samantha Walker):


Additional supplies:
* Black Card Stock
* White Card Stock
* Self Adhesive Crystals
* Pop Dots
* Adhesive Runner
* McGill Paper Blossom Tool Kit (use to add dimension to the flower)

So, let's begin, as I take you through this 3 Part layering process...

Part 1 Layering -
- Take black card stock and cut a card base 10.5L x 5.25W.  Fold in half lengthwise.
- Cut a 5L x 5W square piece of grey designer paper.
- Using your Silhoutte machine: Cut the Ornate Frame from black card stock (4.795L x 4.790W)
   and pink designer paper (4.625L x 4.620W).
- Layer as shown in photo (bottom to top).


Part 2 Layering -
- Using your Silhouette machine: Cut the 10 piece Circle Stamp from white
  card stock (2.875L x 2.875W) and grey designer paper (2.610L x 2.610W).
- You will also use white card stock to cut a Silhouette Doily Lace (2.440L x 2.435W).
- Layer as shown in photo, using pop dots underneath the stamp layer, and    
   flower/sprig for added dimension.


Part 3 Layering -
- From the black polka dot designer paper, die cut the sprig part of
   the 3 Flower Sprig die set (2.935L x 2.075W).
- Finally, die cut the 3D Layering Flower.  You can use the McGill tool to add some dimension to the
   backside of your flower. You will layer the flower and add an adhesive crystal to the center of the flower.
   add pop dots to back of the flower/sprig.
- Take the "you are sweet" sticker from the Element Sheet.  Add pop dots to the bottom.
- Using your Silhouette machine: Cut the Butterfly die (1.040L x 1.115W).  Add two smaller
adhesive crystals to the center of the butterfly.  Add a pop dot to the back of the butterfly.
- Assemble these last three pieces as shown in photo below.


Now the fun part..time to adhere it all together!  I additionally added some more pop dots underneath the black part of the ornate frame, and added some machine stitching to the grey square piece before adhering to the card base.  Here's what the final card will look like using all these gorgeous products!!


I hope this will inspire you to create using your Silhouette dies, using the Paris line or any other collection designed by Samantha... layering all different kinds of dies!!  I just truly adore the color palette! Just mix and match to your hearts content!

Until next time... have a fabulous day!

Hugs & Smiles,
Related Posts Plugin for WordPress, Blogger...