
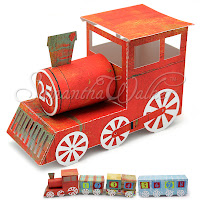
Good Morning! Jamie back with you today with a quick tutorial using Samantha's 3D Advent Calendar Train Engine!
I am only walking through one of the train pieces today as they all assemble similarly, but if you have questions on the other pieces, just leave a comment on this post or shoot us an email at social.samanthawalker@gmail.com!
This train is an advent calendar which is perfect for counting down for Christmas, Birthday's, even family vacations (can't you just picture a Disney train count down!)...but it is also perfect for table decorations or even birthday favors where each kid could take a compartment! The ideas are endless which is one of the reasons I love these files so much!

Here are some other angles...so cute, right!?


Okay, so on with the tutorial!

2. Place adhesive on the sides of the train front (where the grill is) then align the sides and adhere the edges down.
3. Your train front should look like this.

5. Place adhesive on the front side flap and adhere.
6. Your train back should look like this now.

8. Next gather the small circle with tabs and the long piece with a slot in the center. Fold the tabs of the circle down as shown then run the long piece along the edge of your desk to give it a curve.
9. Place adhesive on the tabs of the circle and then begin adhering it to the other piece.

11. Place the number piece on the center of the circle.
12. Next you will be placing this piece on the front of the train. There is a slot that is already cut that the two tab pieces will push through. I slightly angle mine on one end then push through.

14. Push the stack down on the circular tube in the slot provided.
15. Next grab the long rectangle piece and place adhesive on the back side.
 16. Adhere the piece on the bottom of the train to cover the wheel holes.
17. Next place adhesive on the wheels (circle parts only) and adhere them to the train.
18. Continue adhering the wheel pieces until they are all in place.

21. These are the extra pieces I had. Since I used a double sided paper I just turned my wheels over to make them the green paper so I did not use the wheel covers or the wreath/bow piece.

Isn't this cut so much fun!?
Below we have labeled extra pieces in the cut file to show what they are for to help explain the cars better.

Then the long train car image below shows the dividers in place:

Just click on the image below to get your train pieces!


Thanks so much for stopping by!


Loooove your adorable train! Beautiful details!
ReplyDeleteThis is so cute! I'll have to file this idea away for future use.
ReplyDeleteThis is so cute.... however I am having difficulty putting it together and I can't seem to find the tutorial. For the 3D advent calendar train flat car.
ReplyDeleteThanx in advance
Bonjour,
ReplyDeleteJ'ai acheté les 4 trains pour faire le calendrier de l'avent sur Silhouette design store.
J'ai bien trouvé le tutoriel pour la locomotive réf 34372.
J'ai bien réussi à monter les 2 wagons réf. 34375 et 34413.
Mais je n'arrive pas à monter le train-flat-car 34374 :
image.png
Comment faire avec ces découpes ? :
image.png
Pourriez-vous m'aider SVP ?
Cordialement.