
With all that lace for this special day, the last thing I want, is for you to feel intimidated by cutting detailed designs with your silhouette. I wanted to go over some of my tips for cutting detailed designs. If you are looking for additional tutorials, look in the side bar on my blog for a link to a pictorial list of all the silhouette tutorials I have on my blog, plus other fantastic tutorials.
So this week in the Silhouette store, I have several new designs that will test your Silhouette's ability for detail. I also created a few more simple designs because I know not everyone loves lace. Here's what you will find (links to the files are included below above each tutorial:)

Here are my best tips for cutting detailed designs:
1. Make sure your blade is sharp...if not put in a new one. You can still save this duller blade for simple straight cuts if you want to get the most out of each blade. Just make sure to label it somehow. I like to put a dot of fingernail polish on my duller ones to tell them apart.
2. Make sure your mat is sticky. If the design moves around, your details will be distorted.
3. Choose a card stock weight paper for best results. Light weight paper, like copy paper, is not recommend for detailed designs. Thicker than card stock can also be tricky to work with. You will have to experiment with your settings--like using the double cut feature for thicker card stocks. Making two passes with the blade is sometimes better than setting the blade deep, this will prevent bunch-up.
4. Make sure your paper settings are correct. For Bazzill card stock, I like to use a blade depth of 3 or 4. I check the "double cut" box, and make sure my speed is slow...I recommend trying speed 2. If you aren't sure about your settings, do a "test cut" to make sure they will work.
For a more in-depth tutorial on cutting detailed designs, click on this post I did a few months ago here.
Here's how to assemble the Valentine cards in this collection:
Valentine Gate fold and insert card:

1. glue the heart border to the insert.
2. Glue the triangular lace shapes to the front of the gate-fold card.
3. fold the gates in on the card.
4. insert the flat card.
5. tie with a coordinating ribbon.

1. Glue the lace hearts to the front of the card, making sure to center them over the heart flaps on the card.
2. Fold, and tuck the hump of one heart under the other.
3. Envelope assembly: Glue the heart to the front of the card envelope flap.
4. Fold the sides of the envelope in.
5. Glue the rounded flap edge to the other round flap edge.
6. Glue the half circle edge over the glued round edges.
7. Fold down the front flap. Use a heart seal sticker to close.
Lacey Heart Valentine and Envelope set:
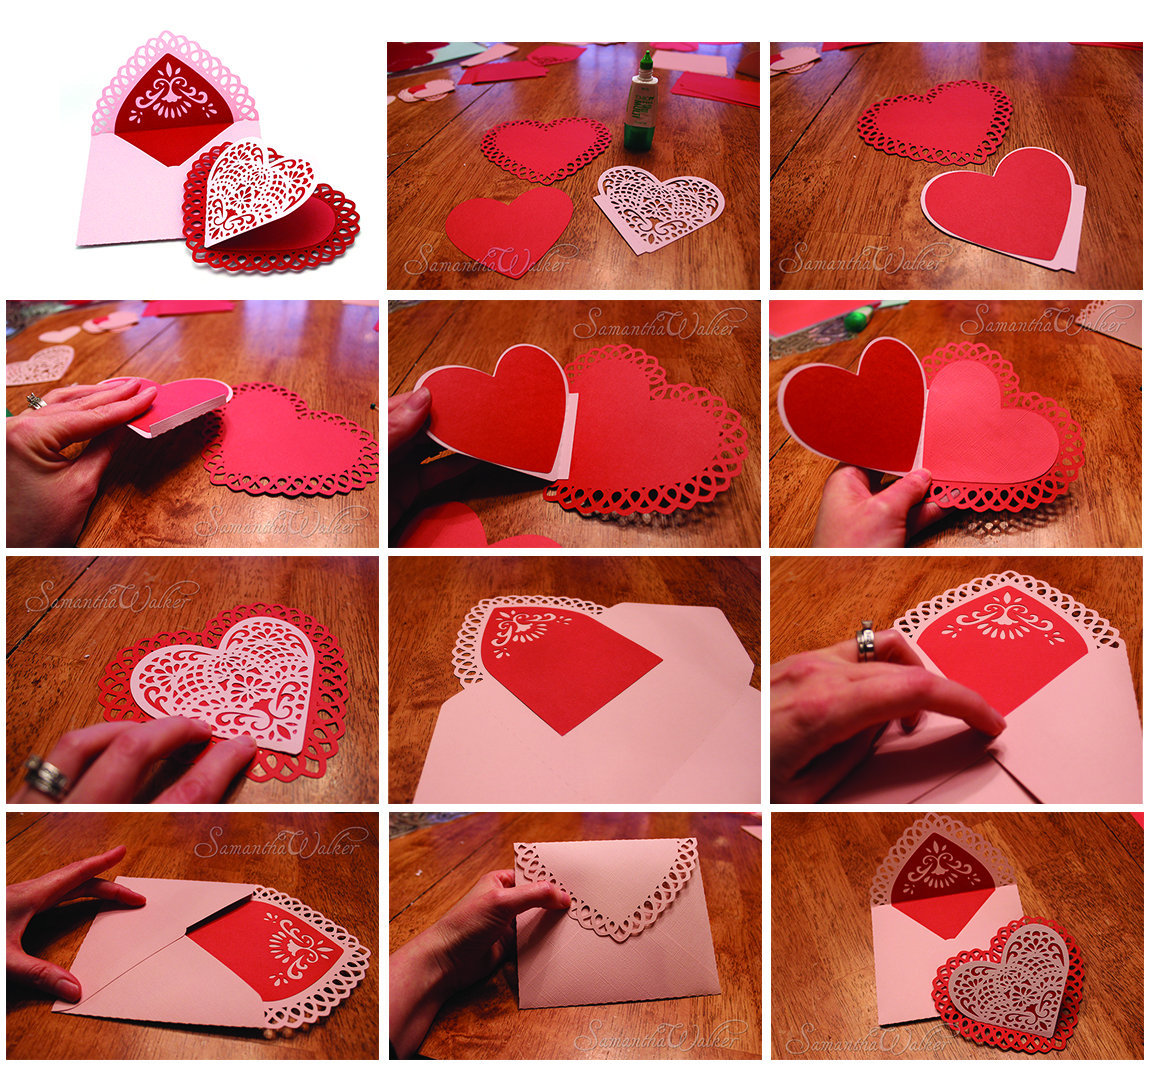
1. Cut the parts out taking care to followed the detailed cutting hints above.
2. Glue one of the plain heart shapes to the back of the lace heart shape.
3. Fold the edge of the lace heart and glue to the larger lace edge heart.
4. Glue the other plain heart over the flap on the inside of the card. You can make this white if you like to do your sentiments on white card stock. This is why I made this piece separate from the front of the card.
5. Glue the envelope linter tot he envelope as shown.
6. Fold in the two sides and glue the points with a dot of glue.
7. Fold up the bottom triangle and glue the edges to the other glued points.
8. Fold the top of the envelope down.
The first box I'll show you how to make is my Valentine treat box. It features my Sweet Hearts Stamps from JustRite Papercraft. They coordinate perfectly with this file. If you have a portrait machine, you can still utilize the smaller heart and phrase stamps in the stamp set.


2. Choose various sentiments to go into the center of the hearts.
3. Glue the hearts to the sides.
4. Fold the sides in as shown.
5. Glue the tabs to the sides. I like to use a good paper glue for this that won't warp the paper.
6. Clip with wonder clips or hold with your fingers.
7. Remove the clips, and you are done!

2. Fold all the sides inward.
3. Wrap the top side around so that it over laps the square on the opposite side. You will know that you've done this right if all of your triangle sides are on the outside of the box and not the inside.
4. Tie each side off with ribbon.
Heart Flap Tuck box:

1. Cut the box pieces. Then find the tab and glue it to the side that is labeled "A" in the studio file.
2. glue the plain loose heart to the center of the lace heart on the box.
3. Fold all of the sides in.
4. Glue the tabs to the nearest side.
5. Fold the heart flap around to the front and tuck the tab into the "v" shaped slot.
Thanks for stopping by today! We'd love to hear how you are going to celebrate Valentine's day in a crafty way. Feel free to share!
Here are some supplies you can use to recreate these designs:


where the link, just paid for this and no instructions
ReplyDelete