Thanks for stopping by today! I've got a few new designs entering the Silhouette Online store this week. They are relatively simple designs, but still might require a little guidance to assemble them. I'll show you some tips and tricks to make sure that you have success with these files.
This is just a selection of some of my files that you will find at
Silhouette this week.
First let's assemble the leaf bag:
Fold all the scored edges first. Make sure to fold the sides toward the inside of the bag, and the "V" on the sides toward the outside of the back.
Next we will assemble the bottom of the bag. This has become my favorite way to close the bottom of a box, so you will see this type of fold often. To assemble the bottom, tuck in one of the angle tabs into the "U."
Now tuck the second angle tab into the "U."
Now tuck the wide "trapezoid" tab into the "U" tab. Voila...Now you have closed box on the bottom and it is strong!
Glue the side tab...be sure to use a good paper glue like Tombow that won't wrinkle your paper.
Hold the sides of the bag together with your fingers, or use clips.
Then guck the flap slot into the slot on the bag. You can also put a piece of contrasting paper behind the leaf if you wish.
Now for a tip on a card wrap!
The card wraps don't need much instruction...just fold the sides on the dotted lines...fun and simple!
However, tying them shut just right, may be another story. I have found the easiest way to do this is to thread the ribbon or string from the underside of each triangle in an "S" like order. Just follow the order of my letters in the photo above. Then with the ribbon ends, pull the corners together, and tie!
Now for instruction on the Pop-Up leaf cards:
First start curling out the edges of the leaves. Be careful not to get too aggressive with this step as you may rip the paper where the leaf is attached.
Some of the leaf cards have a dotted line in the center of the leaf. You may choose to leave that as a decorative element, or you may choose to try to manipulate your paper further by scoring that edge with your thumbnail and using your index finger on the reverse side to somewhat crease the dotted line to give the leaves a little more life. (really, this step is not mandatory...my original purpose with the dotted lines was decoration...then I decided to try this just for fun.)
Keep on going until all your leaves are popped up! Then glue the popped up leaves onto a contrasting cardstock. I used double sided textured cardstock from
Carta Bella. If you used this cardstock, set your blade to a depth of 4, for detailed designs like this one, turn the speed down to 2. Then choose the "double cut" box if your blade is not brand new. With new blades, double cut isn't necessary...but if you are like me and want to get all that you can out of your blade...then go for the double cut.
Now to assemble and fold the envelope. The key here is to make sure you are assembling your envelope right side up. The envelope should be laid out as in the picture above. Notice how the bottom of the side tabs goes wider toward the bottom...that's what you are looking for. Now Glue the envelope liner to the inside of the envelope.
Fold the side tabs in then put a dot of glue where the overlap and press to hold.
Then fold the bottom tab up, and glue it to the sides. Done!
This is what your card and envelope will look like at this point. Look's great, right? But let's embellish it just for fun!
So cut your tag piece in another contrasting color. Glue the little leaf to the tag. This is left over from the envelope liner or the leaf provided in the file (this will be an either or...the maple leaf card has a smaller leaf included in the cut file...the autumn leaf and the oak leaf are just using the envelope insert leaf.) I used this crimson and gold double sided textured cardstock from
Carta Bella...it's more of a green than a gold, but that's a technicality.
A fun embellishment for the tag would be some curling wire or beading wire.
Insert the wire into the tag, then curl the wire...by just wrapping it around a pen or pencil.
Choose a coordinating ribbon,
then thread the wire around it, then glue the ribbon onto the card.
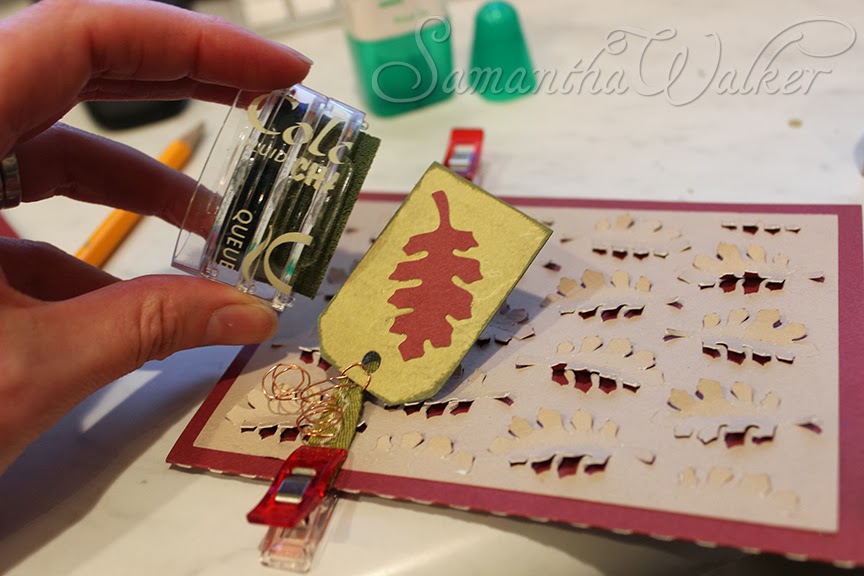
Oooops...just an after thought...I didn't like how the tag didn't "pop" from the card background...so I decided to ink the edges with chalk ink. I used a Colorbox fluid Chalk cat's eye ink pad. These are super easy to use for direct inking to paper.
Ta Da! it's done...your autumn leaf card set!
Samantha Walker


Wow! These are all so amazing. I absolutely love them all!
ReplyDeleteVery Cute!!!
ReplyDeleteBeautiful!
ReplyDeleteThank you most sincerely - if you keep doing this, I won't have to learn how to design my own - I love your designs!
ReplyDeleteJulie
Good work
ReplyDeleteabogado de accidentes de motocicleta virginia
I am grateful to this blog site providing special as well as useful understanding concerning this subject.
ReplyDeleteIf your a students and looking for mla9 vs mla8 assignment then you can visit: MLA9 vs MLA8 Assignment Help