Ads 468x60px

Showing posts with label recipe. Show all posts

Sunday, November 07, 2010

Simplicity of Apple Pie = The good Life!


Disclaimer...all photos were taken on my iphone...as I forgot my camera.  Please forgive and excuse any pixilization or blurriness as it is unintentional.

Okay...now to the fun stuff!

A couple of weeks ago, we took the chance to slip away and relax as a family at my sister in laws cabin at Bear Lake.  I love her cabin.  It is so cozy, and has all the creature comforts you could need...then some huge bonuses...like the 5 foot long deep bathtub.  That's an experience you will never forget.
We sat on the porch to relax and chat.  As I was sitting there with my oldest son, I gazed across the grass at a huge tree and noticed...hmmm...mmmm...are those apples? 
There was only one right thing to do after noticing ripe apples in that much abundance on the tree.  Pick some.  YUM!  After discovering how SUPER tart they were, we decided...we'd make apple pie.  I adore apple pie.  It has to be one of my favorite desserts.  Its up there with Key lime Pie, Pecan pie, and spicy pumpkin pie.  Do you notice a trend in my dessert likes?  I LOVE PIE!
We drove into town to get some missing ingredients...we stopped at the library to look at books with the kids (and my husband needed to use the internet to put in his work schedule bid for the coming month.) Then stopped at a yummy greasy pizza place where we had to overlook the grime-y chairs and napkin holders that hadn't been properly washed each night.  Then finally, we got to the store where we picked up our most important pie ingredient...good quality vanilla ice cream.  You really can't make a pie with out ice cream...it's just not right.  We drove home quickly so the ice cream wouldn't melt, and enjoyed spotting some of our favorite country sites...like the farm with the "oreo" cows.  The way these cows are marked make them look like oreo sandwiches, they are visually black and white...with doublestuff filling.

After returning from our trip to town, I brought the apples into the kitchen and started peeling and discarding any wormy ones.  We are talking real organic apples here, and we didn't even have to pay extra at the grocery store for the worms.  

By the way...this is the view out the kitchen window...yup pretty amazing.  It is definitely a peaceful spot.


The way I was taught to make apple pie is to mix the sugar and cinnamon together with a little flour then pour it over the top of sliced apples stacked as high as they will go in the pan.  Use more sugar if the apples are tart...less if the apples are sweet...and approximately 2 teaspoons of flour, and 1 teaspoon of cinnamon per pie.  No recipe...just eyeball it, and guess...and I swear it turns out the same every time.


Here's a side view of the apples stacked high.  I was not taught to use a store-bought crust. You may have noticed the perfectly pressed crust edge in the previous photo. I hang my head as I tell you that THAT was the other ingredient that we bought at the store. I wasn't going to tell you about it, but the photos don't lie.  Oh the shame! Sigh...but alas, there wasn't a rolling pin at the cabin that we could find, so we took a short cut.
You can see in this picture how the cinnamon and sugar just start melting down into the pie as the apples release their natural juices.  No need to mix in the sugar...it all works itself out in the oven.  This is simplicity at it's best!

Now for the yummy part that makes this pie absolutely amazing!  For each pie, fork together 1/2 cup butter, 1/2 cup sugar and 1 cup flour together in a bowl until crumbly.  Then sprinkle on top of the pie like so:

You will notice I place a baking sheet under my pie.  If you omit this step, you may need to buy a new oven when your pies are finished cooking...you'll also have to serve half your pie to the fire department when they arrive to take care of all the smoke in your kitchen.  Trust me...bake every apple pie on a cookie sheet and you will be forever grateful that you did.
 While the pies cooked in the oven...we rode around the backyard on quads.  Notice the green cast on my daughter's arm...that happened the week prior...the same day (and time) my son was having his staples removed from his head at urgent care. We went from one injury to the next this last month...it's all because the week prior to any of those accidents, my husband and I said, "We have been such lucky parents with our kids...no major injuries...no stitches, staples, or broken bones.  Yes, we are so lucky...gloat, gloat."  Then boom, the next week, Talon gets hit in the head with the end of a ski rope on his uncles boat, and his head splits open...and Sydney broke her arm at school on the play ground.  It was as if we had given God an open invitation to let us experience these trials...since he had forgotten to give us them yet.  Next time...we will not speak of such things out loud...as we have now seen the power of the spoken word.

So never-mind our streak of accident prone kids...we let them ride and have fun on the quads and dirt bike.  Afterall...who could resist riding around such gorgeous property!
 Talon felt the freedom of piloting his own quad.  You should have seen the cool smirk he was wearing around the yard as he drove it all by himself.
 Okay...about an hour and a half later in a 350 degree oven...(yes, I cook my pies slow and long to make sure the apples cook and nothing burns) my pies were finished.  You may have to cover your pies with foil in the last half hour to prevent the crumb top from browning too much.  The foil is also convenient for placing on the counter when you remove the sticky pies. Inevitably, the pies will have leaked sticky juices all over the cookie sheet and you won't want that sticky stuff on your counter.
 Doesn't that look yummy!
There's that sticky stuff I was talking about...you see that caramelized brown resin on the spatula?  Yeah...you forgo the foil, and your pie is stuck to the counter...kind of makes it hard to serve at the table when that happens.  

The pie was to die for...tart crisp apples are definitely the best kind of pie making apples there are. We invited the neighbors over for pie (because that is the right thing to do when you have more than enough pie for the 5 people in your family.) 

Neighbors were glad, we were glad, and you know...pie makes great breakfast the next morning too. Kind of like sugar cereal fruit and milk...only crust, fruit, and cream. 

This is the kind of stuff that makes up the good life.  Family, relaxation, the outdoors, and apple pie!

Wednesday, September 29, 2010

Pioneer Woman (Ree Drummond) inspired Minestrone...


There are a few blogs that really inspire me...one of them being Ree Drummond's Confessions of a Pioneer Woman. Wow, that woman has humor, talent in writing, photography skills, and she cooks like no other. She is the real deal. I look forward to getting her e-mails in my in-box each morning.  

Well this morning, I especially needed inspiration after a hard night with my oldest son waking up with night terrors, then getting sick. Between staying up and working until 1:00 am, then getting up with him for the remainder of the night, I didn't get much sleep. So when I opened up my e-mail this morning, and saw this recipe for a gorgeous roasted vegetable minestrone soup my heart skipped a beat or two. Oh sigh...it looked to die for!  

But knowing how my Wednesdays go, I knew that shopping for the ingredients wasn't in my future. I took the van out no less than 9 times between busing kids to school, to playgroup, to preschool, to birthday parties, to friends houses to play, to tumbling lessons. Oh wait...I didn't drive my oldest two school, so scratch one of those round trips. Either way, I wore out my bus driver cap for sure today.
Somewhere in between, I decided to fill a pot with tomatoes from my Mother in Law's garden to start cooking them down into some spaghetti sauce. My garden tomatoes are just now starting to turn red.  I'm praying for no frost over the next few weeks as I hope to get a late harvest. Thank goodness for over-zealous in laws planting a huge garden just for the two of them. Some peoples' entire backyards are as big as their garden plot! And their produce, is amazing!

The smell of cooking tomatoes wafting through the air, kept reminding me of Ree's soup.  I could almost taste it as I looked at her tantalizing photos again and again as I squeezed a little computer design time into my day.  

Then, I got a marvelous idea! I was going to stop making spaghetti sauce out of my tomatoes and do a mocked up (hopefully not too mucked up) version of Ree's soup with whatever ingredients I had on hand. I can't tell you how many times I start making one thing in my kitchen, then make a U-turn and morph it into something else. Usually, it's a lack of ingredients that forces it...but I can tell you, spaghetti sauce has way less ingredients than Ree's fabulous soup.  I was setting myself up for trouble for sure!

Speaking of tantalizing photos...this isn't one of them...but it serves a purpose! These are some of the ingredients I keep on hand. I love freezers. I never let a batch of celery wilt, an onion go bad, or a green pepper get brown spots...that's because I chop and freeze them before they get a chance. Of course I love to use fresh...and I do often...but I keep a stash in my freezer for emergencies like these. Seriously... Ree's soup was haunting me by this point. If you haven't checked out her blog yet, just go now and look at those roasted zucchini, and yellow squash. You will understand as soon as you peek. Oh my!  

I got a wave of excitement because I remembered I had an over abundance of yellow squash in my fridge...couldn't eat them fast enough with my Mother in Law's garden exploding. To my horror, I let them get soft, and mushy (dare I even say slimey)...way beyond anything I could work with. Why didn't I freeze those? Squash just doesn't freeze well unless you are intending upon putting it in sweet bread.  If you put frozen squash in soup, it becomes part of the broth. So no roasted squash in my soup. Sniff sniff.  
By now I had boiled down my tomatoes only to add water and broth for soup. That was a lot of tomatoes...so I had to add a lot of water. Did I mention I was only cooking for 3 tonight. Me, my 8 year old, my 4 year old, and my 3 year old. Since my oldest son's hunger was at bay from being ill, and Sydney got a peanut butter and honey sandwich on her way out the door to tumbling, and Colin is so picky...this actually amounted to me, making a big pot of soup for me. Did I mention that, Ree takes great pictures...that is my only explanation why I would do something so ludicrous. 

Ree said not to skimp on salt, so I didn't. I love salt...not shy to say that at all. I especially love Kosher salt. Not all salts are the same...so I used my favorite tablespoon and dumped some in...tasted it, then dumped some more. By this time, I had added frozen celery, frozen onions, and frozen green beans to the pot. I also added 2 cans of kidney beans, 3 cans of Costco canned beef chunks, Italian seasoning, pepper, beef bullion cubes, and then decided to add something to make my kids like it.

My secret ingredient...Wacky Mac!  Great stuff...colored with real vegetable dies too...almost a hint of a vegetable serving here, guys...well almost.
So I started cooking those in a separate pot...after adding all those ingredients above, I now had pot one and pot two going on the stove.  The noodles ended up in pot two 
This is pot one.  Starting to look like minestrone isn't it!
Here are pot one and pot two. Yup, cooking for me and who ever else might not eat it. I better eat up!
Here's what the final product ended up looking like:
 Not bad.  Ree recommended shaving off thin slices of Parmesan cheese to garnish the soup. Doesn't that sound gooooood? I had the next best thing (at least in my kids eyes.)
Here's one happy boy! He liked it when I put the little bullion cubes into the soup...he thought I was unwrapping square candy and putting it in our dinner.  I didn't let him know any different because he kept saying, "I wike it Mama."

Okay...notice the Koolaid stained upper lip...I'm not too proud to say, I just got through pouring the kids a round of Koolaid. Oh, I know...all those good veggies in the soup would now be cancelled out by a glass of sugar. Well if you look closer at the photo...you will see a trio of ice cubes on the table.  Colin is actually smiling because he is saying, "I spilled it Mama."

Murphy's Law of Young Families says that if you mop the floors...Koolaid or Applejuice will land on them within 24 hours. Ay yi yi!
Here's Murphy's law in full effect! I do have to say this wasn't the worst thing I cleaned up today. Sticky, Yes...But do you see that sweet little boy with the huge grin right there? Well...he's potty training. I won't go into further detail, and I most certainly did not take pictures...but I've been down on the floor (and carpet) scrubbing at least 3 times today.
That's my bowl of soup next to the Koolaid and ice cubes.  I hadn't even gotten a chance to get a saucer for my bowl, let alone a first bite, when all this spillage happened.
Don't you love tile and grout floors? It's like little irrigation ditches spreading out into oblivion. Even after cleaning it up really well, I'm sure I'll be walking in the kitchen in my socks at some point tomorrow and get stuck somewhere and collect a few sticky grains of rice from our meal the previous night.

Well, the good news...kids liked the soup. I liked the soup...it was more than edible, it was delicious, but not incredible. I'm sure it pales next to Ree's roasted vegetable Minestrone...but I fit the bill for tonight. I can't wait for another night with less chaos to make the real thing.

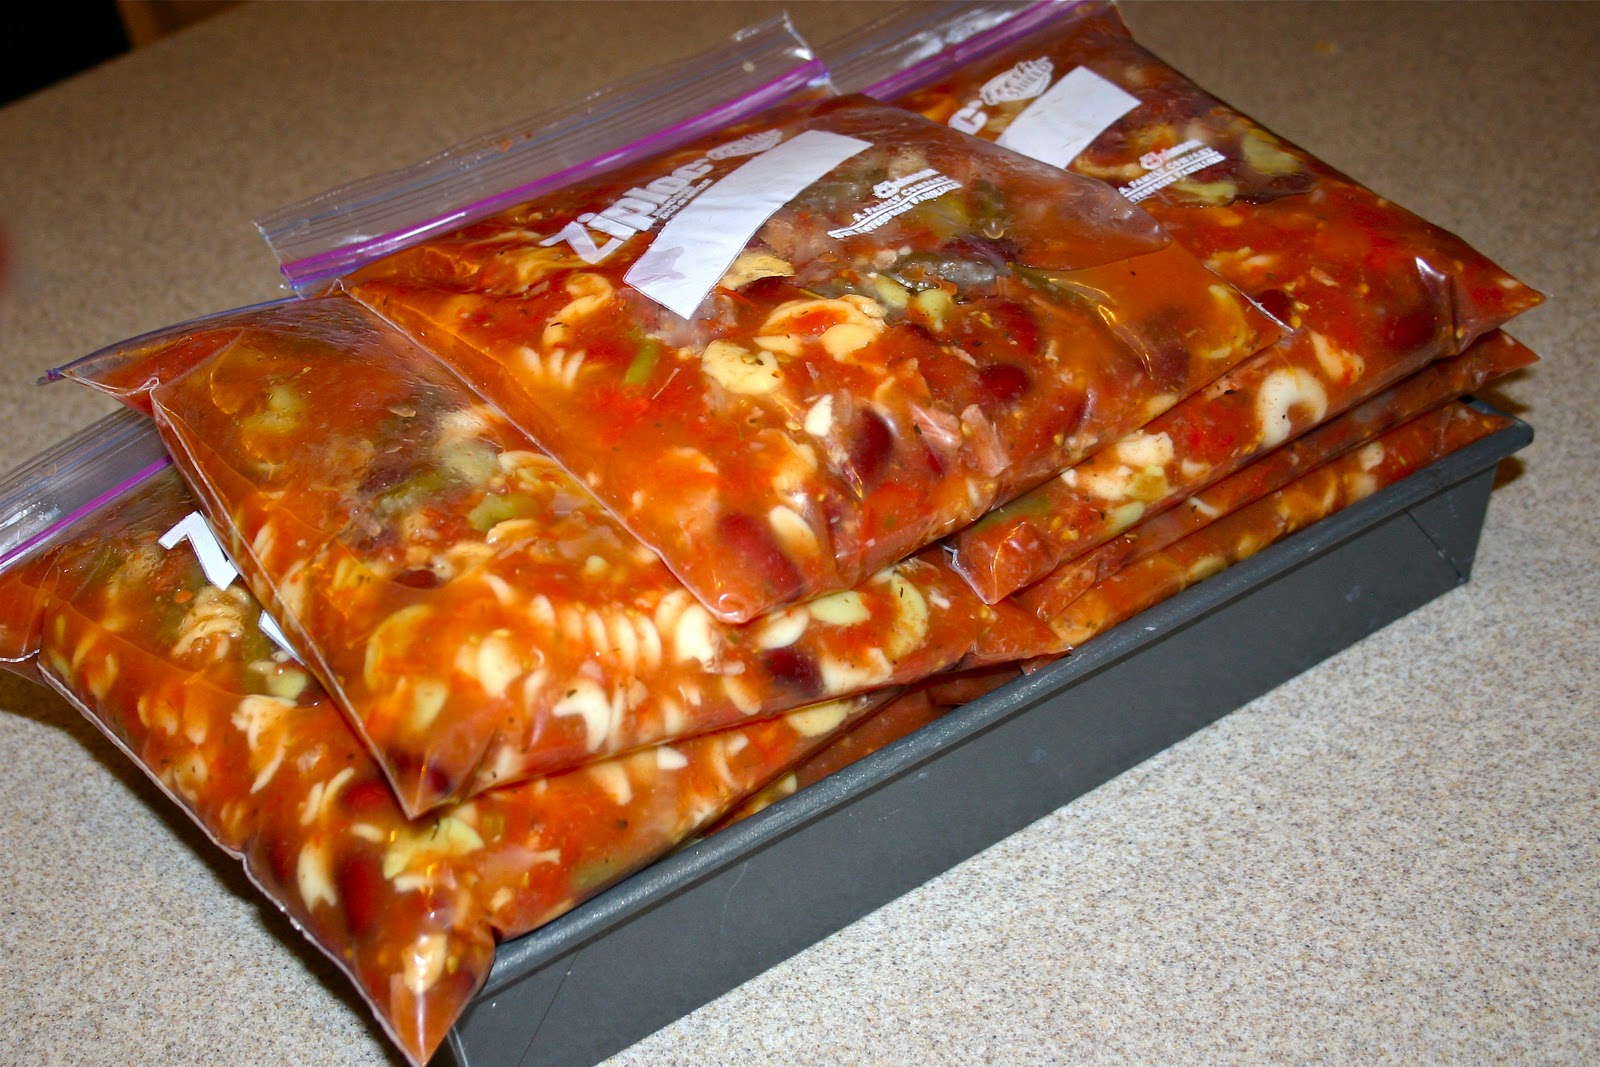
I bet you are all wondering what came of the remaining two pots of soup...


12 quart size freezer bags later...and we have soup for the next few months.

Recipe for Sam's Mocked-up verison of Ree's Roasted Vegetable Minestrone (long name, needs no other explanation.)  I recommend trying the real thing, but if you have to, you can try mine. You don't even need all of the ingredients to make it...that's the beauty of it. Improve and go!

24 large tomatoes blanched and cooked down
lots of water broth bullion cubes...enough to fill two pots with the cooked down tomatoes
frozen onions (about a whole chopped onion)
frozen celery (about 5 stalks of celery)
frozen green peppers (about 1 peppers worth)
1 large bag frozen green beans (I didn't cut them...no time...had to run Sydney to tumbling class during this step.)
2 cans kidney beans
3 cans Costco beef chunks (broth and all)

a good palmful or shaking of italian seasoning
a couple of palms of salt (remember, we are salting two pots here)
Simmer ingredients together for as long as you have, then add the important secret ingredient to make kids like it: Wacky Mac. 
Once Wacky Mac is Al Dente, serve with drink of choice.  I don't recommend Koolaid. 


Wednesday, August 11, 2010

The Ins and Outs of Sourdough

jossandmain.com home furnishing


Let me just start out by saying...this is going to be a long post...there is just no other way to teach about the process of making sourdough bread. Sourdough is fun to do, and once you get the knack, it is not time consuming to make, you just have to get used to the process. I have been wanting to do this post for over a year...but I am just now getting around to doing it. You will understand if you start reading...as there is so much information, which has taken me trial and error to perfect, and reading this and that, then reading more, and reading even more. My hope is to pack a lot of information here that you will just need once place to gather all that you will need to know to make this process go smoothly.
Okay...here we go!
I have always loved sour dough bread...part of that is due to growing up in the Bay Area in California and being able to purchase real San Francisco sourdough bread in the stores. There is nothing like it...unless...you find a bakery that will make a bread with real sourdough starter and no additives, dough enhancers or other things that fluff up the bread in a very unnatural way. Don't get me wrong...fluffy bread has its place...it's just not with sourdough bread. True sourdough should be crusty and bubbly on the outside with a chewy soft center...that is not too soft, nor cake like, and a robust sourdough flavor that does not overwhelm. It should be made with minimal ingredients to create a true old world flavor.
There is also so much you can do with a sourdough starter besides French bread, so I have added a few of my family's favorites at the end of this post.

Square one: making the sourdough starter
No one likes to be in square one, that is why some people skip this step completely and buy a starter from a reputable source...there are many places online where good starters can be purchased. One such source is King Arthur Flour where you can purchase 1 oz. of starter that comes with a pedigree for $6.95 plus shipping.
Alternatively, you can do it the old-fashioned way and catch wild yeast. It's not as hard as it sounds, it just takes time, and lots of it. Don't worry, it won't take much of your time, it just takes the flour time to catch yeast. Don't plan on making bread today...but plan on it two weeks from today, or next month.
In this first step, choose a place for your starter to live. A starter likes a home bigger than they will become, that allows air to flow in and out. A starter gets angry in a small airtight container. I like to use a crock and remove the silicon ring. I bought mine at Target. It was meant to be a sugar canister. Those work great as homes for starters.
Next, measure out a cup of water and a cup of unbleached bread flour, mix it well, place it in its home...and that's it. Yup, the whole darn recipe for starter...so what's so hard about that? Okay...well, at first there is no yeast, at this point, your starter is useless. So in this crock or bowl, you are going to try to "catch" some wild yeast. You don't need to wave it around your kitchen, then quickly put the lid back on...the neighbors might see you doing this through your window and that could be pretty hard to explain.
This is where the time and patience comes in. Now every day for the next two weeks you are going to dump out half the starter and let it go down the drain (emotionally, this is the hardest part for me, as I hate wasting food--if you can find a use for this unready starter, then kudos to you!) Then you will feed your start by adding half a cup of water, and half a cup of unbleached bread flour. Mix it up, then leave it on your counter in a nice warm spot (70-80 F) until the next day. Repeat this step anywhere from 5 days to two weeks. If you forget a day or two...don't worry, just pick up where you left off, and toss half the starter then add your flour and water. Soon, you will start to notice your starter bubble a bit. This is a very good thing! You may even start to notice a sour smell before feedings, and a yeasty (beer-y) smell a few hours after feedings. The more you smell this, the closer you are to success. You have reached true success when your bubbles become frothy a several hours after feedings--this is not just bubbly, but super bubbly! Like I said...this will take anywhere from 5 days to 2 weeks. Just keep going, the end-result is totally worth it!
Here's the science behind what you are doing
Yeast occurs naturally in flour and in the air. You are encouraging yeast growth by making conditions optimal...giving it a warm moist environment and new food every day. Yeast cultures grow and divide making a whole colony of little yeasty beasties. The more you divide, dump, and feed, the more the yeast will continue to multiply. Don't gross out...commercial yeast is merely cultivated yeast that has been dried and packaged, we eat live cultures in yogurt and cheese and many other foods. This kind of stuff is really good for our digestive system. You should celebrate when you've caught enough yeast to make your starter bubble to a froth.

However, I have to admit, I grossed out at the process a little in the beginning...but quickly got over it when I read that when you catch proper yeast cultures, they actually battle bad bacteria and nudge them out of the picture. They like to keep company with their own kind...and that is friendly bacteria and good yeast.

Okay, you have a good starter, Now What?
Name your starter, I call my liquid starter Fred...and I keep a second starter in dough form and call her Ginger (I'll talk a little more about dough form starters later.) Call yours whatever you want...you created your little Frankenstein, it deserves a name! From here on out, I will refer to my starter as Fred or Ginger...Fred being a 1 to 1 ratio flour /water starter, and Ginger being a 2 to 1 flour /water dough form starter. I don't always have both going, as over time, Fred has become my favorite to use, and sometimes I divide him out to make a Ginger out of him.
Taking Care of Fred and Ginger
Okay…once you have your active sour dough culture, you will have to keep it alive. If you have been successful catching good yeast cultures on your kitchen counter, your starter is now ready to upgrade to a home in the refrigerator. You also need to continue feeding it —like you would with any live creature. Fortunately, sour dough food is easy to come by. More flour and more water.
When I'm actively using Fred (my 1 to 1 ratio flour to water starter), I try to feed him once or twice a week with equal parts water and flour. That means on Sunday I feed him one cup of flour, and one cup of water…then I repeat that on Wednesday. I always feed my starter the night before I make bread or make waffles...you always want your starter in an active bubbly, yeasty-smelling state when you use it, not a hungry state where it smells sour and bubbles are hard to find. To feed it, just dump out half the starter, then add one cup water, and one cup flour and let Fred sit out overnight on the counter then return to the fridge the next day. Realistically, feeding your starter 2 times of month will keep it up just fine! It's pretty hard to kill.
When I am not actively using Fred, he becomes very hungry and needs a little TLC. I will be the first to admit I've ignored him for up to 4 months sitting in the back of my fridge (this is not a habit, but it has happened once.) When this happens, don't be alarmed when you take off the lid to your starter and find a layer of clear dark liquid on top, and a very strong smell of alcohol. This is called hooch in the sourdough community, and there is nothing wrong with it. It develops when your starter has not been stirred or fed regularly. However, if you find red, pink, or totally black mold, then that is another story altogether. You'll need to throw it out. This is a sign of your starter dying or decaying. Hooch is just flour that has turned into alcohol and separated from the start, I don't recommend drinking this, but you can stir it back into the starter. I prefer to dump it off the top, then proceed with feeding my starter. I will usually do two or three feedings over 2 days before I start using it again. Instead of dumping out half the starter then adding a feeding...I just take a tablespoon out of the center of the starter and add it to 1 cups flour and 1 cup water. On the next feeding I dump out half and then add another cup water and another cup flour. You will know when it is active again when it starts bubbling and frothing. The good news is, that if you continue to feed and stir your dough regularly, you will likely never see mold. Sour dough starters are rumored to be better the older they are. Fred and Ginger were born sometime at the end of April 2008.
Whenever you know that you will need a larger amount of starter, you can add more than one cup water and one cup flour to your starter, and it will grow and multiply making a large batch of starter. If your ratios of flour and water ever go off a bit, no worries...it won't ruin a thing...just try stirring a little more water or flour in it to make it the right consistency.
One time, I accidently used all my starter up...I was devastated...until I looked at my starter crock and saw that there was still starter clinging around the edges of the crock, so I just added two cups flour and two cups water to my crock, and stirred it up, and within 4 hours it was all bubbly again. So even the smallest amount of active starter can be made into larger amounts if needs be!
I feed Ginger (dough starter once a month 2 parts flour 1 part water). She is less temperamental and more stable. I feed her a ratio of 2 to 1…that means 1 cup flour, ½ cup water. I will knead her in my mixer with the flour feeding, but not too long, as she tends to get stickier than taffy if I do--something about the flour breaking down in the starter. I just make sure I incorporate the flour enough to see it go away, and the dough isn't too lumpy. You can add more flour if you want a stiffer dough start.
The only reason I keep a second starter around is fear that I will accidently use up all of my starter and rinse out the crock before I realize that I didn't refresh it and make more. You can freeze a back up dough starter for emergencies too! Dough starters are also the base for many recipes. However, You can always make your dough starter into a liquid starter and vice versa by changing the proportions of your next feeding. Some say dough starters have a little more of a sour flavor. That is originally why I kept a dough starter in the first place. However, I find that my liquid starter has plenty of sour flavor all on its own. That's why I just keep a Fred in the fridge right now.
Helpful Tips in caring for your starter:

Always cover starters LOOSELY! They emit gas that could explode a sealed jar as there is no room for it to expand. I love to use kitchen crocks, and remove the rubber gasket...some people use canning jars with cheesecloth and a metal ring in place of the metal lid…some people use good old fashioned saran wrap…you can get creative here…just don't seal it shut in an air tight container.
After feeding either Fred or Ginger, I let them hang out on the countertop for 12ish hours. This is not exact science…as you could feasibly forget about your starter until the next feeding in a few days without refrigerating. Anyway…the room temperature gives the starter a chance to really get warm and cozy with their new food. The starter will expand to triple or even quadruple its original size…so plan your containers accordingly. I then refrigerate my starters as they do better refrigerated.
I would refresh a starter that showed signs of not being healthy. Healthy liquid starter bubbles and brews shortly after feeding it (like an hour after.) Healthy dough starter starts to rise up within 3 or 4 hours of a feeding. If your starter is weak, you will not see this kind of activity, and it will act dead. You will nee to give it a double feeding.
A starter that just won't cooperate sometimes needs a few specialty feedings to perk it up. If your starter is not bubbling a few hours after feeding it, you can try adding freshly ground whole wheat flour or rye flour to your start to encourage yeast growth. The wheat bran usually has more yeast on it than the white center of the wheat. It will help fortify your yeast colony any time it needs a boost. Also, if you want to convert your starter to a whole wheat starter, then simply start feeding wheat flour instead. You can always convert back later by adding white flour.
What do I do with it now that I have one?
You get to bake and impress all your friends and family! They will worship you as a bread-making goddess. When they catch a sniff of the bakery smells that waft from your home, they will come running to your home with excuses just to come inside and hopefully sample your bread, muffins, waffles or moist cakes. So here we go...here are two family favorite recipes to get you started.


Sourdough Waffles (with pancake adaptation in notes)
I like to suggest an easy foolproof way to use your new starter before we get onto French bread. We all love waffles...if you don't, you haven't tried these yet. These are so light and fluffy and have a nice crispy outside.
Ingredients:
1 cup milk
1 cup starter
1 1/2 cups flour (white or wheat is great)
2 Tablespoons brown sugar (you substitute use honey or white sugar--just not artificial as you need this to properly feed the starter overnight)
1 teaspoon salt
After dinner or before you go to bed, mix all the above ingredients well in a large bowl. Let sit on the counter overnight.

In the morning add the following:
1/2 c melted butter (not too hot...you don't want to kill the yeast I usually cool the butter off with the eggs)
2 eggs
1/2 teaspoon baking soda

incorporate the above ingredients well into the sourdough mixture. Don't worry about over-stirring this waffle batter. It is a yeast based batter so it doesn't get tough...in fact a little extra mixing is good.
Now pour batter into a hot waffle maker. We make about 8 large Belgium waffles with this recipe. It is my favorite waffle recipe by far. It is never dense and has a mild sourdough flavor which offsets the syrup nicely.
Notes: If you want to convert the recipe into pancakes...just cut the amount of butter in half.
Sourdough French Bread


Tools:
brick stone for baking the bread on...you can use a cookie sheet, it just won't give the same amount of rise or a really crusty bottom (I use a round pizza stone from Pampered Chef--they make several shapes and sizes...there are many manufacturers...make sure it is stoneware, not clayware.)
a good bread mixer
a bowl
a spray bottle for water
a cake pan that you don't mind water deposits on
The night before making bread, feed your starter a double feeding. (2 cups flour 2 cups water) In the morning, it should be nice and frothy.
A little about timing: Get going on your bread first thing if you want bread for dinner that night. If you want bread for breakfast the next day, just start in the afternoon, and do your first rise in the fridge (so that your bread doesn't culture too quickly), and your second rise on the counter before you go to bed.
Now For the dough:
2 1/2 cups unbleached bread flour
1 1/2 teaspoons salt
3/4 cup starter
3/4 cup water
Pam or Cooking oil (to grease the bowl)
You will notice no yeast is used in this recipe...that is because it is not required if you use a good sourdough starter. The starter IS your yeast! If you are working with a brand new starter that is less than a couple of months old, you may opt to add a 1/2 teaspoon of yeast to boost your bread a bit as a young starter will not create a high loaf. I use no yeast at this point, as it does give your bread a different flavor, as your starter matures, try forgoing any yeast boosts.

Add all ingredients to a good mixer starting with your liquid ingredients at the bottom and salt on the top. (I use a Bosch, a Kitchenaide will work fine too.) Knead the bread for 2 minutes. If you are a bread maker, you may notice your dough is too stiff or too sticky...adjust accordingly at this point with a little bit of flour or water. The dough should be a soft dough, but not sticky, and not too firm. When you press your finger in, it should dent easily, but your finger should not stick. Make any necessary adjustments or none, then knead bread another 5 minutes in the mixer.
Put the dough into a bowl 3 times the size as the dough and cover with saran wrap, then let rise for 4 or 5 hours. Or in the fridge for 12 hours (see note at the top of the recipe...you can make adjustments to rise time and whether or not to use the fridge for timing your loaf for optimal freshness at time of serving.)

Next, shape a round loaf by pulling the dough from the sides to the back so that one side becomes round then tuck your pulls on the back side. (if you have ever made dinner rolls, this is like making one very large dinner roll.) Place dough with smooth side down, in a WELL oiled bowl that is roughly twice the size of the dough ball. You can also choose to flour the outside of your dough ball to ensure that it doesn't stick. Make sure to oil the entire inside of the bowl as we will be using this to mold our bread and dump onto our stone. Let rise for another 4 or 5 hours.
A half hour before you want to cook your dough, place a 9 X 13 inch pan filled 3/4 with water and place on the bottom rack of your oven. Place a brick or stone into your oven on your center rack. Then turn your oven onto 400 F to preheat. You may notice steam coming out of your oven from the vents. You can loosely cover the vents with kitchen towels to catch the steam. When the oven and the stone is preheated, carefully open the oven door keeping your face back as you do not want a surprise hot steam facial. As the steam clears a bit (usually like 2 seconds) then remove the heated brick stone.


Working quickly, invert your dough onto the hot stone. This is kind of a rolling action...I place one edge of the bowl on the stone and let the dough roll out. If you do this correctly, the dough will be smooth side up on the baking stone. Now cut slashes on the top of the dough with a razor blade or a sharp sarraded knife. Quickly move dough to oven, then carefully spray the top of the dough with warm water...trying not to spray the stone (you don't want the stone to get cold water on it or it will crack.) Bake in the oven for 25 to 30 minutes...the bread will be a nice light crusty brown. Remove bread from stone and place on a cooling rack to ensure a crusty bottom.

Science behind all these crazy steps:
The hot stone will shock the dough into a quick rise with instant heat. Slashes in the top of the loaf will allow for more expansion of the dough. Spraying the top of the loaf will allow the dough to stay soft in the oven as long as possible preventing crust to form too soon...allowing more rise. This will also help in creating the perfect French bread crust with a crispy chewy texture that has a glossy bubbly finish on top. The steam pan in the oven encourages the dough to stay soft for as long as possible. Every little step allows for more rise...and each step makes a difference.
Last note of encouragement:
I hope this post was helpful...not intimidating.
It sounds like so many steps...but once you get the hang of it...it really amounts to feeding your starter the night before making something (total time less than 2 minutes.) Making dough in the morning (about 15 minutes.) Reshaping a loaf at lunchtime (2 minutes.) Turning on the oven and setting it up (5 minutes) and baking the bread. The other stuff in between all of that is the why how and the what--it's all important stuff to know...but after you know it, you can just tuck it away, and carry on with making your fancy schmancy impressive Sourdough French bread.
I hope this sparked a seed in some of you to become artisan bread bakers yourselves!

Related Posts Plugin for WordPress, Blogger...